Alter Ego Docs
Welcome to the Alter Ego Docs! This documentation website serves as a knowledge hub for Alter Ego, a Discord bot used to facilitate an in-depth, multiplayer text adventure role-playing game, called the Neo World Program. It is an ongoing project maintained by Alter Ego’s developer, MolSno. While development of Alter Ego has slowed significantly since its creation in 2019, this Wiki is kept up-to-date with the most recent changes.
Alter Ego is an open-source project that anyone can fork and modify to suit their own purposes. This Wiki aims to provide accurate, useful documentation and explanations for both casual users and developers.
Neo World Program
The Neo World Program is the name of the game facilitated by Alter Ego. It is a text adventure game using Discord as a medium.
Gameplay
The basis of the Neo World Program is moving between rooms. Each room is represented by a Discord channel. When a player moves from one room to another, they will be removed from the room channel they are currently in and added to the channel corresponding to the desired room. Upon entering the new room, they will receive a written description of the room, noting any interesting objects they find there. They may check who else is in the room with them by looking at the Discord member list. In any given room, a player may speak to other players in the room, inspect objects, take and discard items, solve puzzles, and do various other things.
The Neo World Program is overseen by at least one moderator. The moderator(s) are responsible for creating the map, overseeing combat between players, facilitating role play between players, and much more. Players can reach out to a moderator to perform any actions that cannot be done using Alter Ego. For example, players can attempt to murder other players, use items in creative ways (such as spilling water on the floor to make other players slip and fall), restrain other players, and much more. The purpose of Alter Ego is to automate all tasks that can be automated so that the moderator(s) have more free time to assist players in their role play.
Discord
Discord is a free voice and text chat program that’s designed for gamers. Due to many of its features, Alter Ego was designed specifically to use it via the discord.js API.
Features
Discord members congregate in servers. Servers may be publicly accessible or open only to members who are sent an invite link to that server. Further, text and voice chat can take place in different channels in a server. Within a server, different members may be granted specific permissions. These permissions can be given to specific roles or assigned to members on a channel by channel basis. Permissions exist to give members the ability do several different things, including:
- Create and delete channels.
- Grant and revoke permissions to specific members.
- Kick and ban members from the server.
- Change a member’s nickname within the server.
- See a channel on the channel list and read messages within it.
- Delete and pin messages within a channel.
- Read the message history of a channel.
- And many more.
In every channel, a member list is displayed on the right-hand side which displays all of the members that can read that channel. Members can be in a server without having a Discord account using the Discord browser app, however these members will cease to exist after they exit the app. With a Discord account, members can be in a server indefinitely, even when they’re offline.
Discord members can also direct message each other outside of a server. They can create group DMs as well.
Neo World Program
This section lists how Discord is used to facilitate the Neo World Program.
A game is contained in one and only one Discord server. It is run by Alter Ego.
Every Player is represented by a Discord server member. Each Player must have their own Discord account. A single account cannot be used for multiple Players.
Every Room is represented by a Discord text channel. When a Player moves to a given Room, they will be granted permission to read that channel, and their permission to read the channel of the Room they were previously in will be revoked. This creates the effect of only being in one Room at a time. In a Room, a Player can see all of the other Players that are in the Room on the user list on the right side of the screen. Messages sent by a Player to a Room channel act as dialogue from that Player, enabling communication between Players in a Room.
Every Whisper is also represented by a Discord text channel. When a Whisper is created between two or more Players, a new channel will be created in the Whisper category, and only the Players in the Whisper will be granted read access to that channel. When a Player leaves the Room or is otherwise removed from the Room’s channel, their read access to all Whispers they were in will be revoked. Their name will also be removed from the Whisper name, whose channel name will be edited accordingly. When all Players in a Whisper leave the Room, the Whisper channel will either be archived or immediately deleted, depending on the autoDeleteWhisperChannels setting.
Every spectate channel also has a Discord text channel. When Player data is loaded from the spreadsheet, Alter Ego will check to see if that Player already has a spectate channel in the Spectator category. If not, it will create one with that Player’s name. It will not do this if there are already 50 spectate channels in the category.
When a Player enters a Room, inspects an Object or Item, or otherwise does something that requires text from the Spreadsheet be sent, Alter Ego will send the text to that Player via DM. Any Narration regarding a Player action will generally be sent to the channel of the Room that Player is in.
Limitations
Discord servers have a number of limits. The following limitations are relevant to Alter Ego and the Neo World Program:
- A server can have at most 500 channels - text, voice, and categories combined. Once 500 channels are reached, no
more channels can be created.
- Because each Room is represented by its own channel, and because there are 10 channels (including categories) minimum that Alter Ego requires outside of Room and Whisper channels, a single game can have at most about 440 Rooms. This number would consist of 8 categories for Rooms, each containing 50 channels, as well as a 9th category containing only 31 channels. This number does not account for spectate channels. Theoretically, a single game could have up to 491 Rooms, but only if Whispers are disabled, no Players have spectate channels, and the Whisper and Spectator categories are deleted.
- A channel category can have at most 50 channels - text and voice combined. Once 50 channels are reached, no more
channels can be created in the category.
- If a game has more than 50 Rooms, additional Room categories will have to be created.
- Message limit: 2,000 characters. Nitro users have a message limit of 4,000 characters. (note:
user/channel/role mentions and emojis contain more characters than are shown)
- If a description (without formatting characters) is longer than 2,000 characters, Alter Ego will not be able to send it to a Player.
- If a Player with Discord Nitro sends a message in a Room or Whisper channel that is longer than 2,000 characters, it will not be sent to spectate channels. Players should be discouraged from doing this.
- Username/nickname: 32 characters.
- A Player’s name must be 32 characters or fewer.
Another limit involves the Read Message History permission. When a member doesn’t have this permission (which is recommended for the Neo World Program), they will not be able to see messages sent any time they didn’t have permission to read a channel during their current Discord session. A Discord session can loosely be defined as the period of time starting when a member opens the Discord application and ending when they close it. This can mean different things depending on what version of the Discord application the user is using:
- On the Discord desktop app, a session ends when the user logs out, closes the app, refreshes the app, puts their computer into sleep mode, or turns off their computer.
- On the Discord browser app, a session ends when the user logs out, closes the tab, refreshes the page, closes their browser, or puts their computer into sleep mode.
- On the Discord mobile app, a session ends when the user logs out, closes the app, locks their device, or turns off their device. The session may also end when the user switches to a different app, though this depends on what operating system the device uses and how long the Discord app is inactive.
When a session ends, all messages that a user without the Read Message History permission was previously able to read will disappear when the user opens Discord again. For this reason, the Discord desktop app provides the best experience when playing the Neo World Program because it most easily retains a session. The Discord browser app also works somewhat well for this purpose. However, using the Discord mobile app to play the Neo World Program is severely not recommended. Unless the user keeps the app open constantly, never switches to another app, and never locks their device, a continuous session cannot be guaranteed, and thus the message history they have access to will clear very frequently. If you would like to see this issue resolved, upvote this thread in the Discord Feedback forums.
Known bugs
- Occasionally, when a Player moves to a new Room, the member list for that Room will appear blank. This can usually be fixed by the user opening a channel in the Monopad category and then opening the Room channel again.
- Occasionally, when a Player leaves a Room, their read permission for all of the Whispers they were in will not be revoked. Additionally, the channel name may not be updated.
Installation and Setup
Note
These instructions are for installing Alter Ego using Docker. If you wish not use Docker, please refer to the node installation instructions.
Installation of Alter Ego is rather complicated, but is made significantly easier with Docker. This page will explain the process in detail.
Step 0: System Requirements
Note
The requirements below are for Linux servers. For system requirements for Windows and Mac, refer to their respective Docker Desktop documentation.
| Minimum | Recommended | |
|---|---|---|
| Architecture | x86_64 / ARM64 | x86_64 / ARM64 |
| CPUs | 1 | 2 |
| Memory | 512 MB | 2 GB |
| OS | Linux | Linux |
| Storage | 10 GB HDD | 20 GB SSD |
Although Alter Ego can run on any system that can run Docker, running it on a Linux VPS is recommended, as performance on Windows and Mac are inferior and can be significantly slower. For instance, the Windows version of Docker relies on virtualization, and therefore suffers a large performance penalty. Some good VPS providers include Hetzner, DigitalOcean, and Linode.
Step 1: Download Alter Ego
First, you need to download Alter Ego itself. Go to the Alter Ego GitHub page and download the latest release. Click the releases box and select the newest one (or whichever version you choose).

There, you will see something like this.

Windows, Linux, Mac Desktop
From this page, download the archive Alter-Ego-[VERSION].tar.gz. Use your favorite archive utility to open the
archive (e.g. 7zip, GNOME Archive Manager, Keka), and extract the contents into your folder of choice.
Linux Terminal
Use wget to download the archive straight from the terminal. The following is an example (replace VERSION with the
version you want to download).
wget https://github.com/molsnoo/Alter-Ego/releases/download/[VERSION]/Alter-Ego-[VERSION].tar.gz
Unarchive the Alter-Ego folder by running this command (replace VERSION with Alter Ego version).
tar -xzvf Alter-Ego-[VERSION].tar.gz
Step 2: Install Docker
If you already have Docker installed, you can skip this step.
Docker is a container management platform that allows users to run applications on their machines regardless of operating system or dependencies. It has very low performance overhead, and provides isolation that improves security.
Although Alter Ego can be installed bare-metal (i.e. without Docker), this is not recommended.
Linux
To install Docker on your Linux system, refer to the link below:
https://docs.docker.com/engine/install/
Most cloud/VPS providers offer a Docker installation image when you create your VM (e.g. Hetzner).
This saves you time and effort from installing docker yourself, and is highly recommended for new users.
Windows
To install Docker on your Windows system, refer to the link below:
https://docs.docker.com/desktop/install/windows-install/
You can also consult this YouTube tutorial for a step-by-step guide.
Mac
To install Docker on your Mac system, refer to the link below:
https://docs.docker.com/desktop/install/mac-install/
You can also consult this YouTube tutorial for a step-by-step guide.
Step 3: Create a Discord bot
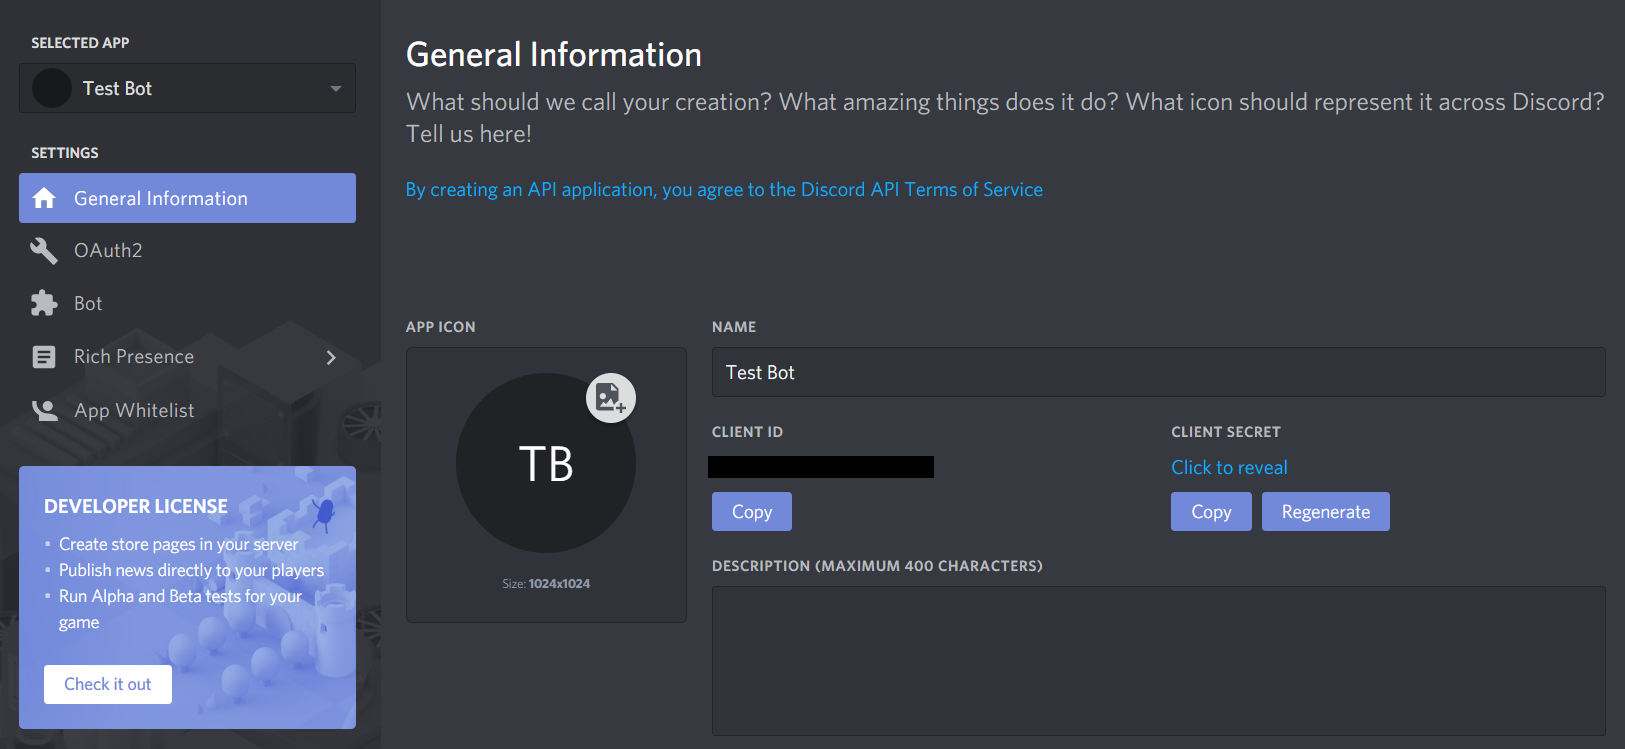
Now that you have Alter Ego installed, you’ll need to create a new Discord bot to bind its functionality to. Navigate to https://discordapp.com/developers/applications/, and once you log in to your Discord account, create a new application. You can call it whatever you like. This example will use an application called “Test Bot”. Once you create the application, you’ll be taken to a page that looks like this:
You can ignore this for now. Navigate over to the Bot tab on the left-hand side, then click Add Bot. This will bring you to a page like this:
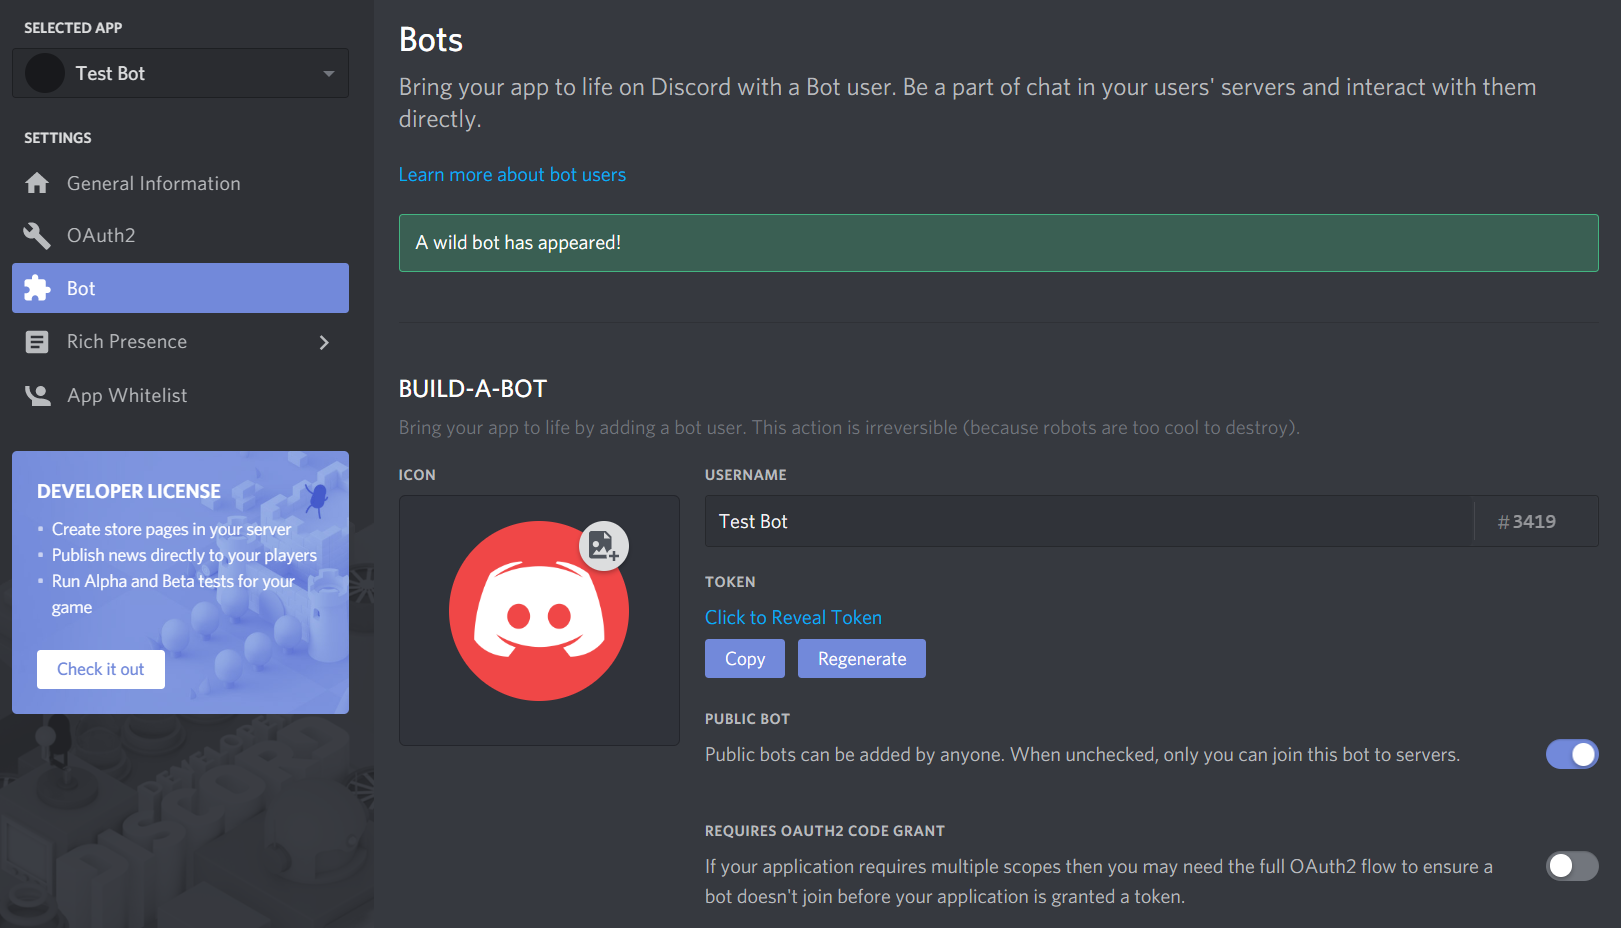
On this page, you can change the bot’s name, set its profile picture, and a few other things. Be sure to uncheck the Public Bot setting! Alter Ego can only be on one server, so you definitely don’t want people inviting it to their own servers!
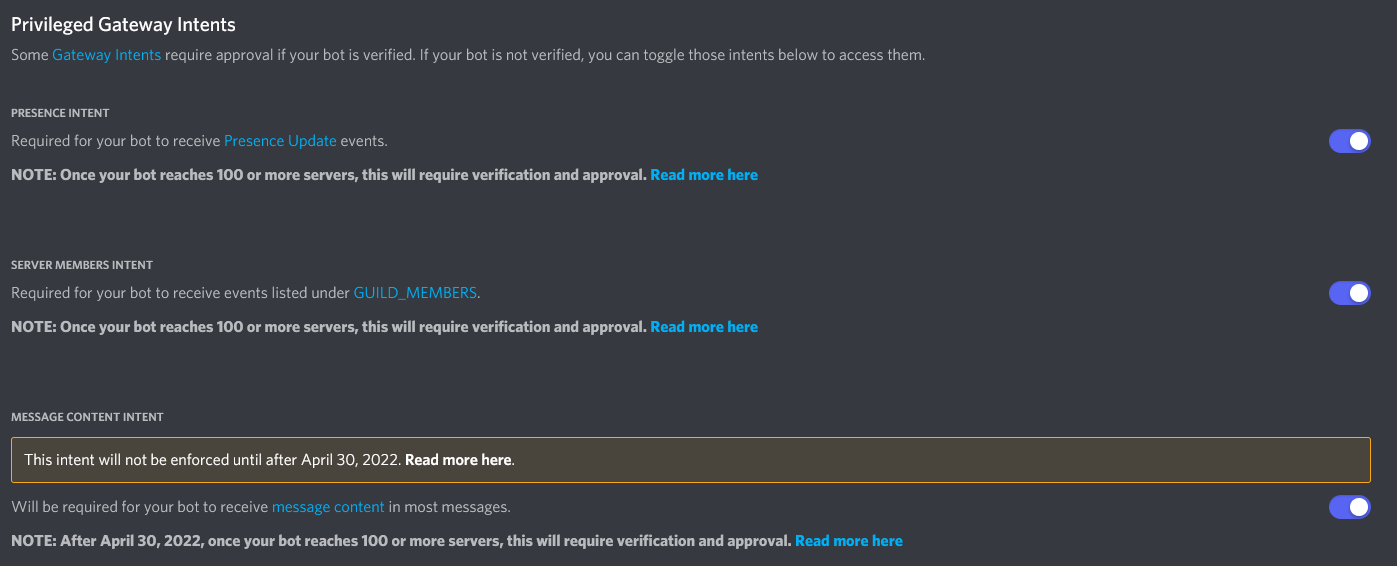
In order for Alter Ego to function properly, you must check the three options under the Privileged Gateway Intents section, specifically the Presence Intent, Server Members Intent, and Message Content Intent. If you’ve done this right, it will look like this:
Step 4: Create a Discord server
Before you can get Alter Ego up and running, you’ll have to create a Discord server. You can call it whatever you like, but once it’s made, you’ll have to set a number of things up.
The easiest way to create a server is using this template, which will add all of the requisite roles and channels for you. If you want to set those up manually, refer to this page.
Enable Developer Mode
You’ll have to enable Developer Mode for your account for the next few steps. To do this, navigate to your User Settings in Discord. Open the Appearance tab and scroll to the bottom. Under Advanced, you’ll see a switch labeled Developer Mode. Turn it on if it’s not already.
Step 5: Invite your bot to the server
Back on the Discord Developer Portal, click on the OAuth2 tab on the left-hand side. Scroll down to this section:
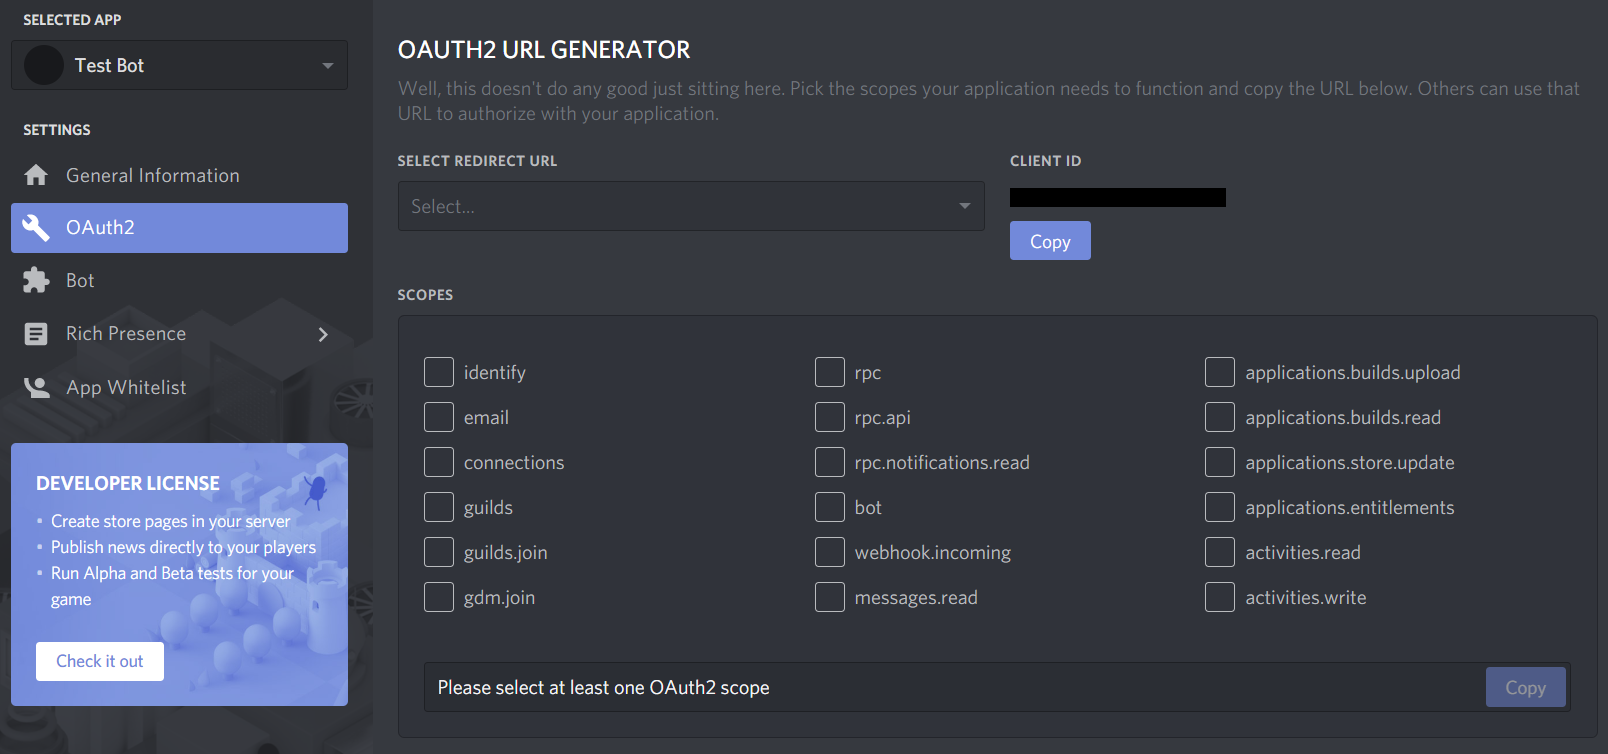
Check bot, then in the box that appears below, check Administrator. You should have something that looks like this:

Finally, copy that URL in the Scopes box and open it in your browser. It will take you to a page that looks like this:
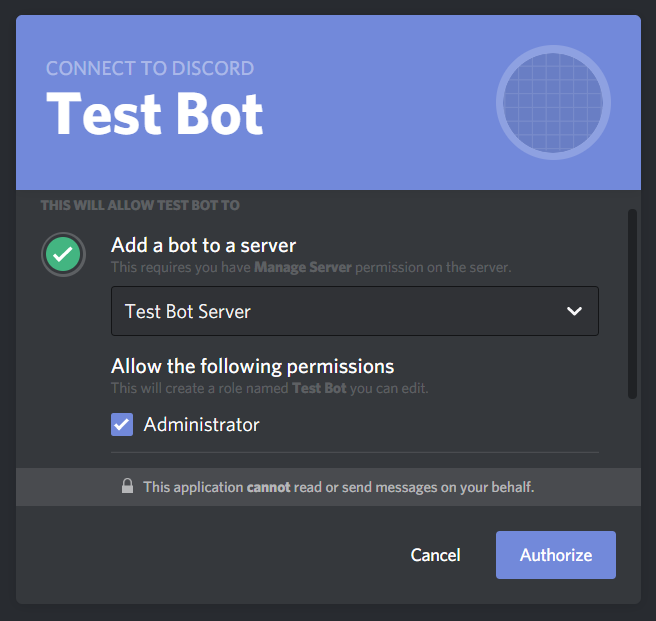
Select the server you just made, make sure Administrator is checked, and click Authorize.
With that, your bot will join your server! However, it doesn’t do anything at the moment. You still need to do a few things.
Step 6: Create a spreadsheet
Next, you will need to create a spreadsheet for Alter Ego to use. For more information, see the article on spreadsheets.
Step 7: Enable the Google Sheets API
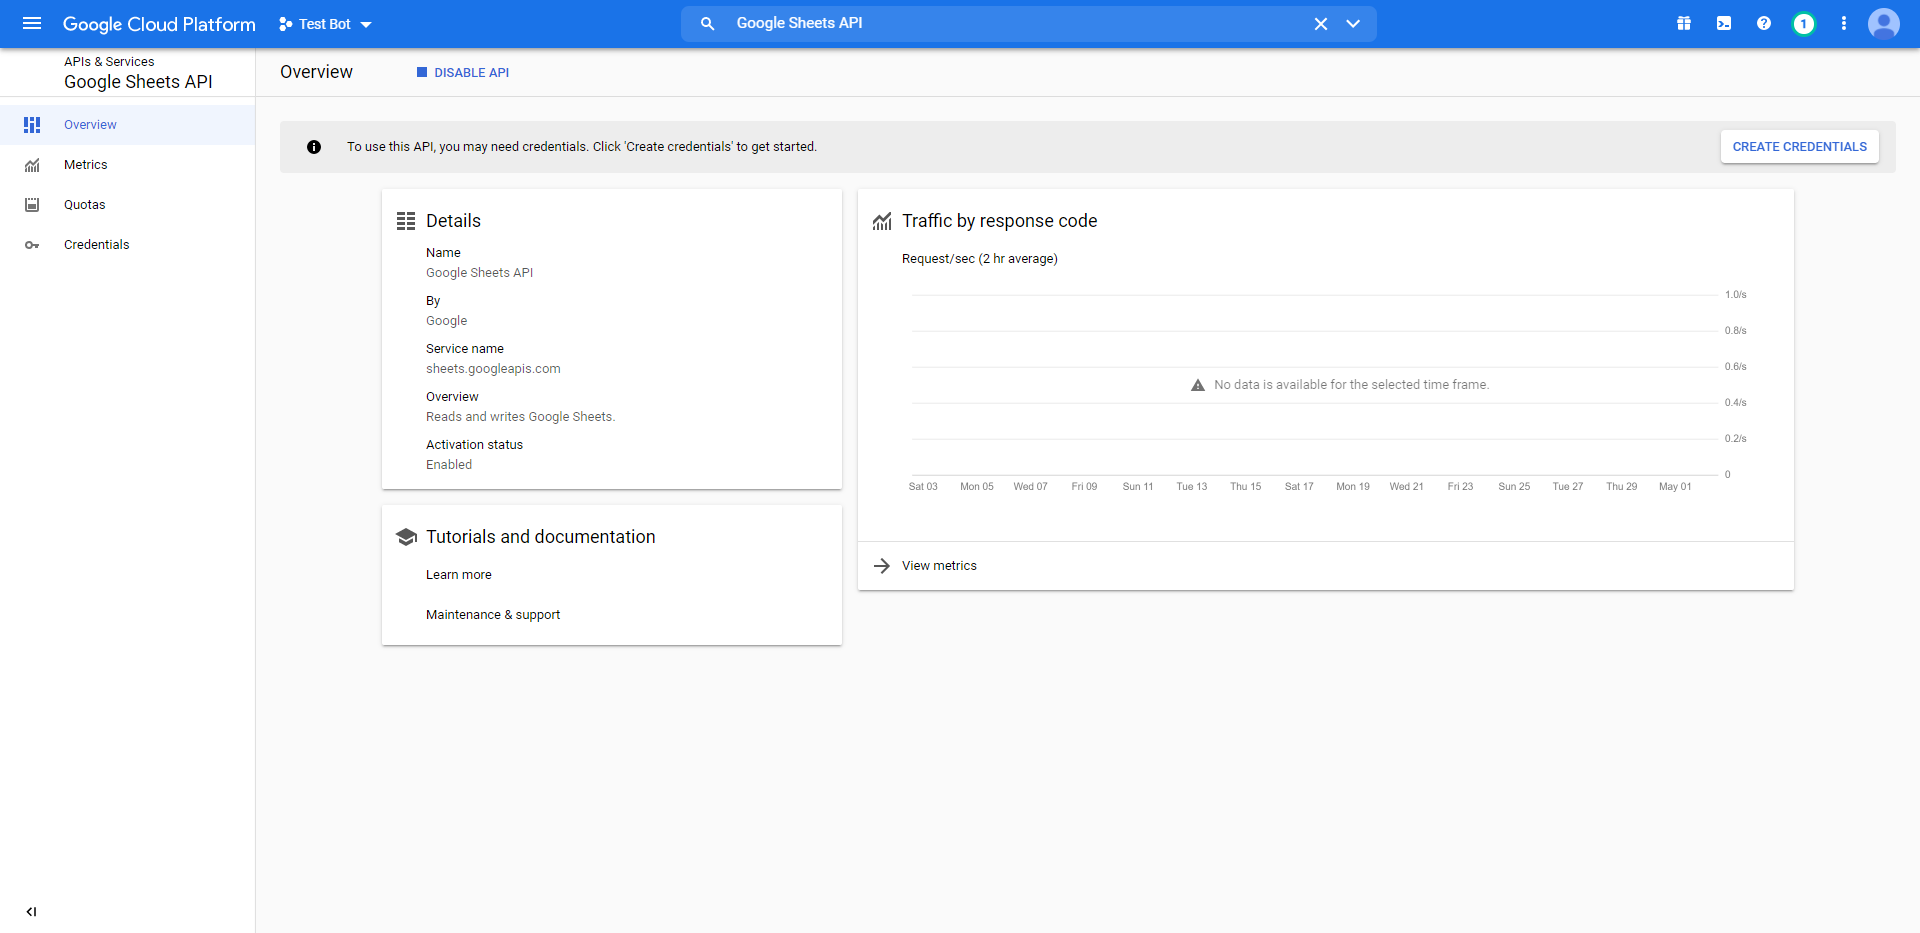
In order for Alter Ego to work properly, you will need to create a new Google APIs project. The easiest way to do that is to navigate to the Google Workspace project creation guide and follow the instructions. For step 5 under the Enable a Google Workspace API section, search for Google Sheets API. Assuming you’ve done this correctly, you should arrive at a page that looks like this:
Step 8: Create a service account
In order to allow Alter Ego to make changes to the spreadsheet, you’ll need to create a service account for it to use. To do that, navigate to the Credentials tab on the left-hand side of the page you were just taken to. Click the Create credentials button and select Service account. You should be brought to a page like this:
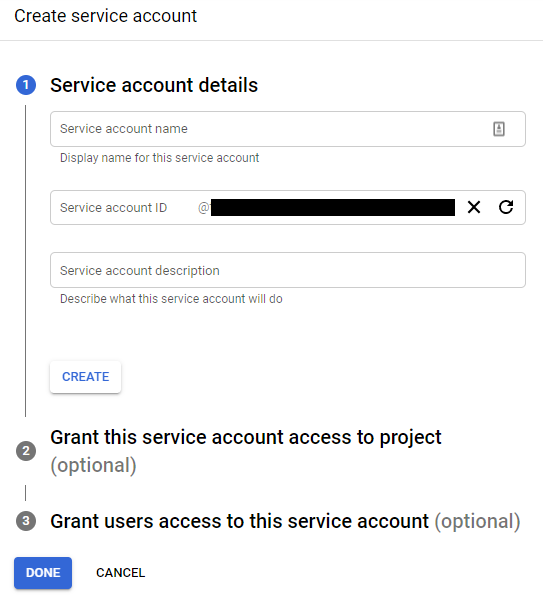
For the name, enter the bot’s name; in this case, it’s Test Bot. For the description, enter whatever you like. Next, grant it the “Owner” role. You can skip step 3.
Once your service account is made, you should see it under the Service Accounts list. Click on the edit button for the service account, and then click on the Keys tab, so that it brings you to a page like this:
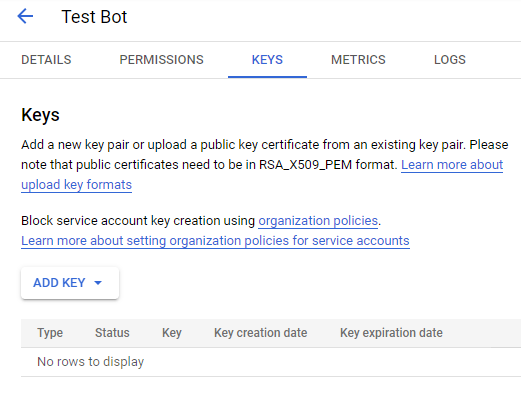
Click the Add Key button and select Create new key. Make sure the key type is JSON, then click Create. This will download a file to your computer. Don’t touch that just yet - there’s one thing to do first. Return to the Service Accounts page.
Step 9: Share the spreadsheet
On the Service Accounts page, you should now see the service account you just created. Copy its email address, then head over to the spreadsheet you made earlier.
On the spreadsheet, press the Share button. Paste the service account’s email address into the dialog box and make sure to give it permission to edit the spreadsheet. You can also do the same with any other moderators you have, if you haven’t done so already. Once you’ve done that, you nearly have everything you need.
Step 10: Edit .env file
The .env file is used to change all settings for Alter Ego. Before running Alter Ego, you must change several values
here.
First, open the Alter-Ego folder that you downloaded. Then, make a copy of .env.example and name it .env (note you
may have to set your file browser to show hidden files). On Linux, use these commands.
cd Alter-Ego
cp .env.example .env
Open the .env file on your computer. You should see something like this.
# This is an example of an environment file for docker compose.
#
# '#' has been used to comment out any variables that do not need
# to be changed from default. Remove '#' to set them if you want
# to use something other than the default value.
#
# Environment variables should be enclosed in single quotes, and
# should follow the data type next to it (e.g. String).
# For instance: DEBUG_MODE='true'

# Time Zone
# See https://en.wikipedia.org/wiki/List_of_tz_database_time_zones
# for a complete list of timezones.
TZ='America/New_York'

# Credentials
DISCORD_TOKEN=                      # String. Token of discord bot
G_PROJECT_ID=                       # String. Google project ID
G_PRIVATE_KEY_ID=                   # String. Google private key ID
G_PRIVATE_KEY=                      # String. Google private key
G_CLIENT_EMAIL=                     # String. Google client email
G_CLIENT_ID=                        # String. Google client id
G_CLIENT_X509_CERT_URL=             # String. Google cert url

# Settings
SPREADSHEET_ID=                     # String. ID of spreadsheet
...
(file continues on)
Setting Time Zone
Before running Alter Ego, you should set the time zone for your container, so that events in the game sync up to your location.
Edit the TZ line so that it matches the time zone where the game occurs in. For instance, if you want to set the
timezone to London, you would change the line to TZ='Europe/London'. For a complete list of timezones, refer to
this Wikipedia article.
Setting Credentials
Navigate to the Discord Developer Portal once again and find the application you created earlier. Open the Bot tab.
Under Token, click Copy. Paste it inside the single quotes after DISCORD_TOKEN= in your .env file. This
token must not be shared with anyone, as it grants access to your bot’s account.
Next, open the file you downloaded after creating the service account in any text editor. The file should look something like this:
{
    "type": "service_account",
    "project_id": "(CONFIDENTIAL)",
    "private_key_id": "(CONFIDENTIAL)",
    "private_key": "(CONFIDENTIAL)",
    "client_email": "(CONFIDENTIAL)",
    "client_id": "(CONFIDENTIAL)",
    "auth_uri": "https://accounts.google.com/o/oauth2/auth",
    "token_uri": "https://oauth2.googleapis.com/token",
    "auth_provider_x509_cert_url": "https://www.googleapis.com/oauth2/v1/certs",
    "client_x509_cert_url": "(CONFIDENTIAL)"
}
In case it wasn’t clear, almost all of the data in this file is confidential. Don’t share it with a single person, and make absolutely sure not to put it online somehow.
Next, add the Google service account credentials to your .env file. Copy each corresponding value in the Google
credentials file into your .env file. For instance, copy project_id into PROJECT_ID=. Replace the double quotes in
the original file with single quotes. Don’t worry about any values that aren’t in the .env file, you won’t need them.
If you did everything right, the credentials section should look like this:
...
# Credentials
DISCORD_TOKEN='(CONFIDENTIAL)'                      # String. Token of discord bot
G_PROJECT_ID='(CONFIDENTIAL)'                       # String. Google project ID
G_PRIVATE_KEY_ID='(CONFIDENTIAL)'                   # String. Google private key ID
G_PRIVATE_KEY='(CONFIDENTIAL)'                      # String. Google private key
G_CLIENT_EMAIL='(CONFIDENTIAL)'                     # String. Google client email
G_CLIENT_ID='(CONFIDENTIAL)'                        # String. Google client id
G_CLIENT_X509_CERT_URL='(CONFIDENTIAL)'             # String. Google cert url
...
Setting Spreadsheet ID
Finally, you must set the spreadsheet ID. A Google Sheets URL contains two IDs. The first is the ID of the entire spreadsheet itself. The second is the ID of the individual sheet currently open in the spreadsheet. You can retrieve the ID of either by copying them from the URL. The format is as follows:
https://docs.google.com/spreadsheets/d/(entire spreadsheet ID)/edit#gid=(individual sheet ID)
Copy the ID for the entire spreadsheet and paste it in single quotes after SPREADSHEET_ID=. For instance.
SPREADSHEET_ID='1234567890'
(Optional) Fill out other settings
If you wish to change other settings other than the ones outlined above, you can edit their entries in the .env file.
Remember to uncomment (i.e. remove the # before the line) for them to go into effect. For more information, see the
article on settings.
Step 11: Run Alter Ego
Finally, you can run Alter Ego. First, make sure that you are in the directory where Alter Ego is installed.
In a terminal, run:
docker compose up -d
If you did everything right, this is what you’ll see:
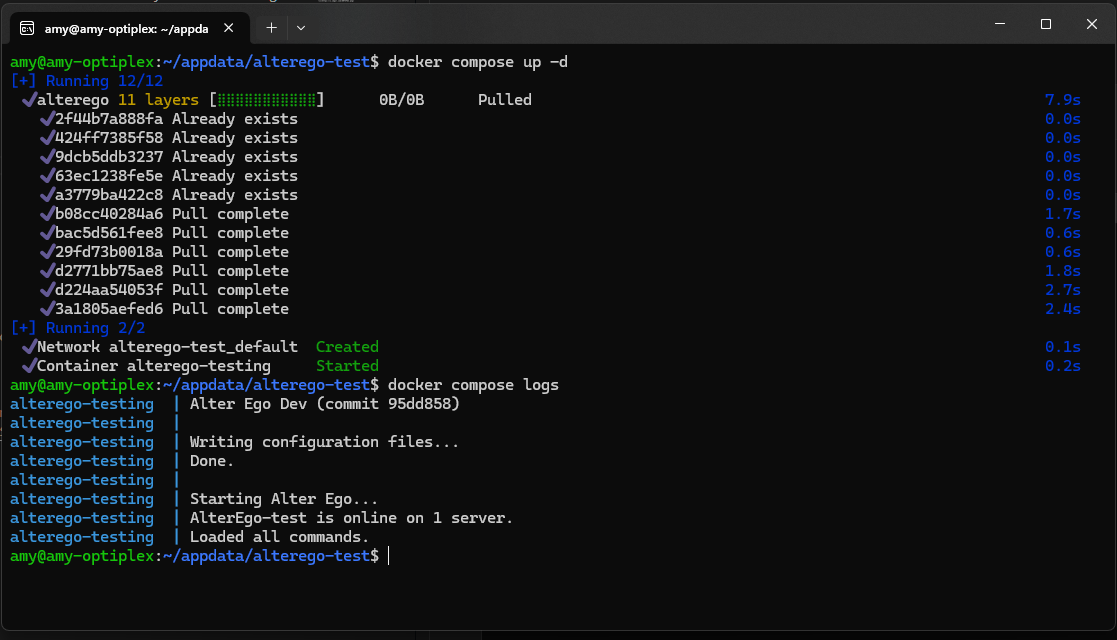
If you run the command docker compose logs, you should see this:
alterego  | Alter Ego (VERSION) (commit (COMMIT))
alterego  |
alterego  | Writing configuration files...
alterego  | Done.
alterego  |
alterego  | Starting Alter Ego...
alterego  | AlterEgo-test is online on 1 server.
alterego  | Loaded all commands.
Congratulations! If everything went well, you can now use Alter Ego to run a game of the Neo World Program. Good luck!
Updating Alter Ego
To update Alter Ego, first take the container down with this command.
docker compose down
Next, open docker-compose.yml. You should see something like this.
version: "3.8"

services:
    alterego:
        image: ghcr.io/molsnoo/alter-ego:1.8.0
        container_name: alterego
        env_file:
            - .env
        volumes:
            - data:/home/node/app/Configs
        restart: unless-stopped

volumes:
    data:
Then, change the image: line so that it corresponds to the new version of Alter Ego. For instance, change 1.8.0 to
1.9.0. The line should now read something like this.
image: ghcr.io/molsnoo/alter-ego:1.9.0
Save the file and quit your text editor.
Next, pull the new update using the following command:
docker compose pull
Finally, simply start the container again and Docker will automatically update Alter Ego for you.
docker compose up -d
Docker Commands
To view the status of your container run:
docker ps
To view the logs of Alter Ego, run while in the same directory as Alter Ego:
docker compose logs
To stop the container, run:
docker compose stop
To start the container after stopping it, run:
docker compose start
To restart the container, run:
docker compose restart
For a full reference to Docker Compose, refer to the official documentation.
Moderating
Moderating a Neo World Program game is a difficult endeavor. Although Alter Ego was designed to make that process easier, it presents its own challenges. In this tutorial, the process will be explained.
Purpose
The purpose of a moderator in the Neo World Program is to facilitate gameplay. While Alter Ego does most of the heavy lifting, there are many things it cannot do. A moderator must draw the Map, program the game world on the spreadsheet, create and manage the server, host Alter Ego, respond to player inquiries, narrate player actions, handle combat, fix bugs, and much more.
A good moderator must remain calm even during the most tense situations. However, these responsibilities can and do take a toll on a moderator, and it is all too easy to become overwhelmed. For this reason, it is strongly recommended to have multiple moderators running a game so that the responsibilities are not all carried out by one person.
Motivation
Before you can become a moderator, you should think about whether it’s right for you. Moderating a Neo World Program game is not easy, and it takes a specific kind of person to excel at it. Consider why you want to do so before setting anything in stone. Do you have a story you want to tell that would be best told in a Neo World Program game? Do you have experience in game design or an interest in learning about it? Do you easily grasp basic programming concepts? Do you find repetitive tasks enjoyable? Do you have enough free time to dedicate months of your life to programming, writing, and testing a game world? Will you have enough free time and energy to moderate game sessions for several hours every day? Will you be able to financially support yourself and tend to your physical needs during that time? If you can answer yes to all of these questions, then you’re a perfect fit to moderate a Neo World Program game. If you answer no to any of them, consider whether the Neo World Program is right for you. If you simply want to host a Danganronpa-style killing game role play, there are much simpler alternatives that you could use instead.
First steps
Once you’ve decided that you want to be a Neo World Program moderator, your first step should be to install and set up Alter Ego. To do that, see the following articles:
Once you’re able to use Alter Ego, you must learn how it works. Alter Ego is a complex tool with many intricate behaviors that you need to familiarize yourself with. The best way to get started is to read all of the articles on this wiki - most importantly, the Data Structure entries and the writing descriptions tutorial. After that, you can begin putting your knowledge into practice.
Familiarize yourself with all of the commands available to you as a moderator by utilizing the help command to read the details of each one. Memorize the syntax of each command and all of the ways it can be used. Create a small test game consisting of a few Rooms. Get a good understanding of how Alter Ego interprets data entered on the spreadsheet and what will make it return errors when you load data. Make use of the testparser command to catch errors in your writing. Test your game using a separate Player account and observe what bugs Alter Ego is unable to detect. Implement fixes for them and test again. Develop a habit of loading, parsing, testing, and fixing your game until it’s second nature to you.
Planning a game
Once you’re intimately familiar with Alter Ego’s workings, you can begin planning a real game. Consider what kind of story you want to tell. The best kinds of stories told through the Neo World Program have many moving pieces that are gradually revealed throughout the course of the game. This style of storytelling lends itself well to the nature of the Neo World Program, where players are only aware of things they’ve personally seen. It allows each player to attempt to piece together the clues in order to shine light on the overarching mysteries. The specifics of what story you want to tell are up to you, but you should at least have a general plan before formally announcing your game.
Due to how much work it takes to develop a Neo World Program game, it is strongly recommended that you select your players several months in advance. Having a cast of characters set in stone long before the game is held makes it significantly easier to tailor the game world to them.
Also during the planning phase, you should decide on a setting. A good setting effortlessly aids the story you want to tell. When you’ve decided on a setting, you can begin making a map to display how the various rooms connect to one another. However, you should keep in mind the scope of the game and how you’re going to make the map manageable. A map with hundreds of rooms is a gargantuan task to implement, so you should start small. Remember: what makes a map engaging to the players isn’t how many rooms it has, but how interesting those rooms are to explore. See the mapmaking tutorial for more information.
Writing a game
By far the longest and most difficult part of a moderator’s job is writing the game. Writing takes place entirely on the spreadsheet. In this stage of development, your goal must be to write all of the Rooms on the map and fill them with Objects, Items and Puzzles for Players to interact with. You’ll need to write Prefabs to provide functionality to Items, add Recipes for Players to carry out, and create Events to enhance the game world. Creating Status Effects can make Players feel more immersed in the game, and writing Gestures makes it easier for them to roleplay simple actions. You’ll need to personalize each Player’s data to suit their character and give them Inventory Items to start out with. When all of these features work together in harmony, it can create an experience that makes it easy for the players on the other side of the screen to feel like they really are a part of the world.
Nevertheless, this is a very time-consuming process. It takes months of continuous work to create a functioning game. Remember that when the game occurs, it takes place in real-time; you will not have time to fix numerous bugs without severely disrupting gameplay. This is why you must get into the habit of loading, parsing, testing, and fixing your game during the writing process. This is game development - using Alter Ego is no different than using a game engine like RPG Maker. This means you have to test your game extensively. Just because Alter Ego loads everything without giving you error messages does not mean everything works as intended, or at all. It is your responsibility to ensure that your game functions properly before you start running it. The more bugs you catch and fix before the game begins, the fewer you’ll have to deal with during the game proper, and the less stressful the experience will be.
In order to write a fun game, your goal should be to make each Room serve a purpose. When writing a Room, ask yourself what it contributes to the game overall. Is it somewhere that Players would want to go? Are there things to do in that Room when they first arrive? What about upon subsequent visits? Does this Room suit the setting? Does it provide valuable insights into the world’s lore? Will this Room be used to further the story? If your game is a killing game role play, can this Room be used to create an interesting murder? Is there already a Room that serve the same purpose that this one would? Remember, the ultimate purpose of a Room is to provide Players a setting in which to role play. If it doesn’t serve that purpose, why have that Room at all? If there’s nothing interesting to do there, then nobody will go there, and you’ll have wasted your time creating that Room.
The Danganronpa formula mandates that after each murder case, a new area of the game world is made accessible to the Players. You don’t have to follow this procedure, but it does keep the game engaging if the Players always have a new area to explore. You can plan for this by using Events corresponding with each chapter that, when triggered, automatically unlock the next section of the map. Then, when writing Room descriptions, you can use if conditionals to systematically change the descriptions to indicate the new state of the game world based on what chapter Event is currently ongoing. If you write your game with this procedure in mind, it allows you to pace the storytelling such that the Players are always gaining new insights into the lore exactly when you want them to. This procedure also allows you to make certain areas of the map more memorable. If each section of the map has its own unique theme, that allows you to tailor each Room to suit that theme, as well as write the lore contained in that section to revolve around it. These things can all make your story more compelling and more memorable.
Making all of the Players NPCs during the writing process can be helpful. This way, you can write up and test all of their data in advance without loading them into the game world before the game begins, and without them even being in the server.
This section of this tutorial is a work in progress. There is always more to consider when writing your game. Writing is a learned skill in general, as it is for the Neo World Program.
Preparing a game
When most or all of your game has been written, it comes time to prepare for the game to begin. This can be a stressful period in the development cycle.
The first step you should take in the preparation phase is to make your server presentable before inviting the players. If you have any moderator-controlled Player characters that you’d like to keep hidden, you should give their account the Hidden role and making sure there are no publicly accessible channels where they appear on the user list. Make sure to delete any messages in publicly accessible channels that spoil the game. If any of your Room channels have message history enabled for Players (such as the trial grounds, in the case of a killing game role play), make sure to delete any messages that have been sent in that channel. Create any supplementary channels that the players might need, such as RP rules, an Alter Ego writing guide, a guide to the basics of the RP universe, rules for the killing game, a list of killing game participants, maps, and so on. If you’re creating any new channel categories that are intended to be publicly accessible, remember to activate the read message history permission for everyone, and deny access to members with the Hidden role.
Once you’ve prepared the server, you can invite all of the players to join. When they do, you’ll need to change their nicknames to match the names of their Player characters and give each of them the Player role. Make sure to remind each Player to check their privacy settings for the server to make sure that Direct Messages from server members are allowed, otherwise Alter Ego will be unable to send them messages. Your players will likely be excited that the game is about to begin - let yourself be excited with them.
If, during the writing process, you made all of the Players NPCs, you’ll need to make them regular Players now by
changing their talent and assigning their Discord ID. **Be warned that
once you do this, loading the game after this point will give them access to the channel associated with their location.
** If you want to continue testing, give them all a Status Effect on the spreadsheet with the following
behavior attributes:
disable all, no speech, no channel, hidden, unconscious. This will prevent them from gaining access to any Room
channels and from getting most messages related to the game, but be aware that they will still receive Status
Effect inflicted
and cured Effect messages unless their other Status Effects
are manually removed from the sheet. For this reason, it’s recommended that if you’re not currently testing something,
you should keep Alter Ego running without having any game data loaded until it’s time to begin. Once you finish
testing, you can simply reboot Alter Ego to unload everything.
During this step, you should consult with all of the players and decide when the game sessions will be held. For a killing game role play, the Neo World Program works best in daily 8-hour sessions, with break days between chapters. This is a huge time commitment, and coordinating the schedules of 16 or more people is a difficult task. Try to find the time that consistently works for the most people possible. Of course, choosing the date that the role play begins on is hard, too - arguably even more so than selecting a time for the sessions to begin. The first day of the session is one of the most important - it’s one of the few times you want every player to participate. Just do the best you can to find a day that works for everyone.
When preparing a game, you should procure a Virtual Private Server (VPS) on which to host Alter Ego. Running it continuously on a (Windows) personal computer is SEVERELY not recommended. Doing so will likely result in Alter Ego being slow and unresponsive when dealing with more than a few Players, and it may even crash. Running it on a VPS will drastically increase performance. If you have no experience operating a VPS, it can be challenging to learn, but it is worth it. You will not find a VPS for free, and you should be suspicious of any that purport to be free. However, there are affordable options, especially considering how little operating power Alter Ego requires, with options ranging from $4 a month. Some good VPS providers include Hetzner, DigitalOcean, and Linode. Once you have a VPS, you’ll need to repeat steps 1-2 of the installation and setup tutorial on it, but then you can copy your credentials and settings files over to it and get Alter Ego up and running with ease.
You can write a custom spawn message for all of the Players to receive when the game begins for the first time. This can be an effective way of immediately immersing the Players into the game world. To accomplish this, all you need to do is make an Event which is ongoing at the start of the game. For the sake of example, this Event will be called PROLOGUE. Once it exists, you can modify the description of the first Exit in each Room that the Players spawn into to contain an if conditional tag that checks whether the PROLOGUE Event is ongoing or not. This message can be customized to suit each individual Player. You can then end the PROLOGUE Event immediately after everyone spawns in so that they don’t receive the spawn message again when they inspect or enter the Room through the first Exit. An example of a description that uses this tactic looks something like this:
<desc><if cond="findEvent('PROLOGUE').ongoing === true"><s>You wake up feeling disoriented. It doesn't take long for your eyes to adjust to the bright light of the room, and you find yourself in bed in what appears to be a small dorm of sorts. The last thing you remember is arriving at the hotel in Miami, Florida on the morning of August 12th, 2045. People were buzzing about the solar eclipse that was supposed to happen today around 12:30 PM, but you were there for another reason: the **Ultimate Conference**. Several months ago, an official from the UN approached you and informed you that you had been selected as the <var v="player.talent" />, and you were invited to speak at the Ultimate Conference, where you and many other talented individuals would be able to promote your talents and ideas on the world stage. The conference was supposed to start on the 14th, but as soon as you entered your hotel suite, the room filled up with gas, and you went unconscious.<br /><br />You look around. You're currently lying in a BED, which is pushed into the corner of the room. A NIGHTSTAND is just to your right. In the corner past it is a small CLOSET with a DRESSER beside it. A MONITOR is mounted on the wall to your right. Looking up at the ceiling, you notice a CAMERA between the dull fluorescent lights. On the wall to your left, past the foot of the bed, is a wall-mounted MIRROR. There is a DOOR on the wall across from you, with an electronic SWITCH just above the door handle. Beside it is a TRASH CAN. You suddenly notice the strange BRACELET on your left wrist.</s></if><if cond="findEvent('PROLOGUE').ongoing === false"><s>You enter dorm 1. In the back right corner is a BED, which has a NIGHTSTAND just to the left of it. A MIRROR is mounted on the wall to the right, past the foot of the bed. In the back left corner is a small CLOSET. Beside it, against the left wall, is a DRESSER. A MONITOR is mounted on the left wall as well. Looking up at the ceiling, you notice a CAMERA between the dull fluorescent lights. The DOOR behind you is fitted with an electronic SWITCH just above the door handle. There is a TRASH CAN just beside the door.</s></if></desc>
Once all of your preparations have been made and you have Alter Ego up and running, it’s officially time to start the
game. Note that if you have all of the Player data written on the spreadsheet already, you don’t have to use
the startgame command at all, and doing so will result in your
Player data being overwritten. To begin, all you need to do is send .load all start.
Running a game
If the entire game world has been written and thoroughly tested in advance, then the process of running the game can be surprisingly easy. In this situation, Alter Ego handles everything like a well-oiled machine. For the most part, you can take this time to sit back and watch the Players interact with one another as they move through the game world. The first day will be busy, however. In a killing game role play, this is when you’ll have to have an NPC explain the situation and the rules of the game, usually with all Players present in the same Room.
Running the game can be stressful. For that reason, you should make sure that you have people to support you during this time - ideally, people who aren’t players in the game. You may get frustrated, but don’t take your anger out on the players. Don’t forget to eat, drink water, and use the bathroom throughout the session, and try to get enough sleep at night. The game should not take priority over your physical needs, and giving it that priority will only make you more stressed.
Dealing with bugs
When the game is finally underway, this is when your game world will truly be tested. Players will act in ways that you may not have anticipated, which could reveal bugs that you didn’t catch during development. This is why the more testing you did beforehand, the better - the more bugs you caught in advance, the fewer you’ll have to fix during the game itself. When they do pop up, you can usually just turn on edit mode and fix them within a few minutes.
The most common category of bugs is ghost Items. These are Items that exist in Object, Item, or Puzzle descriptions
which can’t be interacted with in any way because they don’t actually exist. It could be that they never existed on the
Items sheet, they turned into something else via a Recipe, or they were taken or destroyed and now have a quantity of 0.
These are created under several different circumstances, one of which is the use of edit mode combined with the load
command. This is troublesome, as there’s no way to fix ghost Items other than to use edit mode and the load command. For
this reason, ghost Items should usually be dealt with during off-times, such as after the game session when Players
aren’t currently interacting with the game world. They, along with the item tags surrounding them, can simply be removed
from the descriptions in which they appear. Issuing the command .testparser remove can help you identify ghost Items
so that you can remove them from descriptions, although this method won’t necessarily catch all of them.
There will be some bugs whose cause you can’t quickly identify. If they’re not that severe, you can simply let them be
until the game session is over and you have time to study them without Players getting in the way. Sometimes, all you
need to do is reboot Alter Ego and send .load all resume. If this resolves the issue, the bug can usually be
attributed to Alter Ego’s internal data structures getting out of sync with each other. If the bug is severe enough, it
can lead to a stressful situation. Having a moderator-controlled Player in reserve can come in handy in these scenarios,
as it can allow you to experiment with the bug until you determine the cause so that you can fix it.
Managing time
You should try to limit the number of NPCs that you have to control as a moderator. It takes a lot of energy to write multiple characters at once, and Players tend to want to interact with them. Don’t be afraid to let other people write NPCs, such as other moderators, dead Players, or spectators. Just be sure to communicate adequately with them so that they know what the character is like, what their purpose is, and what they are and aren’t allowed to tell Players.
It’s likely you’ll have planned events to carry out during each chapter. For example, you might have an important NPC speak with the Players about a significant plot detail, or you may be planning a deadly combat encounter, or there might be an in-depth Puzzle that requires moderator assistance to solve. In order to prevent Players from blazing through all of the chapter’s content on the first day, you can implement bottlenecks to prevent them from making progress too quickly. For example, you might lock the Exits to important areas, or you could implement a Puzzle that the Players can’t solve until an Event makes the clues visible close to the end of the game session, or you could make an NPC refuse to let the Players take on a combat encounter until they’re adequately prepared. Measures like these can make these planned events less stressful to conduct.
Conducting a murder case
A high source of stress comes when you have to orchestrate a murder case. Sometimes, you’ll find that nobody wants to commit a murder. This is troublesome, as the game can’t progress if no one is willing to kill a fellow Player. To prevent this, you should provide motives that you know will be highly tempting for at least a few characters. You can even plan murders with certain players before the game even begins to circumvent this potential problem altogether.
Once a player has come to you with the intent to kill, you should help them select a victim, if they haven’t chosen one already. If you know of any players with time conflicts that may prevent them from participating, their characters can make for ideal murder victims, and you can suggest them to the culprit. You can ask those players if they’re willing to let their character die, but you’re not obligated to get permission.
If the prospective culprit wants to target a Player whose writer doesn’t want them to die, this can create an
opportunity for combat if the chosen victim intends to fight back. During combat, you should give all involved Players
the heated Status Effect, which will slow down movement speed for all other Players. Then, you should take turns
gathering input from all involved Players about what they intend to do during their next combat move. You can use
the roll command to roll
a Die to determine the success of each action and narrate the results. In this
scenario, the chosen victim can actually come out on top and kill the prospective killer, which can create an
interesting murder case.
During a murder, you should take care to prevent the culprit from getting caught in the act of killing the victim. If the Room it occurs in is unlocked, keep an eye on the surrounding area to make sure that no Players are wandering around. Also be sure that the killer has an escape route that they can use without getting caught carrying a weapon or covered in blood. This can be difficult, as there are a lot of Players to keep track of and you’ll already be busy narrating the murder. This is where it can come in handy to have other moderators who can keep an eye on things and distract nearby Players.
You won’t have time to write in-depth clues for an investigation without turning on edit mode for an unusually long time - this can tip players off out-of-character that something is going on, which can influence how they behave in-character. If you need to, you can always just write the victim’s body into the Room description so that Players can discover it and save writing clues for after the session is over. There’s nothing wrong with holding the investigation and trial the next day. When you do write clues, try to find ways to incorporate the Players’ intelligence stat into the descriptions using if conditionals. For example, Players with a high intelligence stat may notice details about the body that other Players don’t. This can make players who created characters with high intelligence stats feel like the investment was worth it.
Once a murder has occurred, you’ll have to do a lot of writing. Aside from clues, you’ll have to write a case summary and execution, and these can be time-consuming processes. If you want to provide a variation of the Monokuma File from Danganronpa, you can use this GIMP template. However, once everything has been written, you can largely sit back and relax during the investigation and trial. You should give Players ample time to investigate all the clues, although generally only a few hours are needed. You should warn them not to discuss the case while they investigate, as that can easily sour the trial by making the discussion seem redundant.
There may come a point during the trial when the Players are stuck. If this is the case, you can help them. It can be anxiety-inducing for the Players to vote for the wrong culprit, after all. Whether you want to handle that outcome and how you choose to do so is up to you. You might give the culprit a special victory scene before rewinding to earlier in the trial to give the other Players another chance, or you might execute the person they voted for and let the real culprit go free, among other possibilities. When the trial is finally over, however, you can generally take the rest of the day easy.
After the trial, you should take a few break days before resuming the game. You and your players need time to rest and recharge.
Ending the game
As you approach the end of the game, the cast will inevitably feel more tight-knit than it started out with. They’ve worked together to overcome countless obstacles, and now it’s time for them to put an end to it all. Near the end of the game, the Players should have a lot of information about the story - perhaps nearly enough to identify the mastermind of the game, with only a few pieces missing. The last few days should give them an opportunity to obtain the missing pieces they need.
Pacing the last few days can be difficult. You want to ensure that the Players feel like they’re making progress without overwhelming them with too much information at once or too many dramatic reveals. Once they have all the tools they need, though, have confidence in them.
The final day is what all of your work has been building up to. Make sure that they’ll be able to do everything you have planned for them within the game session. The Players should confront the mastermind in one final encounter. Since this is the finale, there’s no need to hold back any secrets - the Players have worked hard to uncover the truth throughout the game, and they deserve to hear everything. The Players absolutely must have agency in the finale. If all of the important choices are being made by NPCs, then it can be underwhelming for the players who have invested all of their time and energy into the game. They should have a say in how the game ends. You should account for the different choices they may want to make and give them set options to choose from so that you’re not blindsided by their decisions.
The final moments of the game will be filled with emotion as the players reflect on everything they’ve been through and
resolve to face the future they chose. Let yourself be emotional with them. Be proud of them for making it this far, and
be proud of yourself for everything you’ve accomplished, too. Running a game of the Neo World Program is a difficult
endeavor, but if you’ve made it to this point, then you’ve succeeded. It feels immensely rewarding to reach the ending,
to say that you finished a game. Enjoy it. And when everyone is ready, end the game by issuing the command, .endgame.
Writing Descriptions
Writing for the Neo World Program is somewhat complex, but thanks to Alter Ego’s custom parser module, it is incredibly flexible. Alter Ego makes use of XML formatting to understand what the moderator has written so that it can make changes as necessary.
Basic concepts of XML
XML, short for eXtensible Markup Language, was designed to store and transport data, and to be relatively simple to
understand. In XML, data is wrapped in tags, like so: <tag>data</tag>.
In XML, you can nest tags. For example, you can write:
<tag>
  <text>
    data
  </text>
</tag>
Note that when nesting tags, you must close them in the same order you opened them. Therefore, you cannot write something like this:
<tag>
  <text>
  data
</tag>
    </text>
Additionally, you can add attributes to tags to give them more information. In order to assign an attribute, use the
following format: <tag attribute="something">data</tag>.
XML is similar to HTML. However, the primary difference between the two is that
unlike HTML, XML doesn’t do anything. XML is used to carry data, but unless a program was designed to interpret that
specific data, the XML won’t do anything. HTML, on the other hand, is used to modify how data looks. Additionally, XML
tags are not predefined like HTML tags are. For example, entering <b>text</b> in an HTML document will display **text
** in a bold font. Entering that in an XML document, however, will have no effect because XML tags have no inherent
meaning.
<desc>
Example: <desc>This is the simplest description you can write.</desc>
The desc tag is used to mark the beginning and ending of a description. It must be included in every single
description.
<s>
Example:
<desc><s>After leaving the PARK, you come to a crossroads.</s> <s>To your left is PATH 2.</s> <s>Straight ahead is PATH 3.</s> <s>To your right is PATH 4.</s> <s>It seems all of these roads lead you to the north side of the island.</s></desc>
The s tag, short for sentence, is used to mark the beginning and ending of a sentence. The closing tag should
always go after the final punctuation mark of the sentence. There should generally be a space between the closing tag of
one sentence and the opening tag of another sentence. It isn’t technically required that every sentence be in its own
s tag. For the most part, unless a single sentence contains other tags, such as item lists, the s tag can go
around multiple sentences. For example, this would be perfectly acceptable:
<desc><s>You inspect the couches. They are soft and comfortable, and each is lined with a few pillows.</s> <s>Looking underneath the cushions, you find <il><item>a GUN</item></il>.</s></desc>
<br>
Example:
<desc><s>You flip through the diary.</s> <s>Most of the pages are blacked out.</s> <s>A few things remain:</s><br /><s>-"my wife's birthday is on the 4th Monday of the month this year,"</s><br /><s>-"anniversary dinner went great, but my wife's birthday is in just 3 days and I don't know what to get her!"</s></desc>
The br tag, short for break, is used to divide text into multiple lines. In general, you should never split the
contents of a cell on the spreadsheet into multiple lines. Instead, use the br tag. Note that the br tag cannot
surround text, so it must be closed in the same tag that it is opened with, like so: <br />. If a Player inspects the
example description above, it will be divided into multiple lines, like this:
You flip through the diary. Most of the pages are blacked out. A few things remain:
-"my wife's birthday is on the 4th Monday of the month this year,"
-"anniversary dinner went great, but my wife's birthday is in just 3 days and I don't know what to get her!"
<il>
Example:
<desc><s>The floor beneath you is soft and earthy.</s> <s>You find <il></il> haphazardly placed on it.</s></desc>
The il tag, short for item list, is used to mark the beginning and ending of a list of Items, though it can
include non-Items as well. In the example above, the set of il tags contains nothing. In this case, when this
description is sent to a player, the entire sentence containing the pair of il tags will be removed. That is, the
player will be sent: The floor beneath you is soft and earthy.
The primary function of the il tag is so Alter Ego can remove and add Items to descriptions as players take and drop
them, while making sentences that are grammatically correct. For that to be possible, the grammar within an item list
must be correct to begin with. In order to do that, several rules should be followed:
itemtags should be wrapped around either the entire single containing phrase or plural containing phrase of that Item.- If there are two Items, the item list should follow this format:
<il><item>ITEM 1</item> and <item>ITEM 2</item></il>. That is, the word “and” should be between the twoitemtags. - If there are three or more Items, the
itemtags should be comma separated, and an Oxford comma should be used before the “and” preceding the lastitemtag. That is, it should follow this format:<il><item>ITEM 1</item>, <item>ITEM 2</item>, and <item>ITEM 3</item></il>. - Periods and other sentence-ending punctuation should not placed within
iltags. - If the word “is” or the word “are” is in the clause just before or just after an item list, it should be the final
word or first word of the clause, respectively. This is so that Alter Ego can change them if the plurality of the
referenced Items changes. For example, if you have a sentence like this:
<s>There is <il><item>a PENCIL</item></il> on the desk.</s>and a player drops anotherPENCILItem on the desk, the sentence will become:<s>There are <il><item>2 PENCILS</item></il> on the desk.</s>. The same will happen if a different Item is added as well. For example, if anERASERItem was dropped on the desk, the sentence would become:<s>There are <il><item>a PENCIL</item> and <item>an ERASER</item></il> on the desk.</s>. The same happens in reverse, as well. If the second Item, whatever it may be, is removed from the desk, “are” will be changed to “is”. - Though non-Items can be placed within
iltags, they should follow the same grammatical rules thatitemtags would have. For example, in the sentence<s>The shelves are lined with <il><item>2 bags of RICE</item>, different ingredients for baking, and dough mixes</il>.</s>, if theRICEItems were removed, Alter Ego would remove the Oxford comma before “dough mixes”, making the sentence<s>The shelves are lined with <il>different ingredients for baking and dough mixes</il>.</s>. Non-Items should only be placed after allitemtags.
il tags are capable of having attributes. There is one attribute with defined behavior, the name attribute. This
allows you to insert multiple item lists into a description, giving each a name. This looks like:
<desc><s>It's a plain pair of black jeans.</s> <s>It has four pockets in total.</s> <s>In the right pocket, you find <il name="RIGHT POCKET"></il>.</s> <s>In the left pocket, you find <il name="LEFT POCKET"></il>.</s> <s>In the right back pocket, you find <il name="RIGHT BACK POCKET"></il>.</s> <s>In the left back pocket, you find <il name="LEFT BACK POCKET"></il>.</s></desc>
Note that only Prefabs, Items,
Inventory Items
and Players support multiple il tags in a single description.
Lastly, il tags can only be used in a certain number of places, and each one has its own limitations. They can be used
in:
- An Object’s description. A single Object can only have one item list in its description.
- A Prefab’s description. A single Prefab can have multiple item lists; however, there must be one for each inventory slot, with names to match. Item lists in a Prefab’s description will never be updated. They simply serve as a base for instances of that Prefab.
- An Item or Inventory Item’s description. The same rules that Prefabs have apply, however these can be updated as other Items/Inventory Items are inserted or removed.
- A Puzzle’s “Already Solved” text. A single Puzzle can only have one item list in its “Already Solved” text.
- A Player’s description. A single Player can only have two item lists in
their description, and they must be named
equipmentandhands. Any other item lists will never be updated.
Lastly, every item list must be in its own sentence. That is, a single s tag can only have one il tag within it.
To test that you’ve formatted item lists correctly, use the add and remove functions of
the testparser command.
<item>
Example: <desc><s>You open the locker.</s> <s>Inside, you find <il><item>a SWIMSUIT</item></il>.</s></desc>
The item tag is used to mark the beginning and ending of Items. It must go
inside an il tag and contain only the Item’s
entire single containing phrase or a quantity plus its
plural containing phrase. For example:
<desc><s>You open the dresser.</s> <s>There are a few drawers with nothing of interest in them.</s> <s>In the bottom drawer, you find <il><item>a pair of NEEDLES</item></il>.</s></desc>
In this example, the Item, NEEDLES, has the single containing phrase a pair of NEEDLES. If a Player dropped another
NEEDLES Item into this Object, Alter Ego would change the contents of the item tag to the quantity 2 plus the
NEEDLES Item’s plural containing phrase, which is pairs of NEEDLES. The description would become:
<desc><s>You open the dresser.</s> <s>There are a few drawers with nothing of interest in them.</s> <s>In the bottom drawer, you find <il><item>2 pairs of NEEDLES</item></il>.</s></desc>
Likewise, if the Player then removed a NEEDLES Item from this Object, Alter Ego would revert the description to use
the Item’s single containing phrase.
<if>
Example:
<desc><s>You take a look at the seaberry plant.</s> <s>Growing on it are <il><item>SEABERRIES</item></il>.</s> <if cond="player.talent === 'Ultimate Herbalist'"><s>You think you've heard that it can cure nausea.</s></if></desc>
Caution
This tag has the ability to run code. In order to determine if the condition in the
condattribute is true, Alter Ego uses the JavaScript eval function, which most programmers agree is a massive security risk. Given that the only way to insert code is to write it on the spreadsheet, write access should be given to as few people as possible. Possible malicious uses of this feature include, but are not limited to:
- Sending Alter Ego’s authentication token to the server
- Killing a player in the game
- Shutting down Alter Ego
The if tag is used to modify the contents of a description before it is sent to a Player. If the condition in the
cond (condition) attribute is true, then the contents of the if tag will be kept in the description. If it is false,
the contents will be removed. In the above example, there are two outcomes:
- If the Player inspecting this Object has the talent “Ultimate Herbalist”, the condition is true, and they will be sent
You take a look at the seaberry plant. Growing on it are SEABERRIES. You think you've heard that it can cure nausea. - If the Player inspecting this Object doesn’t have the talent “Ultimate Herbalist”, the condition is false, and they
will be sent
You take a look at the seaberry plant. Growing on it are SEABERRIES.
You can chain multiple if tags together for different outcomes. For example, in this Object description:
<desc><s>The window covers most of the wall, filling the room with <if cond="findEvent('NIGHT').ongoing === true">moonlight</if><if cond="findEvent('NIGHT').ongoing === false">sunlight</if>.</s></desc>
- If the
NIGHTEvent is ongoing, the Player inspecting this Object will be sent:The window covers most of the wall, filling the room with moonlight. - If the
NIGHTEvent is not ongoing, the Player inspecting this Object will be sent:The window covers most of the wall, filling the room with sunlight.
Player conditionals
The function which parses descriptions (and thus, if tags) has access to the Player inspecting it. As a result, you
can easily write descriptions that change based on a number of the Player’s attributes:
- Based on the Player’s name:
<if cond="player.name === 'Astrid'">Your name is Astrid.</if> - Based on the Player’s talent:
<if cond="player.talent === 'Ultimate Mortician'">You are the Ultimate Mortician.</if> - Based on the Player’s intelligence stat:
<if cond="player.intelligence > 7">You notice something your classmates didn't notice.</if> - Based on whether a Player has a given Status Effect:
<if cond="player.statusString.includes('hungry')">This food looks delicious.</if> - Based on whether a Player has a given behavior attribute:
<if cond="player.hasAttribute('acute hearing')">It produces an extremely faint noise that you should be able to make out if you listen closely.</if>
Container conditionals
The function which parses descriptions also has access to the entire container of the description, which is accessible
with the this keyword. That is, if the description belongs to a Room, you can
write descriptions that change:
- Based on the number of Players in the room:
<if cond="this.occupants.length > 6">It's a little cramped with so many people in a room this small.</if>
If the description belongs to an Object, you can write descriptions that change:
- Based on whether the Object’s child Puzzle has been solved:
<desc><if cond="this.childPuzzle.solved === true"><s>You examine the poster.</s> <s>It looks like this: https://i.imgur.com/wtUujam.png</s></if><if cond="this.childPuzzle.solved === false"><s>It is too dark to see anything.</s></if></desc>
If the description belongs to an Item, you can write descriptions that change:
- Based on the number of uses the Item has left:
<desc><if cond="this.uses > 0"><s>It's a bottle of water.</s> <s>You feel thirsty just looking at it.</s></if><if cond="this.uses === 0"><s>It's an empty plastic water bottle.</s></if></desc>
Note that the examples given above are not the only things you can do with the description’s container; they are simply the most helpful and commonly used.
Finder conditionals
The function which parses descriptions also has access to the entire game. This is most useful when descriptions should change based on the status of a Puzzle. This is made easy using the functions in the finder module. The finder module includes the following functions (parameters listed in parentheses are optional):
findRoom('room-name')findObject('OBJECT NAME', ('location-name'))findPrefab('PREFAB ID')findItem('PREFAB ID OR IDENTIFIER', ('location-name'), ('Type: CONTAINER NAME'))findPuzzle('PUZZLE NAME', ('location-name'))findEvent('EVENT NAME')findStatusEffect('status effect name')findPlayer('Player name')findLivingPlayer('Player name')findDeadPlayer('Player name')findInventoryItem('PREFAB ID OR IDENTIFIER', ('Player name'), ('CONTAINER NAME'), ('EQUIPMENT SLOT'))
Here are just a few examples of ways to use the finder module in if tags:
- Indicate if a Puzzle is solved or not:
<desc><s>This is a table for praying.</s> <s>On it there are two CANDLES.</s> <if cond="findPuzzle('CANDLES').solved === true"><s>They are currently lit.</s></if><if cond="findPuzzle('CANDLES').solved === false"><s>If you lit them, maybe you'd be able to pray for something.</s></if></desc> - Indicate if a Puzzle is solved or not when there are several Puzzles with the desired name in different Rooms:
<desc><s>You step onto the bridge from the BOTANICAL GARDEN.</s> <if cond="findPuzzle('LOCK', 'bridge').solved === true"><s>A mysterious CAVE is behind where the waterfall used to be.</s></if><if cond="findPuzzle('LOCK', 'bridge').solved === false"><s>A WATERFALL roars right next to the bridge as you enter, spraying you with a cool mist.</s></if> <s>The bridge arches up slightly over a beautiful lake, and in the middle of the bridge is a GAZEBO.</s> <s>The other end leads to a GREENHOUSE.</s></desc> - Indicate which Puzzle of a pair is currently solved:
<desc><s>The terminal appears to control the heat sensor for the freezer.</s> <s>It has two buttons: the OFF BUTTON and the ON BUTTON.</s> <if cond="findPuzzle('OFF BUTTON').solved === true"><s>The sensor is already off.</s></if><if cond="findPuzzle('ON BUTTON').solved === true"><s>The sensor is currently on.</s></if></desc> - Indicate if there are Players in a given Room:
<desc><s>You look through the peephole.</s> <if cond="findRoom('hall-1').occupants.length > 0"><s>There's someone in the hall outside.</s></if><if cond="findRoom('hall-1').occupants.length === 0"><s>You don't see anyone in the hall.</s></if></desc> - Add additional details to a description based on the presence of an Item:
<desc><s>It's a queen bed with perfectly white sheets<if cond="findItem('COMFORTER', this.location.name, 'Object: BED') !== undefined"> and a thick, black comforter tucked neatly under the mattress</if>.</s> <s>On it, you find <il><item>2 PILLOWS</item> and <item>a COMFORTER</item></il>.</s></desc> - Indicate if another Object is activated or not:
<desc><s>It’s a life-sized iron bull made out of metal, with a chamber so you can climb inside.</s> <var v="this.childPuzzle.alreadySolvedDescription" /> <s>Underneath it is <if cond="findObject('BUTTON', 'torture-chamber').activated === false">what looks like a pit for a campfire</if><if cond="findObject('BUTTON', 'torture-chamber').activated === true">a roaring fire</if>.</s> <s>There is a BUTTON on its nose.</s> <s>Do you dare push it?</s></desc> - Provide details based on the presence of an Inventory Item in the Player’s inventory:
<desc><s>You examine the rightmost poster.</s> <s>It seems to be an eye chart to test a patient's vision.</s> <s>There's a line of text on the bottom that's so small you need a magnifying glass to read it.</s> <if cond="findInventoryItem('MAGNIFYING GLASS', player.name) !== undefined"><s>You use your MAGNIFYING GLASS to read the text, which is as follows: "MADE YOU LOOK".</s></if></desc>
<var>
Example:
<desc><if cond="this.childPuzzle.solved === true"><var v="this.childPuzzle.alreadySolvedDescription" /></if><if cond="this.childPuzzle.solved === false"><s>The locker is locked with a combination LOCK.</s> <s>It seems someone scribbled on the front with marker: xyz.</s> <s>What's that supposed to mean?</s></if></desc>
Caution
This tag has the ability to run code. In order to determine if the condition in the
condattribute is true, Alter Ego uses the JavaScript eval function, which most programmers agree is a massive security risk. Given that the only way to insert code is to write it on the spreadsheet, write access should be given to as few people as possible. Possible malicious uses of this feature include, but are not limited to:
- Sending Alter Ego’s authentication token to the server
- Killing a player in the game
- Shutting down Alter Ego
The var tag is used to insert data from the game. The data in question is stored in the v (variable) attribute. In
the above example, the this.childPuzzle.alreadySolvedDescription is:
<desc><s>You open the locker.</s> <s>Inside, you find <il><item>a FIRST AID KIT</item>, <item>a bottle of PAINKILLERS</item>, <item>a PILL BOTTLE</item>, and <item>an OLD KEY</item></il>.</s></desc>.
Thus, if the child Puzzle is solved, the Player will be sent:
You open the locker. Inside, you find a FIRST AID KIT, a bottle of PAINKILLERS, a PILL BOTTLE, and an OLD KEY.
Note that the var tag cannot surround text, so it must be closed in the same tag that it is opened with, like so:
<var v="some variable" />.
The var tag is incredibly useful due to its flexibility for writing dynamic descriptions. Here are just a few common
uses for it:
Indicating Puzzle status
One of the var tag’s most common uses is changing the description of an Object or something else based on the solved
status of a Puzzle. Here are a few examples:
- Indicating what items are inside the Object’s child Puzzle:
<desc><s>You examine the table.</s> <s>Looking closely, you can see that it's not a table at all, but a chest!</s> <if cond="this.childPuzzle.solved === true"><s>It looks like it requires an old key to open, but it seems to be unlocked.</s> <var v=" this.childPuzzle.alreadySolvedDescription" /></if><if cond="this.childPuzzle.solved === false"><s>It looks like it requires an old key to open.</s></if></desc>this.childPuzzle.alreadySolvedDescription:<desc><s>You open the chest.</s> <s>Inside, you find <il><item>a bottle of PEPSI</item>, <item>a ROPE</item>, and <item>a KNIFE</item></il>.</s></desc>- Parsed description if
this.childPuzzle.solved === true:You examine the table. Looking closely, you can see that it's not a table at all, but a chest! It looks like it requires an old key to open, but it seems to be unlocked. You open the chest. Inside, you find a bottle of PEPSI, a ROPE, and a KNIFE. - Parsed description if
this.childPuzzle.solved === false:You examine the table. Looking closely, you can see that it's not a table at all, but a chest! It looks like it requires an old key to open.
- Replace the entire description with
childPuzzle.alreadySolvedDescription:<desc><if cond="this.childPuzzle.solved === true"><var v="this.childPuzzle.alreadySolvedDescription" /></if><if cond="this.childPuzzle.solved === false"><s>The computer is asking for a password.</s></if></desc>this.childPuzzle.alreadySolvedDescription:<desc><s>The computer is logged in.</s> <s>There's no Internet connection, but it seems whoever was using this computer left a saved EMAIL open.</s> <if cond="findPuzzle('DETONATOR').solved === false"><s>There's also a program called DETONATOR open.</s></if></desc>- Parsed description if
this.childPuzzle.solved === true:The computer is logged in. There's no Internet connection, but it seems whoever was using this computer left a saved EMAIL open. There's also a program called DETONATOR open. - Parsed description if
this.childPuzzle.solved === false:The computer is asking for a password.
Indicate Item uses
Another very useful feature of the var tag is indicating how many uses a particular Item has left. Here are a few
examples:
<desc><s>This is a gallon-sized jug of orange juice.</s> <s>It's pulp-free.</s> <if cond="this.uses > 0 && this.uses < 6"><s>It's about <var v="this.uses" />/6th full.</s></if><if cond="this.uses === 0"><s>It's empty.</s></if></desc>- Parsed description if this Item has 6 or more uses left:
This is a gallon-sized jug of orange juice. It's pulp-free. - Parsed description if this Item has (for example) 1 use left:
This is a gallon-sized jug of orange juice. It's pulp-free. It's about 1/6th full. - Parsed description if this Item has 0 uses left:
This is a gallon-sized jug of orange juice. It's pulp-free. It's empty.
- Parsed description if this Item has 6 or more uses left:
<desc><s>It's a bag of frozen chicken nuggets.</s> <s>Sadly, they don't come in fun shapes.</s> <if cond="this.uses > 0"><s>It looks like there are enough in here for <var v="this.uses" /> serving<if cond="this.uses > 1">s</if>, though.</s></if><if cond="this.uses === 0"><s>It's empty.</s></if></desc>- Parsed description if this Item has (for example) 3 uses left:
It's a bag of frozen chicken nuggets. Sadly, they don't come in fun shapes. It looks like there are enough in here for 3 servings, though. - Parsed description if this Item has 1 use left:
It's a bag of frozen chicken nuggets. Sadly, they don't come in fun shapes. It looks like there are enough in here for 1 serving, though. - Parsed description if this Item has 0 uses left:
It's a bag of frozen chicken nuggets. Sadly, they don't come in fun shapes. It's empty.
- Parsed description if this Item has (for example) 3 uses left:
<desc><s>It's a box of fish sticks.</s> <if cond="this.uses > 0"><s>These look delicious.</s> <s>You should cook them in the oven before eating them, though.</s> <s>There are about <var v="this.uses * 8" /> fish sticks inside.</s></if><if cond="this.uses === 0"><s>It's empty.</s></if></desc>- Parsed description if this Item has (for example) 6 uses left:
It's a box of fish sticks. These look delicious. You should cook them in the oven before eating them, though. There are about 48 fish sticks inside. - Parsed description if this Item has (for example) 1 use left:
It's a box of fish sticks. These look delicious. You should cook them in the oven before eating them, though. There are about 8 fish sticks inside. - Parsed description if this Item has 0 uses left:
It's a box of fish sticks. It's empty.
- Parsed description if this Item has (for example) 6 uses left:
Other uses
Because the var tag is able to access all of the game’s data, it has many more uses. Here are just a few:
- Indicate which players are in another Room:
<desc><s>You look through the window into the pool room below.</s> <s>On the right side of the room you see an Olympic-size swimming pool and on the left is a larger recreational pool, surrounded by a number of beach chairs.</s> <if cond="findRoom('rec-pool').occupantsString !== ''"><s>You think you see <var v="findRoom('rec-pool').occupantsString" /> down there.</s></if></desc> - Use the player’s name:
<desc><s>You look in the mirror.</s> <s>It's you.</s> <s><var v="player.name" />.</s></desc> - Indicate the password to an Object’s child Puzzle:
<desc><s>You examine the safe.</s> <s>It comes equipped with a small screen and a miniature keyboard.</s> <if cond="this.childPuzzle.solved === true"><s>It's currently unlocked.</s> <var v="this.childPuzzle.alreadySolvedDescription" /></if><if cond="this.childPuzzle.solved === false"><s>It seems to require a password to unlock.</s> <s><if cond="player.name === 'Nero'">You, of course, know that the password is <var v="this.childPuzzle.solution" />.</if></s></if></desc>
<procedural>
Example:
<desc><s>It's a trading card from the hugely popular card game, Capsulebeasts.</s> <s>This one features the ocean-type fan-favorite, Tortide.</s> <procedural chance="5"><s>This card has a holographic finish, making it extra rare!</s></procedural></desc>
The procedural tag allows Prefabs to be instantiated as Items and Inventory Items with procedurally-generated
descriptions. This can allow you to add some variation in instances of Prefabs without having to create entirely new
Prefabs or manually edit the descriptions of instances of those Prefabs. Keep in mind that procedural tags only affect
the description of instantiated Prefabs, and do not alter their other properties at all.
Note that only Prefabs can have procedural tags in their description. When a Prefab is instantiated as an Item or
Inventory Item, the parser module evaluates all of the procedural tags in the description and algorithmically decides
which ones to keep. The description it generates contains only the text inside the procedural and poss tags that
were selected, without the tags themselves. All other tags remain unaffected.
procedural tags can have attributes. There are three attributes with defined behavior:
Procedural attribute: name
name allows you to give each procedural tag its own identifier. This allows you to manually select procedurals and
the possibilities contained within them when using
the instantiate command.
Procedural attribute: chance
chance takes a percent chance for the contents of a given procedural tag to appear in instances of a Prefab. This
chance is independent of other procedural tags. If the chance attribute is omitted from the tag, or its value is not
a number between 0 and 100, it is assigned a chance of 100, meaning that it will always appear.
However, if a procedural tag is nested inside of another procedural tag, then it will not appear in the generated
description if the parent procedural tag failed to generate, even if its chance is 100.
For example, given the description:
<desc><s>Sentence.</s> <procedural chance="50" name="A1"><s>A1.</s> <procedural chance="100" name="A2"><s>A2.</s></procedural></procedural></desc>
Because procedural A2 is contained inside procedural A1, which has a chance of 50, it will not appear if A1
did not generate. If A1 did generate, then A2 will always generate, since it has a chance of 100. In other words,
the parser module’s generated output will be:
- 50% of the time:
<desc><s>Sentence.</s></desc> - 50% of the time:
<desc><s>Sentence.</s> <s>A1.</s> <s>A2.</s></desc>
For another example, given the description:
<desc><s>Sentence.</s> <procedural name="A1" chance="50"><s>A1.</s> <procedural name="A2" chance="50"><s>A2.</s> <procedural name="A3" chance="50"><s>A3.</s></procedural></procedural></procedural></desc>
Because procedural A3 is nested inside procedural A2 — which is itself nested inside procedural A1 — the
probability of A3 generating will be dependent on A2 generating, which is dependent on A1 generating. In other
words, the parser module’s generated output will be:
- 50% of the time:
<desc><s>Sentence.</s></desc> - 25% of the time:
<desc><s>Sentence.</s> <s>A1.</s></desc> - 12.5% of the time:
<desc><s>Sentence.</s> <s>A1.</s> <s>A2.</s></desc> - 12.5% of the time:
<desc><s>Sentence.</s> <s>A1.</s> <s>A2.</s> <s>A3.</s></desc>
Procedural attribute: stat
stat takes the name of one of the Player’s five stats: strength,
intelligence, dexterity, speed, stamina, or their abbreviations: str, int, dex, spd, sta. If a Player
is supplied when the output is generated, then the chosen stat will affect the chances of all of the poss tags
contained within this procedural tag. When instantiating a Prefab as an Inventory Item, the Player will always be the
Player who the Inventory Item belongs to. When instantiating a Prefab as an Item, it is only possible to supply a Player
in the bot version of the instantiate command; this is the Player who caused the command to be executed.
When a Player’s stat is provided, a percent modifier, \(M\), is calculated for each poss tag within the
procedural. The formula for \(M\) is as follows:
\[ M = (f + \frac{c - f}{p - 1}) * i * 10\]
In this formula there are several variables:
- \(c\) is the maximum modifier value, where \(c = x - 5\), with \(x\) being the stat value.
- \(f\) is the minimum modifier value, where \(f = -1 * c\).
- \(p\) is the number of
posstags inside thisprocedural. - \(i\) is the numbered position of the
posstag that \(M\) is being calculated for. The firstposstag in the list has an \(i\) value of \(0\).
After M is calculated for a poss tag, it is added to that tag’s chance, before moving onto the next poss tag.
In effect, this means that a higher stat value is more likely to result in poss tags near the end of the list being
generated, while a lower stat value is more likely to result in poss tags near the beginning of the list being
generated. A Player with a stat value of 10 may have a percent modifier of -50% for the first listed poss tag and +50%
for the final listed poss tag. Meanwhile, a Player with a stat value of 1 may have a percent modifier of +40% for the
first listed poss tag and a -40% for the final listed poss tag. This may very well make it impossible for some
poss tags in the procedural to generate at all, as it is unlikely that all of the poss chances will still be
between 0 and 100.
For example, given the description:
<desc><s>This is a red clay pot.</s> <procedural stat="dexterity"><poss chance="50"><s>Judging by the abysmal craftsmanship, it looks like it was made by a total rookie.</s></poss><poss chance="35"><s>It looks decently made, but there are some noticeable mistakes.</s></poss><poss chance="15"><s>It's very well made, with perfectly smooth edges.</s></poss></procedural></desc>
Suppose the provided Player’s dexterity stat is 3. Using the formula listed above, the percent modifiers for each poss
tag would be +20%, ±0%, and -20%, respectively. On the other hand, if the provided Player’s dexterity stat is 9, the
percent modifiers would instead be -40%, ±0%, and +40%, respectively. As a result, the parser module’s generated output
would be:
<desc><s>This is a red clay pot.</s> <s>Judging by the abysmal craftsmanship, it looks like it was made by a total rookie.</s></desc>- 70% of the time if the Player’s dexterity stat is 3.
- 10% of the time if the Player’s dexterity stat is 9.
<desc><s>This is a red clay pot.</s> <s>It looks decently made, but there are some noticeable mistakes.</s></desc>- 30% of the time if the Player’s dexterity stat is 3. This is because 70% + 35% exceeds 100%, so the extra 5% doesn’t matter.
- 35% of the time if the Player’s dexterity stat is 9.
<desc><s>This is a red clay pot.</s> <s>It's very well made, with perfectly smooth edges.</s></desc>- 0% of the time if the Player’s dexterity stat is 3. The actual calculated probability is -5%, but because 70% + 35% exceeds 100%, this makes no difference.
- 55% of the time if the Player’s dexterity stat is 9.
Note that if the stat attribute is set, but there is no Player provided, or the Player’s stat value is 5, the chances
of all of the poss tags contained within the procedural will not be changed.
<poss>
Example:
<desc><s>It's a capsule from your favorite game, Capsulebeasts!</s> <s>This is a <procedural name="color"><poss name="red" chance="25">red</poss><poss name="blue" chance="25">blue</poss><poss name="green" chance="25">green</poss><poss name="black" chance="12.5">black</poss><poss name="white" chance="12.5">white</poss></procedural> <procedural name="species"><poss name="lavazard">Lavazard</poss><poss name="loamander">Loamander</poss><poss name="tortide">Tortide</poss></procedural>.</s> <s><procedural name="finish" chance="25"><poss name="glass" chance="50">This one has a glassy finish.</poss><poss name="metal" chance="50">This one has a metallic finish.</poss><poss name="standard" chance="0"></poss></procedural></s></desc>
The poss tag, short for possibility, is used to add pre-defined variations to the descriptions of Prefabs. It must
go inside a procedural tag. If it is placed outside of a procedural tag, it has no functionality. As
with the procedural tag, poss tags only affect the description of instantiated Prefabs, and do not alter their other
properties at all.
When a Prefab is instantiated into an Item or Inventory Item, the parser module uses a random number generator to pick
one poss tag to keep in the final description. After one is selected, all of the others within the same procedural
tag are removed. The poss tag itself is also removed from the description, so make sure that the text it contains will
not end up outside of an s tag.
poss tags can have attributes. There are two attributes with defined behavior:
Poss attribute: name
name allows you to give each poss tag its own identifier. This allows you to manually select procedurals and the
possibilities contained within them when using
the instantiate command.
In order to make use of the name attribute in a poss tag, the procedural tag that contains it must also have a
name. When using the instantiate command, it is possible to provide procedural selections with the syntax
(procedural name=poss name). For instance, in the above example, if you wanted to manually instantiate an Item with
the standard finish, which normally has no possibility of generating, your command would start with:
.instantiate GACHA CAPSULE (finish=standard). This syntax is not case-sensitive, and extra spaces are ignored. The
effect of doing this would result in the final s tag being removed, because the poss that was selected contained no
text, and as a result, the procedural and thus s tag contained no text. The poss tags within the other
procedural tags in the description would still be randomly chosen.
It is possible to chain manual procedural selections together with a + character. For example, if your command began
with .instantiate GACHA CAPSULE (color=black + species=tortide + finish=metal), then the generated Item would always
have the description:
<desc><s>It's a capsule from your favorite game, Capsulebeasts!</s> <s>This is a black Tortide.</s> <s>This one has a metallic finish.</s></desc>
Poss attribute: chance
chance takes a percent chance for the contents of a given poss tag to be chosen in instances of a Prefab. This
chance is independent of the chance attribute of the procedural tag which contains it. The chance given for the
procedural tag determines how likely it is that any of the poss tags contained inside it will be generated. That
is, even if the containing procedural tag has a chance under 100, all of the chances of the poss tags contained
inside it should ideally add up to 100 (and not the chance of the procedural, as one might assume).
When the parser module has to select a poss tag in a given procedural tag to keep, it first adds together the
chances assigned to each poss tag in the procedural. If a poss tag does not have a chance attribute, or its
value is not a number between 0 and 100, it is considered chanceless, and thus not included in this sum. If there are
any chanceless possibilities, the sum calculated earlier is subtracted from 100, and then divided by the number of
chanceless possibilities. This makes it so that all chanceless possibilities are equally likely to generate, and all of
the chances will add up to 100.
For example, given the description:
<desc><s><procedural><poss name="A1" chance="50">A1.</poss><poss name="A2">A2.</poss><poss name="A3">A3.</poss></procedural></s></desc>
Because A1 has a chance of 50, and A2 and A3 are chanceless, the remainder that it would take for all of the
poss chances to add up to 100 — 50 — is divided by the number of chanceless possibilities — 2 — and assigned equally
to them. As a result, A2 and A3 have an effective chance of 25 each.
If none of the poss tags in a procedural have assigned chances, then they will all be equally likely to be
selected. If the sum of all of the chances already adds up to 100 and there are also chanceless possibilities, then the
chanceless possibilities will never be selected.
After all of the possibilities have been assigned chances, if the procedural has a stat attribute and a Player’s
stat has been provided, these chances will have percent modifiers applied to them.
Then, all of the possibilities are sorted from highest to lowest chance. A random number between 0 and 100 is generated,
and an accumulator value that starts at 0 is created. The possibilities are iterated through, with each one adding to
the accumulator value. If at any point during this iteration, the randomly-generated number is less than the
accumulator’s current value, that possibility is selected. Finally, all other possibilities in the current procedural
are removed from the description.
Edit Mode
Edit mode is a special mode in the Neo World Program that drastically limits gameplay. It can be toggled on and off by a moderator at will using the editmode command.
Purpose
Most of the game world data is stored on a Google Sheets spreadsheet. However, this data is useless by itself. Alter Ego uses this data to facilitate the Neo World Program, but reading it directly from the spreadsheet would be inefficient, as doing so would necessitate making frequent requests to the Google Sheets API, which would introduce additional latency and increase the potential for data asynchrony due to the inherent unpredictability of making requests over the Internet, thus making gameplay significantly slower and more prone to bugs.
In order to combat this, Alter Ego must load data from the spreadsheet into its internal memory, which can be triggered by a moderator with the load command. By keeping an internal copy of the game data, it is able to more efficiently access and modify that data, thus allowing for a much faster and smoother gameplay experience. However, at any given time, Alter Ego has more data than actually appears on the spreadsheet (typically to allow for faster access to data it needs - many of the internal attributes found on the Data Structures pages on this Wiki serve this purpose), and more importantly, that data is out of sync with the data on the spreadsheet.
During gameplay, this is typically not a problem. However, in the event of an error, or a crash, or a power outage, or some other incident which causes Alter Ego to shut down during gameplay, its internal data will be lost. In order to combat this, Alter Ego regularly updates the spreadsheet with the most recent copy of its internal data using the saver module; the interval at which this occurs can be set with the autoSaveInterval setting. While this still guarantees that at least some data will be lost if Alter Ego goes offline, there will always be a fairly recent backup to load from in order to minimize the amount of data loss.
However, because Alter Ego updates the entire spreadsheet at once (only the Prefab, Recipe, Status Effect, and Gesture sheets remain unaffected by the saving process), this can make it difficult for a moderator to edit the spreadsheet during gameplay, both because their changes will be overwritten if they’re not fast enough, and because attempting to edit the spreadsheet during gameplay can result in outdated game data being stored during the next load. The solution to this problem is edit mode.
Functionality
When edit mode is activated, Alter Ego will manually save the current game state to the spreadsheet. It is one of two ways (the other being the save command) of forcibly saving the game. After the spreadsheet is updated, Alter Ego will pause its autosave functionality until edit mode is disabled. This allows a moderator to manually edit the spreadsheet without worrying about their work being overwritten by the next autosave.
In addition, Players are unable to use commands during edit mode. They are
still able to speak (and thus use the say command), since that almost
never changes the game state, but the vast majority of their actions are restricted during edit mode. All Players will
be notified that edit mode has been enabled or disabled, unless they have the
unconscious behavior attribute. As Players are normally able to
act autonomously, their restriction during edit mode drastically reduces the amount of changes that can occur to the
game state without the moderator’s awareness.
To be clear, edit mode does not prevent Alter Ego’s copy of the game data stored in its internal memory from changing. Timers on Events and Status Effects will continue to count down, for example, and any consequences that result from those changes will still be present when edit mode is disabled. Edit mode simply temporarily reduces the amount of unpredictable changes caused by Player actions.
Edit mode is not a perfect solution to this problem. Data asynchrony can still occur when edit mode is used, and the amount of asynchrony within the game data will accumulate the more frequently edit mode is used in conjunction with the load command (especially when only specific data structures are loaded, as is generally good practice). Edit mode is a useful tool for modifying the spreadsheet during gameplay, but care must be taken in order to prevent bugs from accumulating; it can sometimes lead to exceptionally strange behavior when not used responsibly. Some tips to keep the game data consistent are:
- Use edit mode sparingly - only when needed.
- Only load the manually edited data structures before disabling edit mode in order to avoid reloading old game data.
- When applicable, load related data structures. For example, if manually editing Items, load the Objects and Puzzles which contain them.
- Avoid loading Players unless absolutely necessary.
- Every so often, load all game data to get everything back in sync.
- Every once in a while, reboot Alter Ego entirely in order to clear out its internal memory.
Commands
Commands are messages sent to Alter Ego in order to interface with the Neo World Program. In general, they allow a Discord user to influence the game world in some way.
Commands are loaded from the commands directory when Alter Ego is booted up. Each command is a JavaScript file with a
.js extension. This file contains all of the command’s logic which Alter Ego uses to interpret the content of the
message which sent the command and carry out the desired behavior.
All commands are passed through the commandHandler module before being executed. The purpose ouf this module is to determine who is sending the command, and if they have permission to do so. All commands are restricted to a single permission level based on the sender’s Discord roles in the game server.
Player commands
Player commands are usable by users with the Player role. These commands allow Players to interact with the game world of their own volition.
Player commands can only be used when a game is in progress. They can be sent to Alter Ego through DM or in the channel corresponding with the Room that the Player is in. The Player must be alive to use commands, and they must not be inflicted with a Status Effect which disables the command they’re trying to use. With few exceptions, Players cannot use commands when edit mode is enabled. If Alter Ego accepts the Player’s command and it was sent in a Room channel, the message in which the command was issued will be deleted.
craft
Crafts two items in your inventory together.
Aliases
.craft .combine .mix
Examples
.craft drain cleaner and plastic bottle
.combine bread and cheese
.mix red vial with blue vial
.craft soap with knife
Description
Creates a new item using the two items in your hand. The names of the items must be separated by “with” or “and”. If no recipe for those two items exists, the items cannot be crafted together. Note that this command can also be used to use one item on another item, which may produce something new.
dress
Takes and equips all items from a container.
Aliases
.dress .redress
Examples
.dress wardrobe
.dress laundry basket
.redress main pocket of backpack
Description
Takes all items from a container of your choosing and equips them, if possible. You must have a free hand to take an item. Items will be equipped in the order in which they appear in the game’s data, which may not be obvious upon inspecting the container. If an item is equippable to an equipment slot, but you already have something equipped to that slot, it will not be equipped, and you will not be notified when this happens. If the container you choose has multiple inventory slots, you can specify which slot to dress from. Otherwise, you will dress from all slots.
drop
Discards an item from your inventory.
Aliases
.drop .discard .d
Examples
.drop first aid kit
.discard basketball
.drop knife in sink
.discard towel on benches
.drop key in right pocket of skirt
.discard wrench on top rack of tool box
Description
Discards an item from your inventory and leaves it in the room you’re currently in. The item you want to discard must be in either of your hands. You can specify where in the room you’d like to leave it by putting the name of an object or item in the room after the item. Not all objects and items can contain items, but it should be fairly obvious which ones can. If you want to discard it in an item with multiple inventory slots (such as pockets), you can specify which slot to put it in. If you don’t specify an object or item, you will simply leave it on the floor. If you drop a very large item (a sword, for example), people in the room with you will see you discard it.
equip
Equips an item.
Aliases
.equip .wear .e
Examples
.equip mask
.wear coat
.equip sweater to shirt
Description
Equips an item currently in your hand. You can specify which equipment slot you want to equip the item to, if you want. However, some items can only be equipped to certain equipment slots (for example, a mask can only be equipped to the FACE slot). People in the room will see you equip an item, regardless of its size.
gesture
Performs a gesture.
Aliases
.gesture
Examples
.gesture smile
.gesture point at door 1
.gesture wave johnny
Description
Performs one of a set of predefined gestures. Everybody in the room with you will see you do this gesture. This allows
you to communicate during times where you are unable to speak for some reason, though you can gesture at any time, with
few exceptions. Certain gestures may require a target to perform them. For example, a gesture might require you specify
an Exit, an Object, another Player, etc. A gesture can only be performed with one target at a time. Gestures can be made
impossible if you are inflicted with certain Status Effects. For example, if you are concealed, you cannot smile, frown,
etc. as nobody would be able to see it. To see a list of all possible gestures, send .gesture list.
give
Gives an item to another player.
Aliases
.give .g
Examples
.give keiko moldy bread
Description
Transfers an item from your inventory to another player in the room. The item selected must be in one of your hands. The receiving player must also have a free hand, or else they will not be able to receive the item. If a particularly large item (a chainsaw, for example) is given, people in the room with you will see you giving it to the recipient.
help
Lists all commands available to you.
Aliases
.help
Examples
.help
.help move
Description
Lists all commands available to the user. If a command is specified, displays the help menu for that command.
hide
Hides you in an object.
Aliases
.hide .unhide
Examples
.hide desk
.hide cabinet
.unhide
Description
Allows you to use an object in a room as a hiding spot. When hidden, you will be removed from that room’s channel so
that when other players enter the room, they won’t see you on the user list. When players speak in the room that you’re
hiding in, you will hear what they say. Under normal circumstances, a whisper channel will be created for you to speak
in. Most players will be unable to hear what you say in this channel. However, if you want to speak so that everyone can
hear you (while having your identity remain a secret), use the .say command. If someone hides in the same hiding spot
as you, you will be placed in a whisper channel together. If someone inspects or tries to hide in the object you’re
hiding in, your position will be revealed. If you wish to come out of hiding on your own, use the unhide command.
inspect
Learn more about an object, item, or player.
Aliases
.inspect .investigate .examine .look .x
Examples
.inspect desk
.examine knife
.look knife on desk
.x knife in main pouch of red backpack
.investigate my knife
.look akari
.examine an individual wearing a mask
.look marielle's glasses
.x an individual wearing a bucket's shirt
.inspect room
Description
Tells you about an object, item, or player in the room you’re in. An object is something in the room that you can interact with but not take with you. An item is something that you can both interact with and take with you. If you inspect an object, everyone in the room will see you inspect it. The same goes for very large items. If there are multiple items with the same name in the room, you can specify which one you want to inspect using the name of the container it’s in. You can also inspect items in your inventory. If you have an item with the same name as an item in the room you’re currently in, you can specify that you want to inspect your item by adding “my” before the item name. You can even inspect visible items in another player’s inventory by adding “[player name]’s” before the item name. No one will see you do this, however you will receive slightly less info when inspecting another player’s items. You can use “.inspect room” to get the description of the room you’re currently in.
inventory
Lists the items in your inventory.
Aliases
.inventory .i
Examples
.inventory
Description
Shows you what items you currently have. Your inventory will be sent to you via DMs.
knock
Knocks on a door.
Aliases
.knock
Examples
.knock door 1
Description
Knocks on a door in the room you’re in.
move
Moves you to another room.
Aliases
.move .go .exit .enter .walk .m
Examples
.move door 1
.enter door 1
.go locker room
.move door 1>door 1>door 1
.walk hall 1 > hall 2 > hall 3 > hall 4
.m lobby>path 3>path 1>park>path 7>botanical garden
Description
Moves you to another room. You will be removed from the current channel and put into the channel corresponding to the
room you specify. You can specify either an exit of the current room or the name of the desired room, if you know it.
Note that you can only move to adjacent rooms. It is recommended that you open the new channel immediately so that you
can start seeing messages as soon as you’re added. The room description will be sent to you via DMs. You can create a
queue of movements to perform such that upon entering one room, you will immediately start moving to the next one. To do
this, separate each destination with >.
recipes
Lists all recipes available to you.
Aliases
.recipes
Examples
.recipes
.recipes glass
.recipes pot of rice
Description
Lists all recipes you can carry out with the items in your inventory and items in the room. If you supply the name of an item in your inventory, you will receive a list of all recipes that use that item as an ingredient. There are crafting and processing recipes.
To carry out a crafting recipe, you must have both of the ingredients in your hands and combine them with the .craft
command. These recipes take no time. If reversible, you can use the .uncraft command to get the ingredients again.
To carry out a processing recipe, use the .drop command to place all the ingredients in an object, and then activate
the object with the .use command. These recipes take a set amount of time to complete. If it worked, you’ll receive a
message indicating that the process has begun, and another message when it finishes. You won’t receive a message if the
object was already activated when all of the ingredients were put in, but the recipe will still be carried out so long
as all of the ingredients are in place.
run
Runs to another room.
Aliases
.run
Examples
.run hall 1
.run botanical garden
.run hall 1 > hall 2 > hall 3 > hall 4
.run lobby>path 3>path 1>park>path 7>botanical garden
Description
Moves you to another room by running. This functions the same as the move command, however you will move twice as
quickly and lose stamina at three times the normal rate. You will be removed from the current channel and put into the
channel corresponding to the room you specify. You can specify either an exit of the current room or the name of the
desired room, if you know it. Note that you can only move to adjacent rooms. It is recommended that you open the new
channel immediately so that you can start seeing messages as soon as you’re added. The room description will be sent to
you via DMs. You can create a queue of movements to perform such that upon entering one room, you will immediately start
running to the next one. To do this, separate each destination with >.
say
Sends your message to the room you’re in.
Aliases
.say .speak
Examples
.say What happened?
.speak Did someone turn out the lights?
Description
Sends your message to the channel of the room you’re currently in. This command is only available to players with certain status effects.
sleep
Puts you to sleep.
Aliases
.sleep
Examples
.sleep
Description
Puts you to sleep by inflicting you with the asleep status effect. This should be used at the end of the day before the game pauses to ensure you wake up feeling well-rested.
stash
Stores an inventory item inside another inventory item.
Aliases
.stash .store .s
Examples
.stash laptop in satchel
.store sword in sheath
.stash old key in right pocket of pants
.store water bottle in side pouch of backpack
Description
Moves an item from your hand to another item in your inventory. You can specify any item in your inventory that has the capacity to hold items. If the inventory item you choose has multiple slots for items (such as multiple pockets), you can specify which slot you want to store the item in. Note that each slot has a maximum capacity that it can hold, so if it’s too full or too small to contain the item you’re trying to stash, you won’t be able to stash it there. If you attempt to stash a very large item (a sword, for example), people in the room with you will see you doing so.
status
Shows your status.
Aliases
.status
Examples
.status
Description
Shows you what status effects you’re currently afflicted with.
steal
Steals an item from another player.
Aliases
.steal .pickpocket
Examples
.steal from faye's pants
.pickpocket from veronicas jacket
.steal micah's right pocket of pants
.pickpocket devyns left pocket of pants
.steal from an individual wearing a mask's cloak
.pickpocket an individual wearing a buckets side pouch of backpack
Description
Attempts to steal an item from another player in the room. You must specify one of the player’s equipped items to steal from. You can also specify which of that item’s inventory slots to steal from. If no slot is specified and the item has multiple inventory slots, one slot will be randomly chosen. If the inventory slot contains multiple items, you will attempt to steal one at random.
There are three possible outcomes to attempting to steal an item: you steal the item without them noticing, you steal the item but they notice, and you fail to steal the item because they notice in time. If you happen to steal a very large item, the other player will notice you taking it whether you successfully steal it or not, and so will everyone else in the room. Your dexterity stat has a significant impact on how successful you are at stealing an item. Various status effects affect the outcome as well. For example, if the player you’re stealing from is unconscious, they won’t notice you stealing their items no matter what.
stop
Stops your movement.
Aliases
.stop
Examples
.stop
Description
Stops you in your tracks while moving to another room. Your distance to that room will be preserved, so if you decide to move to that room again, it will not take as long. This command will also cancel any queued movements.
take
Takes an item and puts it in your inventory.
Aliases
.take .get .t
Examples
.take butcher's knife
.get first aid kit
.take pill bottle from medicine cabinet
.get towel from benches
.take hammer from tool box
.get key from pants
.take key from left pocket of pants
Description
Adds an item from the room you’re in to your inventory. You must have a free hand to take an item. If there are multiple items with the same name in a room, you can specify which object or item you want to take it from. Additionally, if the item is contained in another item with multiple inventory slots (such as pockets), you can specify which slot to take it from. If you take a very large item (a sword, for example), people will see you pick it up and see you carrying it when you enter or exit a room.
text
Sends a text message to another player.
Aliases
.text
Examples
.text elijah Hello. I am EVA Chan. We are schoolmates.
.text astrid i often paint cityscapes, urban scenes, and portraits of people - but today i decided to experiment with something a bit more abstract. (attached image)
.text viviana (attached image)
Description
Sends a text message to the player you specify. If an image is attached, it will be sent as well. This command works best when sent via direct message, rather than in a room channel. This command is only available to players with certain status effects.
time
Shows the current in-game time.
Aliases
.time
Examples
.time
Description
Shows the current in-game time and date. This will show you the time in the timezone that the bot is currently operating in. This may differ from your local time.
uncraft
Separates an item in your inventory into its component parts.
Aliases
.uncraft .dismantle .disassemble
Examples
.uncraft shovel
.dismantle crossbow
.disassemble pistol
Description
Separates an item in one of your hands into its component parts, assuming they can be separated. This will produce two
items, so you will need a free hand in order to use this command. If there is no crafting recipe for its components that
allows them to be separated again, the item cannot be uncrafted. If you want to re-assemble them, use the .craft
command.
undress
Unequips and drops all items.
Aliases
.undress
Examples
.undress
.undress wardrobe
.undress laundry basket
.undress main pocket of backpack
Description
Unequips all items you have equipped and drops them into a container of your choosing. If no container is chosen, then items will be dropped on the FLOOR. The given container must have a large enough capacity to hold all of the items in your inventory. This command will also drop any items in your hands.
unequip
Unequips an item.
Aliases
.unequip .u
Examples
.unequip sweater
.unequip glasses from face
Description
Unequips an item you currently have equipped. The unequipped item will be placed in your hand, so you must have a free hand. You can specify which equipment slot you want to unequip the item from, if you want. People in the room will see you unequip an item, regardless of its size.
unstash
Moves an inventory item into your hand.
Aliases
.unstash .retrieve .r
Examples
.unstash laptop
.retrieve sword from sheath
.unstash old key from right pocket of pants
.retrieve water bottle from side pouch of backpack
Description
Moves an inventory item from another item in your inventory into your hand. You can specify which item to remove it from, if you have multiple items with the same name. If the inventory item you choose to move it from has multiple slots for items (such as multiple pockets), you can specify which slot you want to take it from as well. If you attempt to unstash a very large item (a sword, for example), people in the room with you will see you doing so.
use
Uses an item in your inventory or an object in a room.
Aliases
.use .unlock .lock .type .activate .flip .push .press .ingest .consume .swallow .eat .drink
Examples
.use first aid kit
.eat food
.use old key chest
.use lighter candle
.lock locker
.type keypad YAMA NI NOBORU
.unlock locker 1 12-22-11
.press button
.flip lever
.use blender
Description
Uses an item from your inventory. Not all items have programmed uses. Those that do will inflict you with or cure you of a status effect of some kind. Status effects can be good, bad, or neutral, but it should be fairly obvious what kind of effect a particular item will have on you.
Some items can be used on objects. For example, using a key on a locker will unlock the locker, using a crowbar on a crate will open the crate, etc.
Some objects are capable of turning items into other items. For example, an oven can turn frozen food into cooked food. In order to use objects like this, drop the items in the object and use it.
You can even use objects in the room without using an item at all. Not all objects are usable. Anything after the name of the object will be treated as a password or combination. Passwords and combinations are case-sensitive. If the object is a lock of some kind, you can relock it using the lock command. Other objects may require a puzzle to be solved before they do anything special.
wake
Wakes you up.
Aliases
.wake
.awaken
.wakeup
Examples
.wake
.awaken
.wakeup
Description
Wakes you up when you’re asleep.
whisper
Allows you to speak privately with the selected player(s).
Aliases
.whisper
Examples
.whisper tim
.whisper katie susie tim
Description
Creates a channel for you to whisper to the selected recipients. Only you and the people you select will be able to read messages posted in the new channel, but everyone in the room will be notified that you’ve begun whispering to each other. You can select as many players as you want as long as they’re in the same room as you. When one of you leaves the room, they will be removed from the channel. If everyone leaves the room, the whisper channel will be deleted. You are required to use this when discussing the game with other players. Do not use DMs.
Eligible commands
Eligible commands are usable by users with the Eligible role (or the Tester role if Alter Ego is in debug mode). These commands have extremely limited use, only usable by Players before they’ve been given the Player role.
Eligible commands can only be used when a game is in progress. They can only be sent in the general channel (or the testing channel if debug mode is on). If Alter Ego accepts the user’s command, the message in which the command was issued will be deleted.
Below is a list of all eligible commands, as well as information about each one.
help
Lists all commands available to you.
Aliases
.help
Examples
.help
.help play
Description
Lists all commands available to the user. If a command is specified, displays the help menu for that command.
play
Joins a game.
Aliases
.play
Examples
.play
Description
Adds you to the list of players for the current game.
Moderator commands
Moderator commands are usable by users with the Moderator role. These commands allow moderators to control the game world and Players. They allow many built-in restrictions placed on Players’ actions to be bypassed.
Most moderator commands can only be used when a game is in progress, but some are able to be used when this isn’t the case. With the exception of the delete command, all moderator commands must be sent to the bot commands channel.
addplayer
Adds a player to the game.
Aliases
.addplayer
Examples
.addplayer @cella
Description
Adds a user to the list of players for the current game. This command will give the specified user the Player role and add their data to the players and inventory items spreadsheets. This will be generated using the data in the playerdefaults config file. Note that edit mode must be turned on in order to use this command. After using this command, you may edit the new Player’s data. Then, the players sheet must be loaded, otherwise the new player will not be created correctly, and their data may be overwritten.
clean
Cleans the items and inventory items sheets.
Aliases
.clean
.autoclean
Examples
.clean
.autoclean
Description
Combs through all items and inventory items and deletes any whose quantity is 0. All game data will then be saved to the spreadsheet, not just items and inventory items. This process will effectively clean the spreadsheet of items and inventory items that no longer exist, reducing the size of both sheets. Note that edit mode must be turned on in order to use this command. The items and inventory items sheets must be loaded after this command finishes executing, otherwise data may be overwritten on the sheet during gameplay.
craft
Crafts two items in a player’s inventory together.
Aliases
.craft .combine .mix
Examples
.craft chris drain cleaner and plastic bottle
.combine keiko's bread and cheese
.mix finn red vial with blue vial
.craft dayne's soap with knife
Description
Creates a new item using the two items in the given player’s hand. The prefab IDs or container identifiers of the items must be separated by “with” or “and”. If no recipe for those two items exists, the items cannot be crafted together. Note that this command can also be used to use one item on another item, which may produce something new.
createroomcategory
Creates a room category.
Aliases
.createroomcategory .register
Examples
.createroomcategory Floor 1
.register Floor 2
Description
Creates a room category channel with the given name. The ID of the new category channel will automatically be added to the roomCategories setting in the serverconfig file. If a room category with the given name already exists, but its ID hasn’t been registered in the roomCategories setting, it will automatically be added. Note that if you create a room category in Discord without using this command, you will have to add its ID to the roomCategories setting manually.
dead
Lists all dead players.
Aliases
.dead
.died
Examples
.dead
.died
Description
Lists all dead players.
delete
Deletes multiple messages at once.
Aliases
.delete
Examples
.delete 3
.delete 100
.delete @Alter Ego 5
.delete @MolSno 75
Description
Deletes multiple messages at once. You can delete up to 100 messages at a time. Only messages from the past 2 weeks can be deleted. You can also choose to only delete messages from a certain user. Note that if you specify a user and for example, 5 messages, it will not delete that user’s last 5 messages. Rather, it will search through the past 5 messages, and if any of those 5 messages were sent by the given user, they wil be deleted.
destroy
Destroys an item.
Aliases
.destroy
Examples
.destroy volleyball at beach
.destroy gasoline on shelves at warehouse
.destroy note in locker 1 at mens locker room
.destroy wrench in tool box at beach house
.destroy gloves in breast pocket of tuxedo at dressing room
.destroy all in trash can at lounge
.destroy nero's katana
.destroy yuda's glasses
.destroy vivians laptop in vivian's vivians satchel
.destroy shotput ball in cassie's main pocket of large backpack
.destroy all in hitoshi's trousers
.destroy all in charlotte's right pocket of dress
Description
Destroys an item in the specified location or in the player’s inventory. The prefab ID or container identifier of the item must be given. In order to destroy an item, the name of the room must be given, following “at”. The name of the container it belongs to can also be specified. If the container is another item, the identifier of the item or its prefab ID must be used. The name of the inventory slot to destroy the item from can also be specified.
To destroy an inventory item, the name of the player must be given followed by “’s”. A container item can also be specified, as well as which slot to delete the item from. The player will not be notified if a container item is specified. An equipment slot can also be specified instead of a container item. This will destroy whatever item is equipped to it. The player will be notified in this case, and the item’s unequipped commands will be run.
Note that using the “all” argument with a container will destroy all items in that container.
dress
Takes and equips all items from a container for a player.
Aliases
.dress .redress
Examples
.dress ezekiel wardrobe
.dress kelly laundry basket
.redress luna main pocket of backpack
Description
Takes all items from a container of your choosing and equips them for the given player, if possible. They must have a free hand to take an item. Items will be equipped in the order in which they appear on the spreadsheet. If an item is equippable to an equipment slot, but the player already has something equipped to that slot, it will not be equipped, and they will not be notified when this happens. If the container you choose has multiple inventory slots, you can specify which slot to dress from. Otherwise, the player will dress from all slots.
drop
Drops the given item from a player’s inventory.
Aliases
.drop .discard .d
Examples
.drop emily's knife
.drop veronica knife on counter
.drop colin's fish sticks in oven
.drop aria yellow key in large purse
.drop devyn wrench on top rack of tool box
Description
Forcibly drops an item for a player. The item must be in either of the player’s hands. You can specify where in the room to drop the item into by putting the name of an object or item in the room after the item. If you want to discard the item in an item with multiple inventory slots, you can specify which slot to put it in. If no object or item is specified, they will drop it on the FLOOR. This can be changed in the settings file. Only objects and item in the same room as the player can be specified.
dumplog
Dump current game state to file.
Aliases
.dumplog
Examples
.dumplog
Description
Dumps a log of the most recently used commands, as well as current internal game state. This will generate two files. The data_commands file will contain all successfully-issued commands that have been used recently, but keep in mind that the bot only stores up to 10,000 commands at a time. The data_game file will contain the entirety of the bot’s internal memory relating to the game, with certain data types being truncated when nested. Because these files can be quite large, and Discord has a maximum file size limit of 10 MiB, they will be compressed into a .gz file before being sent. If the file size exceeds this, they will instead be saved to disk.
This command is for debugging purposes, and has no use during regular gameplay. If you discover a bug that was not caused by Moderator error, please use this command and attach these files to a new Issue on the Alter Ego GitHub page.
editmode
Toggles edit mode for editing the spreadsheet.
Aliases
.editmode
Examples
.editmode
.editmode on
.editmode off
Description
Toggles edit mode on or off, allowing you to make edits to the spreadsheet. When edit mode is turned on, Alter Ego will no longer save the game to the spreadsheet automatically. Additionally, all player activity, aside from speaking in room channels or in whispers, will be disabled. Players will be notified when edit mode is enabled, so use it sparingly. Data will be saved to the spreadsheet before edit mode is enabled, so be sure to wait until the confirmation message has been sent before making any edits. When you are finished making edits, be sure to load the updated spreadsheet data before disabling edit mode.
end
Ends an event.
Aliases
.end
Examples
.end rain
.end explosion
Description
Ends the specified event. The event must be ongoing. If the event has any ended commands, they will be run.
endgame
Ends a game.
Aliases
.endgame
Examples
.endgame
Description
Ends the game. All players will be removed from whatever room channels they were in. The Player and Dead roles will be removed from all players.
equip
Equips an item for a player.
Aliases
.equip .wear .e
Examples
.equip lavris's mask
.equip keiko lab coat
.equip cara's sweater to shirt
.equip aria large purse to glasses
Description
Equips an item currently in the given player’s hand. You can specify which equipment slot you want the item to be equipped to, if you want. Any item (whether equippable or not) can be equipped to any slot using this command. People in the room will see the player equip an item, regardless of its size.
exit
Locks or unlocks an exit.
Aliases
.exit .room .lock .unlock
Examples
.exit lock carousel door
.exit unlock headmasters quarters door
.lock warehouse door 3
.unlock trial grounds elevator
Description
Locks or unlocks an exit in the specified room. The corresponding entrance in the room the exit leads to will also be locked, so that it goes both ways. When an exit is locked, players will be unable to enter the room that exit leads to, and will be unable to enter through the exit from another room. If the exit can also be locked or unlocked via a puzzle, you should NOT lock/unlock it with this command. Instead, use the puzzle command to solve/unsolve it.
gesture
Performs a gesture for the given player.
Aliases
.gesture
Examples
.gesture astrid smile
.gesture akira point at door 1
.gesture holly wave johnny
Description
Makes the given player perform one of a set of predefined gestures. Everybody in the room with them will see them do
this gesture. Certain gestures may require a target to perform them. For example, a gesture might require you specify an
Exit, an Object, another Player, etc. A gesture can only be performed with one target at a time. Gestures can be made
impossible if the given player is inflicted with certain Status Effects. For example, if they are concealed, they cannot
smile, frown, etc. as nobody would be able to see it. To see a list of all possible gestures, send .gesture list.
give
Gives a player’s item to another player.
Aliases
.give .g
Examples
.give vivian's yellow key to aria
.give natalie night vision goggles to shiori
Description
Transfers an item from the first player’s inventory to the second player’s inventory. Both players must be in the same room. The item selected must be in one of the first player’s hands. The receiving player must also have a free hand, or else they will not be able to receive the item. If a particularly large item (a chainsaw, for example) is given, people in the room with you will see the player giving it to the recipient.
help
Lists all commands available to you.
Aliases
.help
Examples
.help
.help status
Description
Lists all commands available to the user. If a command is specified, displays the help menu for that command.
hide
Hides a player in the given object.
Aliases
.hide .unhide
Examples
.hide nero beds
.hide cleo bleachers
.unhide scarlet
Description
Forcibly hides a player in the specified object. They will be able to hide in the specified object even if it is attached to a lock-type puzzle that is unsolved, and even if the hiding spot is beyond its capacity. To force them out of hiding, use the unhide command.
inspect
Inspects something for a player.
Aliases
.inspect .investigate .examine .look .x
Examples
.inspect akio desk
.examine florian knife
.look florian knife on desk
.x florian knife in main pouch of red backpack 1
.investigate blake blake's knife
.look jun amadeus
.examine nestor jae-seong
.look roma lain's glasses
.x haruka binita's shirt
.inspect ambrosia room
Description
Inspect something for the given player. The target must be the “room” argument, an object, an item, a player, or an inventory item, and it must be in the same room as the given player. The description will be parsed and sent to the player in DMs. If the target is an object, or a non-discreet item or inventory item, a narration will be sent about the player inspecting it to the room channel. Items and inventory items should use the prefab ID or container identifier. If there are multiple items in the room with the same ID, you can specify which one to inspect using its container’s name (if the container is an object or puzzle), or its prefab ID or container identifier (if it’s an item). The player can be forced to inspect items and inventory items belonging to a specific player (including themself) using the player’s name followed by “’s”. If inspecting a different player’s inventory items, a narration will not be sent.
instantiate
Generates an item.
Aliases
.instantiate .create .generate
Examples
.instantiate raw fish on floor at beach
.create pickaxe in locker 1 at mining hub
.generate 3 empty drain cleaner in cupboards at kitchen
.instantiate green book in main pocket of large backpack 1 at dorm library
.create 4 screwdriver in tool box at beach house
.instantiate gacha capsule (color=metal + character=upa) in gacha slot at arcade
.generate katana in nero's right hand
.instantiate gorilla mask on seamus's face
.create laptop in vivian's vivians satchel
.generate 2 shotput ball in cassie's main pocket of large backpack
.instantiate 3 capsulebeast card (species=lavazard) in asuka's left pocket of gamer hoodie
Generates an item or inventory item in the specified location. The prefab ID must be used. A quantity can also be set. If the prefab has procedural options, they can be manually set in parentheses.
To instantiate an item, the name of the room must be given at the end, following “at”. The name of the container to put it in must also be given. If the container is an object with a child puzzle, the puzzle will be its container. If the container is another item, the item’s name or container identifier can be used. The name of the inventory slot to instantiate the item in can also be specified.
To instantiate an inventory item, the name of the player must be given followed by “’s”. A container item can be specified, as well as which slot to instantiate the item into. The player will not be notified if a container item is specified. An equipment slot can also be chosen instead of a container item. The player will be notified of obtaining the item in this case, and the prefab’s equipped commands will be run.
inventory
Lists a given player’s inventory.
Aliases
.inventory .i
Examples
.inventory nero
Description
Lists the given player’s inventory.
kill
Makes a player dead.
Aliases
.kill .die
Examples
.kill chris
.die micah joshua amber devyn veronica
Description
Moves the listed players from the living list to the dead list. The player will be removed from whatever room channel they’re in as well as any whispers. A dead player will retain any items they had in their inventory, but they will not be accessible unless they are manually added to the spreadsheet. A dead player will retain the Player role. When a dead player’s body is officially discovered, use the reveal command to remove the Player role and give them the Dead role.
knock
Knocks on a door for a player.
Aliases
.knock
Examples
.knock kanda door 1
Description
Knocks on a door for the given player
living
Lists all living players.
Aliases
.living
.alive
Examples
.living
.alive
Description
Lists all living players.
load
Loads game data.
Aliases
.load .reload .gethousedata
Examples
.load all start
.load all resume
.load all
.load rooms
.load objects
.load prefabs
.load recipes
.load items
.load puzzles
.load events
.load status effects
.load players
.load inventories
.load gestures
Description
Gathers the game data by reading it off the spreadsheet. Can specify what data to collect. “all start” must be used at the beginning of the game after the startgame timer is over, as it will gather all the data and send the room description of the room they start in to each player. If at any point you restart the bot, use “all resume”. Any data that was previously gathered will be updated. Any data you edit manually, including descriptions, will require use of this command.
location
Tells you a player’s location.
Aliases
.location
Examples
.location faye
Description
Tells you the given player’s location, with a link to the channel.
move
Moves the given player(s) to the specified room or exit.
Aliases
.move .go .enter .walk .m
Examples
.move joshua door 2
.move val amber devyn trial grounds
.move living diner
.move all elevator
Description
Forcibly moves the specified players to the specified room or exit. If you use “living” or “all” in place of the players, it will move all living players to the specified room (skipping over players who are already in that room as well as players with the Headmaster role). All of the same things that happen when a player moves to a room of their own volition apply, however you can move players to non-adjacent rooms this way. The bot will not announce which exit the player leaves through or which entrance they enter from when a player is moved to a non-adjacent room.
object
Activates or deactivates an object.
Aliases
.object .activate .deactivate
Examples
.object activate blender
.object deactivate microwave
.activate keurig kyra
.deactivate oven noko
.object activate fireplace log cabin
.object deactivate fountain flower garden
.activate freezer zoran "Zoran plugs in the FREEZER."
.deactivate washer 1 laundry room "WASHER 1 turns off"
Description
Activates or deactivates an object. You may specify a player to activate/deactivate the object. If you do, players in the room will be notified, so you should generally give a string for the bot to use, otherwise the bot will say “[player] turns on/off the [object].” which may not sound right. If you specify a player, only objects in the room that player is in can be activated/deactivated. You can also use a room name instead of a player name. In that case, only objects in the room you specify can be activated/deactivated. This is useful if you have multiple objects with the same name spread across the map. This command can only be used for objects with a recipe tag. If there is a puzzle with the same name as the object whose state is supposed to be the same as the object, use the puzzle command to update it as well.
occupants
Lists all occupants in a room.
Aliases
.occupants .o
Examples
.occupants floor-b1-hall-1
.o ultimate conference hall
Description
Lists all occupants currently in the given room. If an occupant is in the process of moving, their move queue will be
included, along with the time remaining until they reach the next room in their queue. Note that the displayed time
remaining will not be adjusted according to the heatedSlowdownRate setting. If a player in the game has the heated
status effect, movement times for all players will be displayed as shorter than they actually are. Occupants with the
hidden behavior attributes will also be listed alongside their hiding spots.
ongoing
Lists all ongoing events.
Aliases
.ongoing
.events
Examples
.ongoing
.events
Description
Lists all events which are currently ongoing, along with the time remaining on each one, if applicable.
online
Lists all online players.
Aliases
.online
Examples
.online
Description
Lists all players who are currently online.
puzzle
Solves or unsolves a puzzle.
Aliases
.puzzle .solve .unsolve .attempt
Examples
.puzzle solve button
.puzzle unsolve keypad
.solve binder taylor
.unsolve lever colin
.solve computer PASSWORD1
.solve computer PASSWORD2
.puzzle solve keypad tool shed
.puzzle unsolve lock men's locker room
.solve paintings emily "Emily removes the PAINTINGS from the wall."
.unsolve lock men's locker room "The LOCK on LOCKER 1 locks itself"
.puzzle attempt cyptex lock 05-25-99 scarlet
Description
Solves or unsolves a puzzle. You may specify an outcome, if the puzzle has more than one solution. You may specify a player to solve the puzzle. If you do, players in the room will be notified, so you should generally give a string for the bot to use, otherwise the bot will say “[player] uses the [puzzle].” which may not sound right. If you specify a player, only puzzles in the room that player is in can be solved/unsolved. Additionally, if you specify a player, you can make them attempt to solve a puzzle. You can also use a room name instead of a player name. In that case, only puzzles in the room you specify can be solved/unsolved. This is useful if you have multiple puzzles with the same name spread across the map. This should generally only be used for puzzles which require moderator intervention.
restore
Restores a player’s stamina.
Aliases
.restore
Examples
.restore flint
Description
Sets the given player’s stamina to its maximum value. Note that this does not automatically cure the weary status effect.
reveal
Gives a player the Dead role.
Aliases
.reveal
Examples
.reveal chris
.reveal micah joshua amber devyn veronica
Description
Removes the Player role from the listed players and gives them the Dead role. All listed players must be dead.
roll
Rolls a die.
Aliases
.roll
Examples
.roll
.roll int colin
.roll faye devyn
.roll str seamus terry
.roll strength shinobu shiori
.roll sta evad
.roll dexterity agiri
Description
Rolls a d6. If a stat and a player are specified, calculates the result plus the modifier of the player’s specified
stat. If two players are specified, any status effects the second player has which affect the first player will be
applied to the first player, whose stats will be recalculated before their stat modifier is applied. Additionally, if a
strength roll is performed using two players, the second player’s dexterity stat will be inverted and applied to the
first player’s roll. Any modifiers will be mentioned in the result, but please note that the result sent has already had
the modifiers applied. Valid stat inputs include: str, strength, int, intelligence, dex, dexterity, spd,
speed, sta, stamina.
save
Saves the game data to the spreadsheet.
Aliases
.save
Examples
.save
Description
Manually saves the game data to the spreadsheet. Ordinarily, game data is automatically saved to the spreadsheet every 30 seconds, as defined in the settings file. However, this command allows you to save at any time, even when edit mode is enabled.
say
Sends a message.
Aliases
.say
Examples
.say #park Hello. My name is Alter Ego.
.say #general Thank you for speaking with me today.
.say amy One appletini, coming right up.
Description
Sends a message. A channel or player must be specified. Messages can be sent to any channel, but if it is sent to a room channel, it will be treated as a narration so that players with the “see room” attribute can see it. If the name of a player is specified and that player has the talent “NPC”, the player will speak in the channel of the room they’re in. Their dialog will be treated just like that of any normal player’s. The image URL set in the player’s Discord ID will be used for the player’s avatar.
set
Sets an object, puzzle, or set of items as accessible or inaccessible.
Aliases
.set
Examples
.set accessible puzzle button
.set inaccessible object terminal
.set accessible object keypad tool shed
.set accessible object items medicine cabinet
.set inaccessible puzzle items lock men's locker room
Description
Sets an object, puzzle, or set of items as accessible or inaccessible. You have to specify whether to set an object or puzzle, even if you want to set a set of items. When you use the optional “items” argument, it will set all of the items contained in that object or puzzle as accessible/inaccessible at once. Individual items cannot be set. You can also specify a room name. If you do, only object/items/puzzles in the room you specify can be set as accessible/ inaccessible. This is useful if you have multiple objects or puzzles with the same name spread across the map.
setdest
Updates an exit’s destination.
Aliases
.setdest
Examples
.setdest corolla DOOR wharf VEHICLE
.setdest motor boat PORT docks BOAT
.setdest wharf MOTOR BOAT wharf MOTOR BOAT
Description
Replaces the destination for the specified room’s exit. Given the following initial room setup:
Room Name|Exits |Leads To|From
---------------------------------
room-1   |EXIT A|room-2  | EXIT B
---------------------------------
room-2   |EXIT B|room-1  | EXIT A
	 |EXIT C|room-3  | EXIT D
---------------------------------
room-3   |EXIT D|room-2  | EXIT C
If the destination for room-1’s EXIT A is set to room-3’s EXIT D, players passing through EXIT A would emerge from EXIT D from that point onward. The Rooms sheet will be updated to reflect the updated destination, like so:
room-1   |EXIT A|room-3  | EXIT D
---------------------------------
...
---------------------------------
room-3   |EXIT D|room-1  | EXIT A
Note that this will leave room-2’s EXIT B and EXIT C without exits that lead back to them, which will result in errors next time rooms are loaded. To prevent this, this command should be used sparingly, and all affected exits should have their destinations reassigned.
setdisplayicon
Sets a player’s display icon.
Aliases
.setdisplayicon
Examples
.setdisplayicon kyra https://cdn.discordapp.com/attachments/697623260736651335/912103115241697301/mm.png
.setdisplayicon kyra
Description
Sets the icon that will display when the given player’s dialog appears in spectator channels. It will also appear in Room channels when the player uses the say command. The icon given must be a URL with a .jpg or .png extension. When player data is reloaded, their display icon will be reverted to their Discord avatar. Note that if the player is inflicted with or cured of a status effect with the concealed attribute, their display icon will be updated, thus overwriting one that was set manually. However, this command can be used to overwrite their new display icon afterwards as well. Note that this command will not change the player’s avatar when they send messages to Room channels normally. To reset a player’s display icon to their Discord avatar, simply do not specify a new display icon.
setdisplayname
Sets a player’s display name.
Aliases
.setdisplayname
Examples
.setdisplayname usami Monomi
.setdisplayname faye An individual wearing a MINOTAUR MASK
Description
Sets the name that will display whenever the given player does something in-game. This will not change their name on the spreadsheet, and when player data is reloaded, their display name will be reverted to their true name. Note that if the player is inflicted with or cured of a status effect with the concealed attribute, their display name will be updated, thus overwriting one that was set manually. However, this command can be used to overwrite their new display name afterwards as well. Note that this command will not change the player’s nickname in the server.
setpronouns
Sets a player’s pronouns.
Aliases
.setpronouns
Examples
.setpronouns sadie female
.setpronouns roma neutral
.setpronouns platt male
.setpronouns monokuma it/it/its/its/itself/false
.setpronouns sadie she/her/her/hers/herself/false
.setpronouns roma they/them/their/theirs/themself/true
.setpronouns platt he/him/his/his/himself/false
Description
Sets the pronouns that will be used in the given player’s description and other places where pronouns are used. This
will not change their pronouns on the spreadsheet, and when player data is reloaded, their pronouns will be reverted to
their original pronouns. Note that if the player is inflicted with or cured of a status effect with the concealed
attribute, their pronouns will be updated, thus overwriting the ones that were set manually. However, this command can
be used to overwrite their new pronouns afterwards as well. Temporary custom pronoun sets can be applied with this
method. They must adhere to the following format:
subjective/objective/dependent possessive/independent possessive/reflexive/plural.
setupdemo
Sets up a demo game.
Aliases
.setupdemo
Examples
.setupdemo
Description
Populates an empty spreadsheet with default game data as defined in the demodata config file. This will create a game environment to demonstrate most of the basics of Neo World Program gameplay. By default, it will generate 2 rooms, 8 objects, 14 prefabs, 3 recipes, 3 items, 1 puzzle, 1 event, 13 status effects, and 6 gestures. If the channels for the demo game’s rooms don’t exist, they will be created automatically. It will not create any players for you. Once this command is used you can use the .startgame command to add players, or manually add them on the spreadsheet. It is recommended that you have at least one other Discord account to use as a player. Once the spreadsheet has been fully populated, you can use .load all start to begin the demo. If there is already data on the spreadsheet, it will be overwritten. Only use this command if the spreadsheet is currently blank.
setvoice
Sets a player’s voice.
Aliases
.setvoice
Examples
.setvoice kyra a deep modulated voice
.setvoice spektrum a high digitized voice
.setvoice persephone multiple overlapping voices
.setvoice ghost a disembodied voice
.setvoice typhos pollux
.setvoice nero haru
.setvoice kyra
Description
Sets a player’s voice descriptor that will be used when the player uses the .say command or speaks in a room with a player who can’t view the room channel. This will not change their voice descriptor on the spreadsheet, and when player data is reloaded, their voice descriptor will be reverted to what appears on the spreadsheet. You can also supply another player’s name instead of a voice descriptor. In this case, the first player’s voice will sound exactly like the second player’s, which they can use to deceive other players. Note that unlike other commands which change a player’s characteristics, the player’s voice will not be changed by being inflicted or cured of a status effect with the concealed attribute. If this command is used to change a character’s voice, it must be used again to change it back to normal. It can be reset to their original voice descriptor by omitting a voice descriptor in the commands.
startgame
Starts a game.
Aliases
.startgame .start
Examples
.startgame 24h
.start 0.25m
Description
Starts a new game. You must specify a timer using either hours (h) or minutes (m). During this time, any players with the Eligible role will be able to join using the PLAY command, at which point they will be given the Player role. When the timer reaches 0, all of the players will be uploaded to the Players spreadsheet. After making any needed modifications, use “.load all start” to begin the game.
stash
Stores a player’s inventory item inside another inventory item.
Aliases
.stash .store .s
Examples
.stash vivian laptop in satchel
.store nero's sword in sheath
.stash antimony's old key in right pocket of pants
.store cassie water bottle in side pouch of backpack
Description
Moves an item from the given player’s hand to another item in their inventory. You can specify any item in their inventory that has the capacity to hold items. If the inventory item you choose has multiple slots for items (such as multiple pockets), you can specify which slot you want to store the item in. Note that each slot has a maximum capacity that it can hold, so if it’s too full or too small to contain the item you’re trying to stash, you won’t be able to stash it there. If you attempt to stash a very large item (a sword, for example), people in the room with the player will see them doing so.
stats
Lists a given player’s stats.
Aliases
.stats
Examples
.stats ayaka
Description
Lists the given player’s default and current stats, as well as the roll modifiers they have based on each current stat. The maximum weight the player can carry will be listed, as well as how much weight they are currently carrying. Additionally, the player’s current maximum stamina will be listed, as this can differ if the player is inflicted with any status effects that modify the stamina stat.
status
Deals with status effects on players.
Aliases
.status .inflict .cure .view
Examples
.status add mari heated
.inflict yume heated
.status add aki saay yuko haru asleep
.inflict all deafened
.status remove flint injured
.cure elijah injured
.status remove astrid ryou juneau drunk
.cure living asleep
.status view jordan
.view jordan
Description
Deals with status effects on players.
-add/inflict: Inflicts the specified players with the given status effect. Those players will receive the “Message When Inflicted” message for the specified status effect. If the status effect has a timer, the players will be cured and then inflicted with the status effect in the “Develops Into” column when the timer reaches 0. If the status effect is fatal, then they will simply die when the timer reaches 0 instead.
-remove/cure: Cures the specified players of the given status effect. Those players will receive the “Message When Cured” message for the specified status effect. If the status effect develops into another effect when cured, the players will be inflicted with that status effect.
-view: Views all of the status effects that a player is currently afflicted with, along with the time remaining on each one, if applicable.
tag
Adds, removes, or lists a room’s tags.
Aliases
tag addtag removetag tags
Examples
tag add kitchen video surveilled
tag remove kitchen audio surveilled
addtag vault soundproof
removetag freezer cold
addtag command-center video monitoring, audio monitoring
removetag command-center video monitoring, audio monitoring
tag list kitchen
tags kitchen
Description
-add/addtag: Adds a comma-separated list of tags to the given room. Events that affect rooms with that tag will immediately apply to the given room, and any tags that give a room special behavior will immediately activate those functions.
-remove/removetag: Removes a comma-separated list of tags from the given room. Events that affect rooms with that tag will immediately stop applying to the given room, and any tags that give a room special behavior will immediately stop functioning.
-list/tags: Displays the list of tags currently applied to the given room.
take
Takes the given item for a player.
Aliases
.take .get .t
Examples
.take nero food
.take livida food from floor
.take cleo sword from desk
.take taylor hammer from tool box
.take aria green key from large purse
.take veronica game system from main pocket of backpack
Description
Forcibly takes an item for a player. The player must have a free hand to take an item. You can specify which object or item to take the item from, but only items in the same room as the player can be taken. Additionally, if the item is contained in another item with multiple inventory slots (such as pockets), you can specify which slot to take it from.
testparser
Tests the parsing module on your descriptions.
Aliases
.testparser
Examples
.testparser parse
.testparser parse nero
.testparser add
.testparser add vivian
.testparser add formatted
.testparser remove
.testparser remove aria
.testparser remove formatted
Description
Tests the parsing algorithm responsible for interpreting and editing descriptions. Sends the results as a text file to the command channel. If testing the add or remove function, you can add “formatted” to display the formatted descriptions. Otherwise, it will display the parsed versions. For all functions, you can input a player name to parse the text as if that player is reading it. Note that if using the “formatted” argument, a player name cannot be used. This command should be used to make sure you’ve written properly formatted descriptions.
-parse: Outputs the formatted and parsed descriptions.
-add: Goes through each object, item, puzzle, player, and inventory item description with item containers and adds random items.
-remove: Goes through each room, object, item, puzzle, player, and inventory item description with items and removes each item in the list. In “formatted” mode, items will be removed in every possible order. However, it will only remove up to 4 items in a description.
testspeeds
Checks the move times between each exit.
Aliases
.testspeeds
Examples
.testspeeds players
.testspeeds stats
Description
Tests the amount of time it takes to move between every exit in the game. Sends the results as a text file to the command channel. An argument must be provided. If the “players” argument is given, then the move times will be calculated for each player in the game. Note that the weight of any items the players are carrying will affect their calculated speed. If the “stats” argument is given, then the move times will be calculated for hypothetical players with speed from 1-10.
text
Sends a text message from an NPC.
Aliases
.text
Examples
.text amy florian I work at the bar.
.text amy florian Here's a picture of me at work. (attached image)
.text ??? keiko This is a message about your car's extended warranty.
.text ??? hibiki (attached image)
Description
Sends a text message from the first player to the second player. The first player must have the talent “NPC”. If an image is attached, it will be sent as well.
trigger
Triggers an event.
Aliases
.trigger
Examples
.trigger rain
.trigger explosion
Description
Triggers the specified event. The event must not already be ongoing. If the event has any triggered commands, they will be run.
uncraft
Separates an item in a player’s inventory into its component parts.
Aliases
.uncraft .dismantle .disassemble
Examples
.uncraft olavi shovel
.dismantle avani crossbow
.disassemble juno pistol
Description
Separates an item in one of the given player’s hands into its component parts, assuming they can be separated. This reverses the process of a crafting recipe, using the product of the recipe as an ingredient, and creating its ingredients as products. This will produce two items, so they will need a free hand in order for this command to be usable. If there is no crafting recipe that produces the supplied item which allows it to be uncrafted again, this command cannot be used.
undress
Unequips and drops all items for a player.
Aliases
.undress
Examples
.undress haru
.undress yuko locker 1
.undress aki laundry basket
.undress stella main pocket of backpack
Description
Unequips all items the given player has equipped and drops them into a container of your choosing. If no container is chosen, then items will be dropped on the FLOOR. The given container must have a large enough capacity to hold all of the items in the given player’s inventory. This command will also drop any items in their hands.
unequip
Unequips an item for a player.
Aliases
.unequip .u
Examples
.unequip lavris's mask
.unequip keiko lab coat
.unequip cara's sweater from shirt
.unequip aria large purse from glasses
Description
Unequips an item the given player currently has equipped. The unequipped item will be placed in one of the player’s free hands. You can specify which equipment slot you want the item to be unequipped from. Any item can be unequipped, whether it’s equippable or not. People in the room will see the player unequip an item, regardless of its size.
unstash
Moves an inventory item into a player’s hand.
Aliases
.unstash .retrieve .r
Examples
.unstash vivian's laptop
.retrieve nero sword from sheath
.unstash antimony's old key from right pocket of pants
.retrieve cassie water bottle from side pouch of backpack
Description
Moves a player’s inventory item from another item in their inventory into their hand. You can specify which item to remove it from, if they have multiple items with the same name. If the inventory item you choose to move it from has multiple slots for items (such as multiple pockets), you can specify which slot you want to take it from as well. If you attempt to unstash a very large item (a sword, for example), people in the room with the player will see them doing so.
use
Uses an item in the given player’s inventory.
Aliases
.use
Examples
.use princeton first aid kit
.use celia's food
.use pollux first aid spray ximena "Pollux uncaps and applies a can of FIRST AID SPRAY to Ximena's wounds."
.use ayaka's black lipstick on wynne "Ayaka applies a tube of BLACK LIPSTICK to Wynne's lips."
Description
Uses an item in one of the given player’s hands. You can specify a second player for the first player to use their item on. If you do, players in the room will be notified, so you should generally give a string for the bot to use, otherwise the bot will say “[player] uses [item single containing phrase] on [target].” which may not sound right. Both players must be in the same room. If no second player is given, the first player will use the item on themself. Note that you cannot solve puzzles using this command. To do that, use the puzzle command.
whisper
Initiates a whisper with the given players.
Aliases
.whisper
Examples
.whisper nestor jun
.whisper sadie elijah flint
.whisper amy hibiki Clean it up.
.whisper amy hibiki The mess you made. Clean it up now.
Description
Creates a channel for the given players to speak in. Only the selected players will be able to read messages posted in the new channel, but everyone in the room will be notified that they’ve begun whispering to each other. You can select as many players as you want as long as they’re all in the same room. When a player in the whisper leaves the room, they will be removed from the channel. If everyone leaves the room, the whisper channel will be deleted. If one of the players listed has the talent “NPC”, the remaining string after the list of players will be sent in the whisper channel. Once the channel is created, NPC players can only speak in the whisper using this command and the list of players in the whisper.
Bot Commands
Bot commands are not usable by any Discord user. These commands are passed into the commandHandler module directly by Alter Ego. Their purpose is to allow greater flexibility in behavior for Prefabs, Events, and Puzzles. They allow many built-in restrictions placed on Players’ actions to be bypassed.
Bot commands can only be used when a game is in progress. They can only be entered on the spreadsheet. Unlike other commands, bot commands must not start with the commandPrefix. Bot commands which act upon Players generally have three different arguments that can be used in place of a Player’s name, but this isn’t always the case.
These arguments are:
player- The command will act on the Player who caused the command to be executed. For Prefabs, this is the Player who equipped/unequipped the Inventory Item. For Puzzles, this is the Player who solved/unsolved the Puzzle.
room- The command will act on all Players in the same Room as the Player who caused the command to be executed. Alternatively, for Events, this is all Players in all Rooms affected by the Event.
all- The command will act on all living Players, except for NPCs and Players with the Headmaster role.
destroy
Destroys an item.
Aliases
destroy
Examples
destroy volleyball at beach
destroy gasoline on shelves at warehouse
destroy note in locker 1 at mens locker room
destroy wrench in tool box at beach house
destroy gloves in breast pocket of tuxedo at dressing room
destroy all in trash can at lounge
destroy player keyboard
destroy all face
destroy vivians laptop in vivian's vivians satchel
destroy shotput ball in cassie's main pocket of large backpack
destroy all in hitoshi's trousers
destroy all in charlotte's right pocket of dress
Description
Destroys an item in the specified location or in the player’s inventory. The prefab ID or container identifier of the item must be given. In order to destroy an item, the name of the room must be given, following “at”. The name of the container it belongs to can also be specified. If the container is another item, the identifier of the item or its prefab ID must be used. The name of the inventory slot to destroy the item from can also be specified.
To destroy an inventory item, “player”, “room”, “all”, or the name of a player followed by “’s”, must be given. A container item can also be specified, as well as which slot to delete the item from. The player will not be notified if a container item is specified. An equipment slot can also be specified instead of a container item. This will destroy whatever item is equipped to it. The player will be notified in this case, and the item’s unequipped commands will be run.
Note that using the “all” argument with a container will destroy all items in that container.
end
Ends an event.
Aliases
end
Examples
end rain
end explosion
Description
Ends the specified event. The event must be ongoing. If it isn’t, nothing will happen. If the event has any ended commands, they will not be run if they were passed by another event. They will be run if they were passed by anything else, however.
exit
Locks or unlocks an exit.
Aliases
exit room lock unlock
Examples
exit lock carousel door
exit unlock headmasters quarters door
lock warehouse door 3
unlock trial grounds elevator
Description
Locks or unlocks an exit in the specified room. The corresponding entrance in the room the exit leads to will also be locked, so that it goes both ways. When an exit is locked, players will be unable to enter the room that exit leads to, and will be unable to enter through the exit from another room.
instantiate
Generates an item.
Aliases
instantiate create generate
Examples
instantiate raw fish on floor at beach
create pickaxe in locker 1 at mining hub
generate 3 empty drain cleaner in cupboards at kitchen
instantiate green book in main pocket of large backpack 1 at dorm library
create 4 screwdriver in tool box at beach house
instantiate gacha capsule (color=metal + character=upa) in gacha slot at arcade
generate katana in player right hand
instantiate monokuma mask on all face
create laptop in vivian's vivians satchel
generate 2 shotput ball in cassie's main pocket of large backpack
instantiate 3 capsulebeast card (species=lavazard) in asuka's left pocket of gamer hoodie
Description
Generates an item or inventory item in the specified location. The prefab ID must be used. A quantity can also be set. If the prefab has procedural options, they can be manually set in parentheses.
To instantiate an item, the name of the room must be given at the end, following “at”. The name of the container to put it in must also be given. If the container is an object with a child puzzle, the puzzle will be its container. If the container is another item, the item’s name or container identifier can be used. The name of the inventory slot to instantiate the item in can also be specified.
To instantiate an inventory item, “player”, “room”, “all”, or the name of a player followed by “’s”, must be given. A container item can be specified, as well as which slot to instantiate the item into. The player will not be notified if a container item is specified. An equipment slot can also be chosen instead of a container item. The player will be notified of obtaining the item in this case, and the prefab’s equipped commands will be run.
kill
Makes a player dead.
Aliases
kill die
Examples
kill natalie
die shiori corin terry andrew aria
kill player
die room
Description
Moves the listed players from the living list to the dead list. The player will be removed from whatever room channel they’re in as well as any whispers. A dead player will retain any items they had in their inventory, but they will not be accessible unless they are manually added to the spreadsheet. A dead player will retain the Player role. When a dead player’s body is officially discovered, use the reveal command to remove the Player role and give them the Dead role. If you use “player” in place of a list of players, then the player who triggered the command will be killed. If the “room” argument is used instead, then all players in the room will be killed.
move
Moves the given player(s) to the specified room.
Aliases
move
Examples
move susie main-office
move player general-managers-office
move player cafeteria
move room trial-grounds
move all elevator
Description
Forcibly moves the specified player to the specified room. If you use “all” in place of the player, it will move all living players to the specified room (skipping over players who are already in that room as well as players with the Headmaster role). If you use “player” in place of the player, then the player who triggered the command will be moved. If you use “room” instead, all players in the room will be moved. All of the same things that happen when a player moves to a room of their own volition apply, however you can move players to non-adjacent rooms this way. The bot will not announce which exit the player leaves through or which entrance they enter from when a player is moved to a non-adjacent room.
object
Activates or deactivates an object.
Aliases
object activate deactivate
Examples
object activate blender
object deactivate microwave
activate keurig kyra
deactivate oven noko
object activate fireplace log cabin
object deactivate fountain flower garden
activate freezer zoran "Zoran plugs in the FREEZER."
deactivate washer 1 laundry room "WASHER 1 turns off"
Description
Activates or deactivates an object. You may specify a player to activate/deactivate the object. If you do, players in the room will be notified, so you should generally give a string for the bot to use, otherwise the bot will say “[player] turns on/off the [object].” which may not sound right. If you specify a player, only objects in the room that player is in can be activated/deactivated. You can also use a room name instead of a player name. In that case, only objects in the room you specify can be activated/deactivated. This is useful if you have multiple objects with the same name spread across the map. This command can only be used for objects with a recipe tag. If there is a puzzle with the same name as the object whose state is supposed to be the same as the object, use the puzzle command to update it as well.
puzzle
Solves or unsolves a puzzle.
Aliases
puzzle solve unsolve attempt
Examples
puzzle solve button
puzzle unsolve keypad
solve binder taylor
unsolve lever colin
solve computer PASSWORD1
solve computer PASSWORD2
puzzle solve keypad tool shed
puzzle unsolve lock men's locker room
solve paintings player "player removes the PAINTINGS from the wall."
unsolve lock men's locker room "The LOCK on LOCKER 1 locks itself"
puzzle attempt cyptex lock 05-25-99 player
Description
Solves or unsolves a puzzle. You may specify an outcome, if the puzzle has more than one solution. You may specify a player to solve the puzzle. If you do, players in the room will be notified, so you should generally give a string for the bot to use, otherwise the bot will say “[player] uses the [puzzle].” which may not sound right. If you specify a player, only puzzles in the room that player is in can be solved/unsolved. Additionally, if you specify a player, you can make them attempt to solve a puzzle. If you use “player” in place of the player, then the player who triggered the command will be the one to solve/unsolve the puzzle. It will also do the same in the string, if one is specified. You can also use a room name instead of a player name. In that case, only puzzles in the room you specify can be solved/unsolved. This is useful if you have multiple puzzles with the same name spread across the map.
set
Sets an object, puzzle, or set of items as accessible or inaccessible.
Aliases
set
Examples
set accessible puzzle button
set inaccessible object terminal
set accessible object keypad tool shed
set accessible object items medicine cabinet
set inaccessible puzzle items lock men's locker room
Description
Sets an object, puzzle, or set of items as accessible or inaccessible. You have to specify whether to set an object or puzzle, even if you want to set a set of items. When you use the optional “items” argument, it will set all of the items contained in that object or puzzle as accessible/inaccessible at once. Individual items cannot be set. You can also specify a room name. If you do, only object/items/puzzles in the room you specify can be set as accessible/ inaccessible. This is useful if you have multiple objects or puzzles with the same name spread across the map.
setdest
Updates an exit’s destination.
Aliases
setdest
Examples
setdest corolla DOOR wharf VEHICLE
setdest motor boat PORT docks BOAT
setdest wharf MOTOR BOAT wharf MOTOR BOAT
Description
Replaces the destination for the specified room’s exit. Given the following initial room setup:
Room Name|Exits |Leads To|From
---------------------------------
room-1   |EXIT A|room-2  | EXIT B
---------------------------------
room-2   |EXIT B|room-1  | EXIT A
	 |EXIT C|room-3  | EXIT D
---------------------------------
room-3   |EXIT D|room-2  | EXIT C
If the destination for room-1’s EXIT A is set to room-3’s EXIT D, players passing through EXIT A would emerge from EXIT D from that point onward. The Rooms sheet will be updated to reflect the updated destination, like so:
room-1   |EXIT A|room-3  | EXIT D
---------------------------------
...
---------------------------------
room-3   |EXIT D|room-1  | EXIT A
Note that this will leave room-2’s EXIT B and EXIT C without exits that lead back to them, which will result in errors next time rooms are loaded. To prevent this, this command should be used sparingly, and all affected exits should have their destinations reassigned.
setdisplayicon
Sets a player’s display icon.
Aliases
setdisplayicon
Examples
setdisplayicon kyra https://cdn.discordapp.com/attachments/697623260736651335/912103115241697301/mm.png
setdisplayicon player https://cdn.discordapp.com/attachments/697623260736651335/911381958553128960/questionmark.png
setdisplayicon player
Description
Sets the icon that will display when the given player’s dialog appears in spectator channels. It will also appear in Room channels when the player uses the say command. The icon given must be a URL with a .jpg or .png extension. When player data is reloaded, their display icon will be reverted to their Discord avatar. Note that if the player is inflicted with or cured of a status effect with the concealed attribute, their display icon will be updated, thus overwriting one that was set manually. However, this command can be used to overwrite their new display icon afterwards as well. Note that this command will not change the player’s avatar when they send messages to Room channels normally. If you use “player” in place of a player’s name, then the player who triggered the command will have their display icon changed. To reset a player’s display icon to their Discord avatar, simply do not specify a new display icon.
setdisplayname
Sets a player’s display name.
Aliases
setdisplayname
Examples
setdisplayname usami Monomi
setdisplayname player An individual wearing a MINOTAUR MASK
setdisplayname player
Description
Sets the name that will display whenever the given player does something in-game. This will not change their name on the spreadsheet, and when player data is reloaded, their display name will be reverted to their true name. Note that if the player is inflicted with or cured of a status effect with the concealed attribute, their display name will be updated, thus overwriting one that was set manually. However, this command can be used to overwrite their new display name afterwards as well. Note that this command will not change the player’s nickname in the server. If you use “player” in place of a player’s name, then the player who triggered the command will have their display name changed. To reset a player’s display name to their real name, simply do not specify a new display name.
setpos
Sets a player’s position.
Aliases
setpos
Examples
setpos player 200 5 350
setpos room 400 -10 420
setpos vivian x 350
setpos player y 10
setpos all z 250
Description
Sets the specified player’s position. If the “player” argument is used in place of a name, then the player who triggered the command will have their position updated. If the “room” argument is used instead, then all players in the same room as the player who triggered the command will have their positions updated. Lastly, if the “all” argument is used, then all players will have their positions updated. You can set individual coordinates with the “x”, “y”, or “z” arguments and the value to set it to. Otherwise, a space-separated list of coordinates in the order x y z must be given.
setpronouns
Sets a player’s pronouns.
Aliases
setpronouns
Examples
setpronouns sadie female
setpronouns roma neutral
setpronouns platt male
setpronouns monokuma it\it\its\its\itself\false
setpronouns player she\her\her\hers\herself\false
setpronouns player they\them\their\theirs\themself\true
setpronouns player he\him\his\his\himself\false
Description
Sets the pronouns that will be used in the given player’s description and other places where pronouns are used. This
will not change their pronouns on the spreadsheet, and when player data is reloaded, their pronouns will be reverted to
their original pronouns. Note that if the player is inflicted with or cured of a status effect with the concealed
attribute, their pronouns will be updated, thus overwriting the ones that were set manually. However, this command can
be used to overwrite their new pronouns afterwards as well. Temporary custom pronoun sets can be applied with this
method. They must adhere to the following format:
subjective\objective\dependent possessive\independent possessive\reflexive\plural. If you use “player” in place of a
player’s name, then the player who triggered the command will have their pronouns set.
setvoice
Sets a player’s voice.
Aliases
setvoice
Examples
setvoice player a deep modulated voice
setvoice player a high digitized voice
setvoice persephone multiple overlapping voices
setvoice ghost a disembodied voice
setvoice player pollux
setvoice player haru
setvoice player
Description
Sets a player’s voice descriptor that will be used when the player uses the say command or speaks in a room with a player who can’t view the room channel. This will not change their voice descriptor on the spreadsheet, and when player data is reloaded, their voice descriptor will be reverted to what appears on the spreadsheet. You can also supply another player’s name instead of a voice descriptor. In this case, the first player’s voice will sound exactly like the second player’s, which they can use to deceive other players. If you use “player” in place of a player’s name, then the player who triggered the command will have their voice changed. Note that unlike other commands which change a player’s characteristics, the player’s voice will not be changed by being inflicted or cured of a status effect with the concealed attribute. If this command is used to change a character’s voice, it must be used again to change it back to normal. It can be reset to their original voice descriptor by omitting a voice descriptor in the commands.
status
Deals with status effects on players.
Aliases
status inflict cure
Examples
status add player heated
status add room safe
inflict all deaf
inflict diego heated
status remove player injured
status remove room restricted
cure antoine injured
cure all deaf
Description
Deals with status effects on players.
-add/inflict: Inflicts the specified player with the given status effect. If the “player” argument is used in place of a name, then the player who triggered the command will be inflicted. If the “all” argument is used instead, then all living players will be inflicted. If the “room” argument is used in place of a name, then all players in the same room as the player who solved it will be inflicted.
-remove/cure: Cures the specified player of the given status effect. If the “player” argument is used in place of a name, then the player who triggered the command will be cured. If the “all” argument is used instead, then all living players will be cured. If the “room” argument is used in place of a name, then all players in the same room as the player who solved it will be cured.
tag
Adds or removes a room’s tags.
Aliases
tag addtag removetag
Examples
tag add kitchen video surveilled
tag remove kitchen audio surveilled
addtag vault soundproof
removetag freezer cold
Description
-add/addtag: Adds a tag to the given room. Events that affect rooms with that tag will immediately apply to the given room, and any tag that gives a room special behavior will immediately activate those functions.
-remove/removetag: Removes a tag from the given room. Events that affect rooms with that tag will immediately stop applying to the given room, and any tag that gives a room special behavior will immediately stop functioning.
Note that unlike the moderator version of this command, you cannot add/remove multiple tags at once.
trigger
Triggers an event.
Aliases
trigger
Examples
trigger rain
trigger explosion
Description
Triggers the specified event. The event must not already be ongoing. If it is, nothing will happen. If the event has any triggered commands, they will not be run if they were passed by another event. They will be run if they were passed by anything else, however.
wait
Waits a set number of seconds.
Aliases
wait
Examples
wait 5
wait 60
wait 300
Description
Not a true command, but a pseudo-command. When this command is used in a list of commands, Alter Ego will wait for the given number of seconds before executing the next command.
Data Structures
In the Neo World Program, all of the map data is stored on a Google Sheet. There are a number of reasons for this:
- It allows multiple moderators to collaborate and develop the map together.
- It requires the data be organized in a consistent way which is easily readable by a bot such as Alter Ego.
- All edits to the spreadsheet are automatically saved, and the moderator(s) can revert the spreadsheet to any previous state they please if need be.
- Data entered on the spreadsheet is persistent. If Alter Ego crashes, is restarted, or otherwise shuts off, all of the game data will be preserved in its most recent state.
Alter Ego uses the Google Sheets API to load the data from the spreadsheet, as well as make edits to the spreadsheet. The data for each set of data structures in the map is kept in a separate sheet. This article lists each of the main data structures.
Creation
In order to create a workable spreadsheet, the latest version template should be duplicated into a moderator’s Google Drive by accessing this link, opening the File menu, and selecting Make a copy. At this point, they will have a copy that they can edit as they please.
Die
A Die is a data structure in the Neo World Program. Its purpose is to add a degree of randomness to gameplay. The result of a Die roll can be modified based on various factors, most notably a Player’s stats. Players cannot directly interact with Dice, and their very presence is hidden from a Player’s view; there are no circumstances in which a Player will see the results of a Die roll directly. Currently, there are only two cases where Players can initiate a Die roll of their own volition:
- A Die roll is initiated when a Player uses the steal command. The roll is
modified by their dexterity stat and whether or not they have the
thiefbehavior attribute. - A Die roll is initiated when a Player solves a
probability-type orstat probability-type Puzzle. The roll is modified by the stat used, if applicable. The result is then used to determine which solution is used to solve the Puzzle.
Dice are predominantly used by moderators in order to determine the result of a given Player’s action. This is done with the roll command.
Parameters
A Die can be rolled with up to three optional parameters.
Attacker
This is the active Player in a Die roll. In other words, when rolling to determine the outcome of an action, this is the Player who is attempting the action. If no attacker is given, then the base roll will be the final result.
Defender
This is the passive Player in a Die roll. If an attacker is given, then a defender is optional. A defender should only be given if the attacker is attempting to perform an action against another Player. The defender is capable of modifying the outcome of the attacker’s roll in certain situations, detailed below.
Stat
This is the stat that is being used to modify the Die’s base roll. To be exact, this is the specified stat of the attacker. However, this is optional. A Die can be rolled with an attacker and defender, or just an attacker, without specifying a stat.
Stat Roll Modifier
This is not a parameter, but a value derived from the attacker’s specified stat. This determines what value is added or subtracted from the base roll. The stat roll modifier, \(M\), is calculated with the following formula:
\[ M = \left\lfloor \Bigl\lfloor \frac{1}{2}s - \frac{10}{6} \Bigr\rfloor + \frac{a - i}{a} \right\rfloor \] Stat roll modifier = floor(floor( ( (s - 10) / 3) / 2 ) + (a - i) / a)
In this formula are several variables:
- \(s\) is the attacker’s specified stat.
- \(a\) is the diceMax setting.
- \(i\) is the diceMin setting.
Attributes
Dice have few attributes.
Minimum
- Class attribute: Number
this.min
This is the minimum possible value for the base Die roll. This equals the diceMin setting.
Maximum
- Class attribute: Number
this.max
This is the maximum possible value for the base Die roll. This equals the diceMax setting.
Base Roll
- Class attribute: Number
this.baseRoll
This is the initial result of the Die roll before any modifiers are applied. This is calculated by generating a random number and clamping it between the minimum and maximum values, inclusive.
If the attacker has the all or nothing behavior attribute, then the base roll has 50-50 odds of being either the Die’s
minimum or maximum value, with nothing in-between.
Modifier
- Class attribute: Number
this.modifier
This is the value that is added or subtracted from the base roll to determine the final result. The modifier begins with a value of 0, and is calculated as follows.
If the attacker has the coin flipper behavior attribute, and they have
an Inventory Item
whose single name
contains the string “COIN”, a coin flip is performed to determine if they will have a +1 added to the Die’s modifier,
independent of stat. Effectively, this has a 50% chance of occuring if the given conditions are met.
If the Die is being rolled with a defender and uses the strength stat, this is
interpreted as the attacker physically attacking the defender. Thus, the defender’s ability to dodge the attack is taken
into account. Under these circumstances, the defender’s dexterity roll modifier will be multiplied by -1 and added to
the Die’s modifier.
Then, if the Die is being rolled with a defender, and the defender has any Status Effects with stat modifiers that affect the attacker, the attacker is very briefly inflicted with Status Effects that modify their current stats accordingly. This will likely affect their calculated stat roll modifier.
Finally, if the Die is being rolled for a stat, the attacker’s stat roll modifier for the given stat is calculated and added to Die’s modifier. This is the final value of the Die’s modifier.
Modifier String
- Class attribute: String
this.modifierString
This is a comma-separated list of all of the factors which were used to calculate the Die’s final modifier, along with the values that each factor added.
Result
- Class attribute: Number
this.result
This is the final result of the Die roll, equal to the base roll plus the modifier.
Equipment Slot
An Equipment Slot is a data structure in the Neo World Program. It represents a part of a Player’s body that they can equip Inventory Items to.
Equipment Slots do not have a dedicated sheet on the spreadsheet. Rather, they are derived from data on the Inventory Items sheet. If an Inventory Item has no container name, then an Equipment Slot will be created for it to be equipped to.
Equipment Slots are almost fully customizable. A single Player can have as many or as few Equipment Slots as desired, and each Player can have a unique set of Equipment Slots. If the startgame command is used, then all Players will have the default inventory, but this can be edited after the data is saved to the spreadsheet.
An Equipment Slot cannot exist without an Inventory Item equipped to it. Even in cases where Alter Ego asserts that
nothing is equipped, something is: a dummy Inventory Item with a null Prefab and no data except for the
name of the Equipment Slot it’s equipped to. This behavior is to allow Equipment Slots to persist in a Player’s
inventory without causing errors. In order to define one of these dummy Inventory Items, its Prefab on the sheet should
be listed as NULL.
Attributes
Equipment Slots have very few attributes.
Name
- Class attribute: String
this.name
This is the name of the Equipment Slot, which is inherited from the Equipment Slot attribute of the Inventory Item equipped to it. All letters should be capitalized, and spaces are allowed.
There are two predefined Equipment Slots with special behavior. If an Equipment Slot is named “RIGHT HAND” or “LEFT HAND”, then Inventory Items cannot be equipped to it or unequipped from it like other Equipment Slots. They act as a Player’s hands, allowing them to manipulate their inventory in a variety of ways. If a Player does not have these Equipment Slots, they will be unable to use many commands. It should be noted that in every command where Alter Ego deals with a Player’s inventory, the RIGHT HAND Equipment Slot is assumed to come before that of the LEFT HAND on the spreadsheet. Reversing their order or giving the Player a LEFT HAND with no RIGHT HAND can result in gameplay errors.
Equipped Item
- Class attribute: Inventory Item
this.equippedItem
This is the Inventory Item currently equipped to this Equipment Slot. If the Inventory Item has a NULL Prefab -
indicating that nothing is currently equipped, then this is null.
Items
- Class
attribute: Array<Inventory Item>
this.items
This is a list of Inventory Items that currently occupy this Equipment Slot. This includes the Inventory Item currently equipped to it, any Inventory Items contained within it, any Inventory Items contained within those, and so on.
Row
- Class attribute: Number
this.row
This is the row number of the Inventory Item equipped to this Equipment Slot.
Event
An Event is a data structure in the Neo World Program. Its primary purpose is to allow moderators to create a more dynamic game world capable of automatically changing its state in predictable, predefined ways. Players cannot directly interact with Events. In most cases, Events are completely autonomous, requiring little to no intervention from Players or moderators.
Attributes
Events have relatively few attributes. However, they are capable of quite a lot despite this. Note that if an attribute is internal, that means it only exists within the Event class. Internal attributes will be given in the “Class attribute” bullet point, preceded by their data type. If an attribute is external, it only exists on the spreadsheet. External attributes will be given in the “Spreadsheet label” bullet point.
Name
- Spreadsheet label: Event Name
- Class attribute: String
this.name
This is the name of the Event. All letters should be capitalized, and spaces are allowed. Every Event must have a unique name. This will only be used when Events are triggered or ended with moderator commands or bot commands.
Ongoing
- Spreadsheet label: Ongoing?
- Class attribute: Boolean
this.ongoing
This is a simple Boolean value indicating whether the Event is currently ongoing or not. If this true, then the Event
is ongoing. If it is false, then the Event is not ongoing.
Duration String
- Spreadsheet label: Duration
- Class attribute: String
this.durationString
This is a string which determines how long after the Event is triggered it will be ongoing until it ends. This should consist of a whole number (no decimals) with a letter immediately following it, with no space between them. There is a fixed set of predefined units that correspond with each letter. They are as follows:
| Letter | Unit |
|---|---|
| s | seconds |
| m | minutes |
| h | hours |
| d | days |
| w | weeks |
| M | months |
| y | years |
So, an Event that should last 30 seconds should have a duration of 30s, one that should last 15 minutes should have a
duration of 15m, one that should last 2 hours should have a duration of 2h, one that should last 1.5 days should
have a duration of 36h, and so on.
Duration
- Class attribute: Duration
this.duration
This is an internal attribute which contains a Duration object created from the duration string. If the Event has no
duration string, this is null.
Remaining String
- Spreadsheet label: Time Remaining
- Class attribute: String
this.remainingString
This is a string which determines how much longer the Event has until it ends. If the Event has no fixed duration, then this can be left blank. An Event that is currently ongoing and has a duration must have the time remaining provided. It must follow a specific format:
(D) H:mm:ss
D stands for the number of 24-hour days remaining; it is optional. H stands for the number of hours remaining. mm
stands for the number of minutes remaining; leading zeroes are required. ss stands for the number of seconds
remaining; leading zeroes are required. For example, an Event with 2 days, 13 hours, 45 minutes, and 11 seconds
remaining would have a remaining string of 2 13:45:11. An Event with 1 day, 4 hours, 9 minutes, and 7 seconds
remaining would have a remaining string of 1 4:09:07. An Event with 59 minutes remaining would have a remaining string
of 0:59:00.
Remaining
- Class attribute: Duration
this.remaining
This is an internal attribute which contains a Duration object indicating how much time is remaining until the Event
ends. If the Event has no duration or the Event is not currently ongoing, this is null. While the Event is ongoing,
1000 milliseconds are subtracted from this Duration every second until it is less than or equal to zero, at which point
the Event ends.
Trigger Times String
- Spreadsheet label: Triggers At
- Class attribute: String
this.triggerTimesString
This is a string of comma-separated times that this Event will automatically trigger at. Every minute, Alter Ego iterates through the list of all Events and checks the trigger times for each one. If the current month, weekday, date, hour, and minute match one of the Event’s trigger times, it will automatically be triggered, after which it will be ongoing. A single Event can have multiple trigger times. However, if it is already ongoing, it will not be triggered again. If this cell is left blank, then the Event will not trigger automatically at any time of day.
Note that trigger times are based on the clock of the system running Alter Ego. If it is running on a server with a different timezone than the moderator’s local time, the server’s timezone must be used.
In addition to setting the time that an Event will trigger, it is also possible to specify the day of the week, the numbered day of the month, or days of the year. Trigger times must be written in a specific format.
First, the accepted time formats are as follows:
LT, the time (in hours and minutes) in the system’s local format.LTS, the time (in hours, minutes, and seconds) in the system’s local format. Note that triggering Events on specific seconds is not supported, so the seconds will be ignored.HH:mm, whereHHstands for the hour in a 24-hour format (0-23) andmmstands for the minutes with leading zeroes. Example:7:35or15:00.hh:mm a, wherehhstands for the hour in a 12-hour format (1-12),mmstands for the minutes with leading zeroes, andais eitherAMorPM. Example:7:35 AMor3:00 PM.
The accepted date formats are as follows:
ddd, the abbreviated day of the week in the system’s local format. Example:Wed.ddd, the day of the week in the system’s local format. Example:Wednesday.Do, the numbered day of the month with ordinal. Example:16th.Do MMM, the numbered day of the month with ordinal and abbreviated month. Example:16th Apr.Do MMMM, the numbered day of the month with ordinal and the month. Example:16th April.D MMM, the numbered day of the month and abbreviated month. Example:16 Apr.D MMMM, the numbered day of the month and the month. Example:16 April.MMM Do, the abbreviated month and numbered day of the month with ordinal. Example:Apr 16th.MMMM Do, the month and numbered day of the month with ordinal. Example:April 16th.MMM D, the abbreviated month and numbered day of the month. Example:Apr 16.MMMM D, the month and numbered day of the month. Example:April 16.
It is possible to set a trigger time with only a time of day, and no date. In this case, the Event will trigger at the same time every day. However, it is not possible to set a trigger time with only a date; a time must also be specified. In this case, the date must always precede the time. This is the full table of acceptable formats grouped by date format, as well as an example and a note indicating when the given example will cause the Event to trigger:
| Example | Triggers on | ||||
|---|---|---|---|---|---|
LT | LTS | HH:mm | hh:mm a | 8:30 PM | Every day at 8:30 PM |
ddd LT | ddd LTS | ddd HH:mm | ddd hh:mm a | Wed 8:30:00 PM | Every Wednesday at 8:30 PM |
dddd LT | dddd LTS | dddd HH:mm | dddd hh:mm a | Wednesday 20:30 | Every Wednesday at 8:30 PM |
Do LT | Do LTS | Do HH:mm | Do hh:mm a | 16th 08:30 PM | The 16th day of every month at 8:30 PM |
Do MMM LT | Do MMM LTS | Do MMM HH:mm | Do MMM hh:mm a | 16th Apr 8:30 PM | The 16th of April at 8:30 PM |
Do MMMM LT | Do MMMM LTS | Do MMMM HH:mm | Do MMMM hh:mm a | 16th April 8:30:00 PM | The 16th of April at 8:30 PM |
D MMM LT | D MMM LTS | D MMM HH:mm | D MMM hh:mm a | 16 Apr 20:30 | The 16th of April at 8:30 PM |
D MMMM LT | D MMMM LTS | D MMMM HH:mm | D MMMM hh:mm a | 16 April 08:30 PM | The 16th of April at 8:30 PM |
MMM Do LT | MMM Do LTS | MMM Do HH:mm | MMM Do hh:mm a | Apr 16th 8:30 PM | The 16th of April at 8:30 PM |
MMMM Do LT | MMMM Do LTS | MMMM Do HH:mm | MMMM Do hh:mm a | April 16th 8:30:00 PM | The 16th of April at 8:30 PM |
MMM D LT | MMM D LTS | MMM D HH:mm | MMM D hh:mm a | Apr 16 20:30 | The 16th of April at 8:30 PM |
MMMM D LT | MMMM D LTS | MMMM D HH:mm | MMMM D hh:mm a | April 16 08:30 PM | The 16th of April at 8:30 PM |
Trigger Times
This is an internal attribute which contains a list of strings separated from the trigger times string. Every minute, each string in this list is converted into a Moment. This is to ensure that any fields that are not set in this string will match the current date. Then the month, weekday, date, hour, and minute of every Event’s trigger time Moment objects are compared to the current month, weekday, date, hour, and minute. If they match, the Event is triggered.
Room Tag
- Spreadsheet label: In Rooms with Tag
- Class attribute: String
this.roomTag
This is a keyword or phrase assigned to an Event that allows it to affect Rooms. When the Event is triggered, its triggered narration is sent to the channels of all Rooms which have this tag, provided there is at least one Player in each Room. Likewise, when the Event is ended, its ended narration is sent. Additionally, when an Event is ongoing, any Players in a Room affected by it will be subjected to its inflicted and refreshed Status Effects.
Commands String
- Spreadsheet label: When Triggered / Ended
- Class attribute: String
this.commandsString
This is a comma-separated list of bot commands that will be executed when the Event is
triggered. A comma-separated list of bot commands that will be executed when the Event is ended can also be included,
with both sets separated by a forward slash (/). If no ended commands are desired, then the forward slash can be
omitted from the cell. If no triggered commands are desired but ended commands are, the forward slash should be the
first character in the cell, with the ended commands following it.
Note that when writing bot commands, it is good practice to be as precise as possible and provide room names if they are permitted, in order to prevent potential bugs. It should also be noted that when an Event’s commands trigger or end another Event, its commands will not be executed.
Triggered Commands
This is an internal attribute which contains a list of commands that will be executed when the Event is triggered.
Ended Commands
This is an internal attribute which contains a list of commands that will be executed when the Event is ended.
Inflicted Status Effects Strings
This is a comma-separated list of Status Effects that will be inflicted onto all Players who are in a Room which is affected by this Event. Every second, if the Event is ongoing, Alter Ego will look for all Rooms affected by it and attempt to inflict all Players in those Rooms with these Status Effects, if there are any listed. Players who are in the Room when the Event is triggered and Players who enter the Room later while it is still ongoing will all be inflicted, unless they have a Status Effect which overrides it.
Inflicted Status Effects
- Class
attribute: Array<Status Effect>
this.effects
This is an internal attribute which contains references to each of the Status Effect objects whose names are listed in
this.effectsStrings.
Refreshed Status Effects Strings
This is a comma-separated list of Status Effects whose durations will be reset to full on all Players who are in a Room which is affected by this Event. Every second, if the Event is ongoing, Alter Ego will look for all Rooms affected by it and attempt to refresh the durations of all Status Effects every Player in each Room has that are listed here. When a Status Effect’s duration is refreshed, it is set to its original value: the duration of the Status Effect that the Player’s Status Effect is an instance of. The Player’s instance of the Status Effect will continue to have its duration decremented by 1000 milliseconds every second; however, this will be canceled out every second when its duration is refreshed. Effectively, this makes it so that the Player’s instance of the Status Effect cannot expire or develop into its next stage because its duration can never reach 0.
This is particularly useful if the Event is intended to inflict a Status Effect upon all Players who enter certain Rooms that should not expire while the Player continues to stay in one of the affected Rooms (such as “soaking wet” for a RAIN Event and “blinded” for a BLACKOUT Event). However, due to the asynchronous nature of the JavaScript language, it may still be possible for a refreshed Status Effect to expire if its duration is only 1 second. For that reason, refreshed Status Effects that are intended to expire immediately after a Player leaves an affected Room should have a duration of 2 seconds or more. It should also be noted that a Status Effect being refreshed does not mean it will be inflicted upon all Players who are in an affected Room. It must be inflicted by some other means, such as being listed as one of the Event’s inflicted Status Effects.
Refreshed Status Effects
- Class
attribute: Array<Status Effect>
this.refreshes
This is an internal attribute which contains references to each of the Status Effect objects whose names are listed in
this.refreshesStrings.
Triggered Narration
- Spreadsheet label: Narration When Triggered
- Class attribute: String
this.triggeredNarration
This is the Narration that will be parsed and then sent to the channels of all occupied Rooms that the
Event is affected by when it is triggered. If no Players are in one of the Rooms affected by the Event, the Narration
will not be sent to that Room’s channel. See the article
on writing descriptions
for more information. However, note that because this is a Narration and not a description, it cannot make use of the
player variable under any circumstances.
Ended Narration
- Spreadsheet label: Narration When Ended
- Class attribute: String
this.endedNarration
This is the Narration that will be parsed and then sent to the channels of all occupied Rooms that the Event is affected
by when it is ended. If no Players are in one of the Rooms affected by the Event, the Narration will not be sent to that
Room’s channel. See the article on writing descriptions for more
information. However, note that because this is a Narration and not a description, it cannot make use of the player
variable under any circumstances.
Row
- Class attribute: Number
this.row
This is an internal attribute, but it can also be found on the spreadsheet. This is the row number of the Event.
Timer
- Class attribute: moment-timer
this.timer
This is an internal attribute which contains a timer counting down until the Event ends. Every 1000 milliseconds, 1
second is subtracted from the Event’s remaining Duration until it reaches 0. When it does, the
Event ends, and this attribute becomes null.
Effects Timer
- Class attribute: moment-timer
this.effectsTimer
This is an internal attribute which contains a timer that inflicts and refreshes Status Effects while the Event is
ongoing. Every 1000 milliseconds, Alter Ego iterates through all Rooms tagged with this
Event’s room tag and attempts to inflict and refresh its inflicted and refreshed Status Effects on
any Players occupying them. If this Event has no inflicted or refreshed Status Effects, or if the Event is not ongoing,
this attribute becomes null.
Exit
An Exit is a data structure in the Neo World Program. It represents an exit in a Room.
Attributes
Exits are the internal data structure linking Rooms to one another. As such, most of their attributes serve this purpose. Note that if an attribute is internal, that means it only exists within the Exit class. Internal attributes will be given in the “Class attribute” bullet point, preceded by their data type. If an attribute is external, it only exists on the spreadsheet. External attributes will be given in the “Spreadsheet label” bullet point.
Name
- Spreadsheet label: Exits
- Class attribute: String
this.name
This is the name of the Exit. All letters should be capitalized, and spaces are allowed. For clarity’s sake, it should usually be mentioned in all descriptions of the Room it belongs to, unless it is supposed to be hidden.
Position
- Class attribute: object
this.pos
This is an internal attribute whose properties are the X, Y, and Z coordinates of the Exit. For more information, see the article on Maps.
X
- Spreadsheet label: X
- Class attribute: Number
this.pos.x
This is the X coordinate of the Exit.
Y
- Spreadsheet label: Y
- Class attribute: Number
this.pos.y
This is the Y coordinate of the Exit.
Z
- Spreadsheet label: Z
- Class attribute: Number
this.pos.z
This is the Z coordinate of the Exit.
Unlocked
- Spreadsheet label: Unlocked?
- Class attribute: Boolean
this.unlocked
This indicates whether the Exit is unlocked or not. If this is true, then Players can travel through this
Exit. If it is false, then the Player will simply be told that the Exit is locked.
Destination
- Spreadsheet label: Leads To
- Class attribute: Room
this.dest
This is the Room that the Exit leads to. When a Player travels through this Exit, their permission to view the channel of their current Room will be revoked and they will then be given permission to view the channel associated with the Exit’s destination. Needless to say, when entering a destination on the spreadsheet, it must match the name of the desired Room exactly.
Link
- Spreadsheet label: From
- Class attribute: String
this.link
This is the name of the Exit in the destination Room that this Exit leads to. That Exit must also have this Exit as its link. That is, Exits must link back to one another in both directions. For example, in a set of two Rooms, each with one Exit only, their Exit tables must look like this:
| Room Name | Exit | Leads To | From |
|---|---|---|---|
| room-1 | DOOR | room-2 | EXIT |
| room-2 | EXIT | room-1 | DOOR |
Description
- Spreadsheet label: Description
- Class attribute: String
this.description
This is the description of the Room coming from this Exit. That is, when a Player enters a Room from this Exit, they will receive a parsed version of this string. The Player will not be sent the Exit’s description by itself. Instead, they will be sent a Discord Embed containing:
- The name of the Room.
- The description of the Exit they entered from.
- The Room’s occupants, excluding the Player themself.
- The description of the Room’s default drop Object. If the Room doesn’t have one, “You don’t see any items.” will be sent instead.
- The Room’s icon URL. If the Room does not have one, then the default Room icon URL will be used instead. If no default Room icon URL is set, then Alter Ego will use the server icon instead. If the server icon is not set, then no image will be sent in the MessageEmbed.
See the article on writing descriptions for more information.
Row
- Class attribute: Number
this.row
This is an internal attribute, but it can also be found on the spreadsheet. This is the row number of this Exit in a Room.
Gesture
A Gesture is a data structure in the Neo World Program. It represents a form of body language that a Player can use to communicate with other Players nonverbally.
Gestures are static; once loaded from the spreadsheet, they do not change in any way. Thus, the saver module will never make changes to the Gestures sheet. As a result, the Gestures sheet can be freely edited without edit mode being enabled.
Attributes
Gestures have very few attributes. Note that if an attribute is internal, that means it only exists within the Gesture class. Internal attributes will be given in the “Class attribute” bullet point, preceded by their data type. If an attribute is external, it only exists on the spreadsheet. External attributes will be given in the “Spreadsheet label” bullet point.
Name
- Spreadsheet label: Gesture Name
- Class attribute: String
this.name
This is a name of the Gesture. This is what a Player must input in order to perform this Gesture. There are no rules for how Gestures must be named, although they are conventionally named with all lowercase letters. Each Gesture must have a unique name. Additionally, a Gesture cannot be named “list”, as attempting to perform a Gesture with that name would instead bring up the list of all Gestures.
Requires
This is a comma-separated list of data types the Gesture can take as a target. Accepted data types are:
If this is not blank, then a Player who attempts to perform this Gesture must supply something in the Room they’re in of one of the accepted data types as a target. For example, if the Gesture requires an Object, then the Player must give the name of an Object in the Room in order to perform this Gesture. If the Gesture requires an Item or an Inventory Item, then the Player must give the name of an Item in the Room they’re in or an Inventory Item in their RIGHT HAND or LEFT HAND. If this is blank, then the Player can perform this Gesture without specifying a target.
Disabled Statuses Strings
This is a comma-separated list of Status Effects that prevent this Gesture from being performed. If a Player who is inflicted with any of the Status Effects listed here attempts to use this Gesture, they will be unable to do so.
Disabled Statuses
- Class
attribute: Array<Status Effects>
this.disabledStatuses
This is an internal attribute which contains references to each of the Status Effect objects whose names are listed in
this.disabledStatusesStrings.
Description
- Spreadsheet label: Description
- Class attribute: String
this.description
This is a plain string that describes what the Player will do when they perform this Gesture. This appears in the Gesture list. It does not use XML tags - it must be plain text. An ideal Gesture description should be in second person and use as few words as possible.
Narration
- Spreadsheet label: Narration
- Class attribute: String
this.narration
This is the Narration that will be parsed and then sent to the Player’s Room channel when this Gesture is performed. See the article on writing descriptions for more information.
Row
- Class attribute: Number
this.row
This is an internal attribute, but it can also be found on the spreadsheet. This is the row number of the Gesture.
Target Type
- Class attribute: String
this.targetType
This is an internal attribute which is only assigned when a Gesture is instantiated in the gesture Player method. It indicates the data type of the Gesture’s target. This allows the Gesture’s Narration to contain conditional formatting based on the data type of the target.
Target
- Class
attribute: Exit|Object|Item|Player|Inventory Item
this.target
This is an internal attribute which is only assigned when a Gesture is instantiated in the gesture Player method. It
contains a reference to the target object. This allows the Gesture’s Narration
to make use of the target’s class attributes. For example, if a
Gesture requires an Object as a target, then the tag <var v="this.target.name" /> can be used to insert
the name of the Object in the Narration; if a Gesture requires an Item as a target, then the tag
<var v="this.target.singleContainingPhrase" /> can be used to insert
the single containing phrase of the Item in the Narration; and so on.
Inventory Item
An Inventory Item is a data structure in the Neo World Program. It represents an item that is currently possessed by a Player. It is an instance of a Prefab, and is similar to an Item.
Attributes
Inventory Items themselves have relatively few attributes. However, being instances of Prefabs, they inherit many attributes as a result. Note that if an attribute is internal, that means it only exists within the InventoryItem class. Internal attributes will be given in the “Class attribute” bullet point, preceded by their data type. If an attribute is external, it only exists on the spreadsheet. External attributes will be given in the “Spreadsheet label” bullet point.
Player
- Spreadsheet label: Player Name
- Class attribute: Player
this.player
This is the name of the Player whose inventory this Inventory Item is in. This must match the Player’s name exactly on the spreadsheet.
Prefab
- Spreadsheet label: Prefab
- Class attribute: Prefab
this.prefab
This is the ID of the Prefab this Inventory Item is an instance of. It gives the Inventory Item most of its properties.
The class attribute, this.prefab is a reference to the actual Prefab object underlying the Inventory Item, making all
of that Prefab’s attributes accessible.
This cell can never be left blank, even for empty Equipment Slots. If the Inventory Item is an
Equipment Slot with nothing equipped to it, this should be NULL.
Identifier
- Spreadsheet label: Container Identifier
- Class attribute: String
this.identifier
This is a unique name given to the Inventory Item if it is capable of containing other Inventory Items. This is necessary when loading Inventory Items in order for Alter Ego to determine which container the child Inventory Items belong to, in case there are multiple container Inventory Items with the same Prefab. Typically, this is the Prefab ID followed by a number (the standard followed by the itemManager module), but there are no naming rules for identifiers. No two Items or Inventory Items can have the same identifier. For an example of how this looks, see the following table:
| Player Name | Prefab ID | Container Identifier | Equipment Slot | Container | Quantity |
|---|---|---|---|---|---|
| Astrid | BLACK PARKA | BLACK PARKA 1 | RIGHT HAND | 1 | |
| Astrid | BLACK PARKA | BLACK PARKA 2 | JACKET | 1 | |
| Astrid | COIN | RIGHT HAND | BLACK PARKA 1/RIGHT POCKET | 10 | |
| Astrid | COIN | JACKET | BLACK PARKA 2/RIGHT POCKET | 10 |
For Inventory Items that are not capable of containing Inventory Items, this can be left blank.
Single Name
- Class attribute: String
this.name
This is an internal attribute which is a copy of the Prefab’s single name. Its purpose is to make accessing the Prefab’s single name slightly easier.
Plural Name
- Class attribute: String
this.pluralName
This is an internal attribute which is a copy of the Prefab’s plural name. Its purpose is to make accessing the Prefab’s plural name slightly easier.
Single Containing Phrase
- Class attribute: String
this.singleContainingPhrase
This is an internal attribute which is a copy of the Prefab’s single containing phrase. Its purpose is to make accessing the Prefab’s single containing phrase slightly easier.
Plural Containing Phrase
- Class attribute: String
this.pluralContainingPhrase
This is an internal attribute which is a copy of the Prefab’s plural containing phrase. Its purpose is to make accessing the Prefab’s plural containing phrase slightly easier.
Equipment Slot
- Spreadsheet label: Equipment Slot
- Class attribute: String
this.equipmentSlot
This is the name of the Equipment Slot that this Inventory Item belongs to, whether it is equipped to it or contained in another Inventory Item that is. This cell can never be left blank. For more information, see the article on Equipment Slots.
Found Equipment Slot
- Class attribute: Boolean
this.foundEquipmentSlot
This is an internal attribute which is only used during the process of loading data from the spreadsheet to check if the Equipment Slot given for an Inventory Item contained within another Inventory Item actually exists.
Container Name
- Spreadsheet label: Container
- Class attribute: String
this.containerName
This is a container identifier and slot of the container the Inventory Item can be found in. Unlike Items, Inventory Items cannot have containers of different types; they can only be other Inventory Items. An Inventory Item’s container will have a description that contains a mention of the Inventory Item in an item list. When the Inventory Item is unstashed, mention of the Inventory Item will be removed from the item list in its container. Note that the Inventory Item’s container must belong to the same Player and Equipment Slot as the Inventory Item itself.
In order to properly specify an Inventory Item’s container, the container’s identifier must be given, as well as
the inventory slot this Inventory Item is in, with both separated by a forward slash (/). The
following are some examples of correct container names:
- LAB COAT 1/RIGHT POCKET
- LAB COAT 2/LEFT POCKET
- PLASTIC BAG 34/PLASTIC BAG
If no container name is supplied, then this Inventory Item is equipped to the listed Equipment Slot.
Container
- Class attribute: InventoryItem
this.container
This is an internal attribute which simply contains a reference to the actual Inventory Item object in the Player’s
inventory whose container identifier matches that of this.containerName. If this Inventory Item is equipped to an
Equipment Slot (and thus doesn’t have a container name) or the container it belongs to no longer exists in the Player’s
inventory, then this is null.
Slot
- Class attribute: String
this.slot
This is an internal attribute which simply contains the name of the inventory slot of the container Inventory Item that this Inventory Item is in.
Quantity
- Spreadsheet label: Quantity
- Class attribute: Number
this.quantity
This is a whole number indicating how many instances of this Inventory Item there are in the given container. So long as
its quantity is greater than 0, this Inventory Item can be inspected and unstashed from its container. Unlike Items,
Inventory Items cannot have an infinite quantity; a value must be provided. Inventory Items capable of containing other
Inventory Items cannot have a quantity greater than 1. Equipped Inventory Items cannot have a quantity other than 1,
unless they have the NULL Prefab - in that case, their quantity should be left blank.
Uses
- Spreadsheet label: Uses
- Class attribute: Number
this.uses
This is a whole number indicating how many times this Inventory Item can be used with the use command Although this number is derived from an Inventory Item’s Prefab, it can be manually set to differ on the spreadsheet. If no number of uses is given, the Inventory Item can be used infinitely. If the Inventory Item is dropped, its uses will be retained when it’s converted into an Item. This number can then be used when the subsequent Item is processed as part of a Recipe. For more details, see the section about Item uses.
When this Inventory Item is used (assuming its Prefab is usable) different things will happen depending on certain factors. First, it will inflict the Player with all of the Status Effects listed in its Prefab’s effects strings and cure the Player of all of the Status Effects listed in its Prefab’s cures strings. Then, if it has a limited number of uses, its uses will be decreased by 1. If this happens and its uses is decreased to 0, one of two things will happen:
- If the Inventory Item’s Prefab has a next stage, then it will be destroyed and its next stage will be instantiated in its place.
- If the Inventory Item’s Prefab has no next stage, it will simply be destroyed.
Weight
- Class attribute: Number
this.weight
This is an internal attribute. It is a whole number inherited from the weight of Inventory Item’s Prefab. If the Inventory Item is capable of containing Inventory Items, the Inventory Items inside will add to the weight of the parent Inventory Item. This will also be added to the Player’s carry weight.
Inventory
This is a list of inventory slot objects that the Inventory Item has. It is inherited from its Prefab. For more details, see the section about Prefab inventories.
Description
- Spreadsheet label: Description
- Class attribute: String
this.description
This is the description of the Inventory Item. Note that this can be completely different from the description of the Inventory Item’s Prefab. When a Player inspects this Inventory Item, they will receive a parsed version of this string. See the article on writing descriptions for more information. Note that when an Inventory Item is inspected by a different Player than the one who possesses it, all sentences containing item list tags will be removed.
Row
- Class attribute: Number
this.row
This is an internal attribute, but it can also be found on the spreadsheet. This is the row number of the Inventory Item.
Item
An Item is a data structure in the Neo World Program. It represents an item in a Room that a Player can take with them. It is an instance of a Prefab, and is similar to an Inventory Item.
Attributes
Items themselves have relatively few attributes. However. being instances of Prefabs, they inherit many attributes as a result. Note that if an attribute is internal, that means it only exists within the Item class. Internal attributes will be given in the “Class attribute” bullet point, preceded by their data type. If an attribute is external, it only exists on the spreadsheet. External attributes will be given in the “Spreadsheet label” bullet point.
Prefab
- Spreadsheet label: Prefab
- Class attribute: Prefab
this.prefab
This is the ID of the Prefab this Item is an instance of. It gives the Item most of its properties. The class attribute,
this.prefab is a reference to the actual Prefab object underlying the Item, making all of that Prefab’s attributes
accessible.
Identifier
- Spreadsheet label: Container Identifier
- Class attribute: String
this.identifier
This is a unique name given to the Item if it is capable of containing other Items. This is necessary when loading Items in order for Alter Ego to determine which container the child Items belong to, in case there are multiple container Items with the same Prefab. Typically, this is the Prefab ID followed by a number (the standard followed by the itemManager module), but there are no naming rules for identifiers. No two Items or Inventory Items can have the same identifier. For an example of how this looks, see the following table:
| Prefab ID | Container Identifier | Location | Container | Quantity |
|---|---|---|---|---|
| VINYL GLOVE BOX | VINYL GLOVE BOX 1 | kitchen | Object: HAND WASH STATION 1 | 1 |
| VINYL GLOVE BOX | VINYL GLOVE BOX 2 | kitchen | Object: HAND WASH STATION 2 | 1 |
| VINYL GLOVES | kitchen | Item: VINYL GLOVE BOX 1/VINYL GLOVE BOX | 10 | |
| VINYL GLOVES | kitchen | Item: VINYL GLOVE BOX 2/VINYL GLOVE BOX | 10 |
For Items that are not capable of containing Items, this can be left blank.
Single Name
- Class attribute: String
this.name
This is an internal attribute which is a copy of the Prefab’s single name. Its purpose is to make accessing the Prefab’s single name slightly easier.
Plural Name
- Class attribute: String
this.pluralName
This is an internal attribute which is a copy of the Prefab’s plural name. Its purpose is to make accessing the Prefab’s plural name slightly easier.
Single Containing Phrase
- Class attribute: String
this.singleContainingPhrase
This is an internal attribute which is a copy of the Prefab’s single containing phrase. Its purpose is to make accessing the Prefab’s single containing phrase slightly easier.
Plural Containing Phrase
- Class attribute: String
this.pluralContainingPhrase
This is an internal attribute which is a copy of the Prefab’s plural containing phrase. Its purpose is to make accessing the Prefab’s plural containing phrase slightly easier.
Location
- Spreadsheet label: Location
- Class attribute: Room
this.location
This is the Room the Item can be found in. This must match the Room’s name exactly on the spreadsheet.
Accessible
- Spreadsheet label: Accessible?
- Class attribute: Boolean
this.accessible
This is a simple Boolean value indicating whether the Item can currently be interacted with or not. If this is true,
then players can inspect and take the Item. If it is false, Alter Ego will act as if the Item doesn’t exist when a
player tries to interact with it in any way.
Container Name
- Spreadsheet label: Container
- Class attribute: String
this.containerName
This is a type and name of the container the Item can be found in. An Item’s container is the data structure whose description contains a mention of the Item in an item list. When the Item is taken, mention of the Item will be removed from the item list in its container. Note that the Item’s container must be in the same Room as the Item itself.
In order to properly specify an Item’s container, the type of the container must be specified, then a colon, then the
container’s name. However, if the container is another Item, then its identifier must be given instead of its name, and
the inventory slot this Item is in, with both separated by a forward slash (/). For some
examples of correct container names, see the following table:
| Type | Name / Identifier | Inventory Slot | Container Name |
|---|---|---|---|
| Object | SHELF | Object: SHELF | |
| Puzzle | LOCKER 1 | Puzzle: LOCKER 1 | |
| Item | KAEDES BACKPACK 1 | MAIN POCKET | Item: KAEDES BACKPACK 1/MAIN POCKET |
Container
This is an internal attribute which simply contains a reference to the actual Object, Puzzle, or Item object whose name
matches this.containerName and whose location is the same as the Item.
Slot
- Class attribute: String
this.slot
This is an internal attribute which simply contains the name of the inventory slot of the container Item that this Item is in.
Quantity
- Spreadsheet label: Quantity
- Class attribute: Number
this.quantity
This is a whole number indicating how many instances of this Item there are in the given container. So long as its quantity is greater than 0, this Item can be inspected and taken from its container. If no quantity is given, the Item will be treated as though it has an infinite quantity. Items capable of containing other Items cannot have a quantity greater than 1.
Uses
- Spreadsheet label: Uses
- Class attribute: Number
this.uses
This is a whole number indicating how many times this Item can be used. Although this number is derived from an Item’s Prefab, it can be manually set to differ on the spreadsheet. If no number of uses is given, the Item can be used infinitely. Note that Items cannot be used by a Player, so this attribute primarily denotes how many times an Item can be used if it is turned into an Inventory Item by being taken. For more details, see the section about Inventory Item uses.
Alter Ego uses this attribute when processing this Item as part of a Recipe. If this Item is used as an ingredient and its Prefab is listed as a product in the Recipe, and it has a limited number of uses, its uses will be decreased by 1 every time the Recipe is finished processing. If this happens and its uses is decreased to 0, one of two things will happen:
- If the Item’s Prefab has a next stage, then it will be destroyed and its next stage will be instantiated.
- If the Item’s Prefab has no next stage, it will simply be destroyed.
Weight
- Class attribute: Number
this.weight
This is an internal attribute. It is a whole number inherited from the weight of Item’s Prefab. If the Item is capable of containing Items, the Items inside will add to the weight of the parent Item.
Inventory
This is a list of inventory slot objects that the Item has. It is inherited from its Prefab. For more details, see the section about Prefab inventories.
Description
- Spreadsheet label: Description
- Class attribute: String
this.description
This is the description of the Item. Note that this can be completely different from the description of the Item’s Prefab. When a Player inspects this Item, they will receive a parsed version of this string. See the article on writing descriptions for more information.
Row
- Class attribute: Number
this.row
This is an internal attribute, but it can also be found on the spreadsheet. This is the row number of the Item.
Object
An Object is a data structure in the Neo World Program. It represents a fixed structure within a Room that cannot be taken or moved by a Player. Their primary purpose is to give structure and interactivity to a Room. Note that these are not to be confused with JavaScript’s Object data type.
Attributes
Objects have relatively few attributes. Although their behavior is mostly static, they are capable of quite a few things. Note that if an attribute is internal, that means it only exists within the Object class. Internal attributes will be given in the “Class attribute” bullet point, preceded by their data type. If an attribute is external, it only exists on the spreadsheet. External attributes will be given in the “Spreadsheet label” bullet point.
Name
- Spreadsheet label: Object Name
- Class attribute: String
this.name
This is the name of the Object. All letters should be capitalized, and spaces are allowed. Note that multiple Objects can have the same name, so long as they are in different Rooms.
Location
- Spreadsheet label: Location
- Class attribute: Room
this.location
This is the Room the Object can be found in. This must match the Room’s name exactly on the spreadsheet.
Accessible
- Spreadsheet label: Accessible?
- Class attribute: Boolean
this.accessible
This is a simple Boolean value indicating whether the Object can currently be interacted with or not. If this is true,
then players can inspect the Object, among other things. If it is false, Alter Ego will act as if the Object doesn’t
exist when a player tries to interact with it in any way.
Child Puzzle Name
- Spreadsheet label: Child Puzzle
- Class attribute: String
this.childPuzzleName
This is the name of a Puzzle that is associated with the Object, if any. The child Puzzle must be in the same Room as the Object referencing it. If the name of a Puzzle is supplied, then any Items contained within the Object will technically be contained within the child Puzzle. This allows Items to be made inaccessible until the child Puzzle is solved, while also allowing players to take and drop Items from/into the Object if the child Puzzle is solved. Additionally, when an Object containing Items is assigned a child Puzzle, the item list must be in the child Puzzle’s already solved description. If no child Puzzle is needed, this cell can simply be left blank on the spreadsheet.
Child Puzzle
- Class attribute: Puzzle
this.childPuzzle
This is an internal attribute which simply contains a reference to the actual Puzzle object whose name matches
this.childPuzzleName and whose location is the same as the Object. If no child Puzzle name is given, this will be
null instead.
Recipe Tag
- Spreadsheet label: Recipe Tag
- Class attribute: String
this.recipeTag
This a keyword or phrase assigned to an Object that allows it to carry out Recipes that require that tag. An Object can only have a single Recipe tag. There are no rules for how Recipe tags must be named.
Activatable
- Spreadsheet label: Activatable?
- Class attribute: Boolean
this.activatable
This is another Boolean value indicating whether the Object can be activated or deactivated by a Player with
the use command. If this is true, then a Player can activate and deactivate the
Object at will. If this is false, then its activation state cannot be altered by a Player. Even if the Object is not
activatable, it can still be activated and deactivated by other means, and it will still carry out Recipes if it is
activated.
Activated
- Spreadsheet label: Activated?
- Class attribute: Boolean
this.activated
This is another Boolean value indicating whether the Object is currently checking for and processing Recipes. If this is
true, then the Object will check every second if it contains the necessary ingredients for any Recipe with a matching
tag. If it does, then the Recipe will be processed and the Recipe’s products will be instantiated in the Object when it
is complete. An Object can only process one Recipe at a time. If it is found that the Object is able to process multiple
Recipes with the ingredients it contains, then the Object will process whichever Recipe has the highest number of
matched ingredients, and the remaining Items will be left untouched. If the Object is still able to carry out a Recipe
with the remaining Items, then it will do so upon finishing the first one, as long as it is not automatically
deactivated.
Automatically Deactivated
- Spreadsheet label: Deactivate Automatically?
- Class attribute: Boolean
this.autoDeactivate
This is another Boolean value indicating whether the Object will automatically deactivate after processing a Recipe. If
this is true, then the Object will stop checking for and processing Recipes every time it finishes processing one,
even if the Object’s activatable attribute is false. Note that if the Object is automatically deactivated and no
processable Recipe is found, then it will deactivate after one minute of activation. If this is false, then the Object
will continue checking for and processing Recipes after completing each one.
Hiding Spot Capacity
- Spreadsheet label: Hiding Spot Capacity
- Class attribute: Number
this.hidingSpotCapacity
This is a whole number indicating how many Players can hide in this Object simultaneously. If this is greater than 0, then that many Players can hide in it, and this value can be bypassed with the use of the hide moderator command. If this is 0, the Object cannot be used as a hiding spot at all. For more information, see the article on hiding.
Preposition
- Spreadsheet label: Preposition
- Class attribute: String
this.preposition
This attribute is a string that performs two functions:
- It determines whether or not the Object can contain Items. If it is blank, players cannot take Items from or drop Items into the Object. If it is not blank, then they can.
- When a Player drops a non-discreet Item into the Object, Alter Ego will narrate them doing so using this preposition. For example, if the player Nero drops an Item named SWORD into an Object named CABINET whose preposition is “in”, Alter Ego will send “Nero puts a SWORD in the CABINET.” to CABINET’s Room channel.
Note that a preposition can be multiple words, however care should be taken to ensure that the Narration Alter Ego sends will make grammatical sense. For example, if in the above example, Nero instead dropped the SWORD into an Object named DESK a preposition of “on top” would result in the strange sentence “Nero puts a SWORD on top the DESK.” A preposition of “on top of” or just simply “on” would result in a better sentence.
Description
- Spreadsheet label: Description
- Class attribute: String
this.description
This is the description of the Object. When a Player inspects this Object, they will receive a parsed version of this string. See the article on writing descriptions for more information.
Row
- Class attribute: Number
this.row
This is an internal attribute, but it can also be found on the spreadsheet. This is the row number of the Object.
Process
- Class attribute: object
this.process
This is an internal attribute used to process Recipes. It has the following structure:
{ Recipe recipe, Array<Item> ingredients, moment duration, moment-timer timer }
For more information on the moment data type, see the documentation for Moment.js.
Recipe Interval
- Class attribute: moment-timer
this.recipeInterval
This is an internal attribute that allows Objects to check for and process Recipes every second. If the Object does not
have a Recipe tag, then this will be null.
Player
A Player is a data structure in the Neo World Program. It represents a player that can interact with the game world in a variety of ways.
There are two types of Players: full Players and NPCs. A full Player is associated with a Discord account, and can be controlled by that account. An NPC, short for non-player character, can do nearly everything a full Player can do, however it is not associated with a Discord account; it can only be controlled by a moderator.
It should be noted that when Player data is loaded, so too are Inventory Items. Inventory Items can be loaded without loading Player data, but not vice versa.
Attributes
In order to provide a wide array of functionality, Players have many attributes. Note that if an attribute is internal, that means it only exists within the Player class. Internal attributes will be given in the “Class attribute” bullet point, preceded by their data type. If an attribute is external, it only exists on the spreadsheet. External attributes will be given in the “Spreadsheet label” bullet point.
ID
- Spreadsheet label: Discord ID
- Class attribute: String
this.id
For full Players, this is the unique ID assigned to their Discord account. Developer Mode must be enabled in order to obtain this ID by right clicking on a Discord user and selecting Copy ID. When Player data is loaded, Alter Ego will fetch the guild member whose account has this ID. That Discord user will then be able to control this Player. Because Alter Ego requires guild member data, this account must belong to a Discord user in the server. If the user associated with a particular Player leaves the server, Alter Ego will be unable to load that Player’s data; they must either be removed from the spreadsheet, converted to an NPC, or reassigned a different ID.
Because NPCs aren’t associated with a Discord account, this attribute is repurposed for them. Instead of a Discord user
ID, this must be an image URL with a .png or .jpg file extension. This image will be used as the NPC’s avatar when
they speak; it will appear in Room, Whisper,
and spectate channels.
Member
- Class attribute: GuildMember
this.member
This is an internal attribute which contains a reference to the guild member whose Discord ID matches the Player ID. For
NPCs, this is null.
Name
- Spreadsheet label: Name
- Class attribute: String
this.name
This is the name of the Player. Because this is also used as the name of the Player’s spectate channel, it is subject to Discord’s limits on channel names. Only alphanumeric characters (A-Z, a-z, 0-9) and hyphens (-) are permitted; spaces, symbols, and punctuation are not. This should generally match the Player’s nickname on the server, although it doesn’t have to. For that reason, this should be 32 characters or fewer. This conventionally follows naming customs: the first letter is capitalized, and the rest is in lowercase. However, this is not a requirement.
Display Name
- Class attribute: String
this.displayName
This internal attribute is the string which Alter Ego uses to refer to the Player during most gameplay scenarios. It is
used instead of the name in Narrations, spectate channels, and more. The reason this is used is that unlike the
Player’s name, this can change during gameplay. It is automatically changed when the Player is inflicted with
a Status Effect that has the
concealed behavior attribute, and it can be manually changed with
the setdisplayname command.
When Player data is loaded, this is the same as the Player’s name. For that reason, moderators should be careful when
loading Player data during gameplay, as any Players with different display names will have their display names reset.
Display Icon
- Class attribute: String
this.displayIcon
This is an internal attribute which contains an image URL that will be used as an avatar when the Player uses
the say command, and when their dialog
appears in a spectate channel. It is also used when NPCs use
the whisper command. For full Players, this is most often null -
their display avatar is used
instead. Only NPCs have this set to a non-null value by default: the image URL in their ID. Much like the Player’s
display name, this can change during gameplay. It is automatically set
to this image when the
Player is inflicted with a Status Effect that has the concealed behavior attribute, and it can be manually changed
with
the setdisplayicon command.
However, it should be noted this will not replace a full Player’s avatar when they speak in a Room or Whisper
channel by sending a message to it; it will only appear in spectate channels when this is the case.
Talent
- Spreadsheet label: Talent
- Class attribute: String
this.talent
This is primarily a relic from older versions of Alter Ego which used this attribute to produce behavior that has since been re-implemented using Status Effect behavior attributes. For full Players, this can be left blank without issue. However, its main benefit is that it can be used as a variable in descriptions.
There is one programmed use case for this attribute. If this is set to NPC, then the Player will become an NPC. If the
Player has the NPC talent, then Alter Ego will not do anything to them that would require a Discord account, such as
sending them DMs, granting/revoking them permission to read channels, and adding/removing roles. NPC Players also will
not be counted in the online Player count, will not be inflicted with or cured of Status Effects when the “all” argument
is used in the status command, and will not be moved when the “all”
argument is used in the move command.
Pronoun String
- Spreadsheet label: Pronouns
- Class attribute: String
this.pronounString
This is a string which determines what set of third person
singular personal pronouns will be used to refer to the
Player by default. This must adhere to a strict format:
subjective/objective/dependent possessive/independent possessive/reflexive/plural, although there are shorthands for
the three most common pronoun sets:
maleis shorthand forhe/him/his/his/himself/false.femaleis shorthand forshe/her/her/hers/herself/false.neutralis shorthand forthey/them/their/theirs/themself/true.
There are several parts to this format. They are as follows:
- The subjective pronoun is used to refer to the Player as the subject of a verb. For example, “She speaks.”
- The objective pronoun is used to refer to the Player as an object of a verb. For example, “I saw him.”
- The dependent possessive pronoun is used to refer to the Player as the owner of something which is the object of the verb. For example, “That’s their room.”
- The independent possessive pronoun is used to refer to the Player as the owner of something which is the subject of the verb. For example, “The car is hers.”
- The reflexive pronoun is used to refer to the Player when they are the object of a verb where they are also the subject. For example, “They wash themself.”
- The plural variable determines whether this set of pronouns pluralizes verbs. If this is
true, then verbs will take the form they use with plural pronouns. For example, “They are here. They have money. They smell strange.” If this isfalse, then verbs will take the form they use with singular pronouns. For example, “He is here. She has money. It smells strange.”
As long as this format is followed, any set of pronouns can be used. For example, a Player who uses it pronouns would
have the pronoun string it/it/its/its/itself/false.
A Player cannot have more than one pronoun set at a time. For example, a Player who uses both he and they pronouns interchangeably can be referred to with he or they by Alter Ego, but not both. It cannot alternate between them at will. However, this is relatively minor, as Player pronouns are seldom used in built-in Narrations. Descriptions, custom Narrations, and dialog can all be written with alternating pronouns.
Original Pronouns
- Class attribute: object
this.originalPronouns
This internal attribute is an object containing variables that contain each of the Player’s default pronouns. This is primarily used in response messages in moderator commands and in log messages.
Please see the following class attribute for more info.
Pronouns
- Class attribute: object
this.pronouns
This internal attribute is an object containing variables that contain each of the Player’s current pronouns. This is
primarily what is used in Narrations. The reason this is used is that unlike the Player’s original pronouns, this can
change during gameplay. It is automatically changed to the neutral pronoun set when the Player is inflicted with a
Status Effect that has the concealed behavior attribute, and it can be manually changed with
the setpronouns command.
When Player data is loaded, this is the same as the Player’s original pronouns, right down to the structure. For that
reason, moderators should be careful when loading Player data during gameplay, as any Players with pronouns different
from their original pronouns will have their pronouns reset.
This, as well as the original pronouns attribute, has the following structure:
{ String sbj, String Sbj, String obj, String Obj, String dpos, String Dpos, String ipos, String Ipos, String ref, String Ref, Boolean plural }
This essentially groups what would be multiple class attributes into one. They are listed below:
Subjective
- Class attribute: String
this.pronouns.sbj
This is the Player’s subjective pronoun.
Capital Subjective
- Class attribute: String
this.pronouns.Sbj
This is the Player’s subjective pronoun, except the first letter is capitalized. This is useful at the beginning of a sentence when writing descriptions that use the Player’s pronouns as variables.
Objective
- Class attribute: String
this.pronouns.obj
This is the Player’s objective pronoun.
Capital Objective
- Class attribute: String
this.pronouns.Obj
This is the Player’s objective pronoun, except the first letter is capitalized.
Dependent Possessive
- Class attribute: String
this.pronouns.dpos
This is the Player’s dependent possessive pronoun.
Capital Dependent Possessive
- Class attribute: String
this.pronouns.Dpos
This is the Player’s dependent possessive pronoun, except the first letter is capitalized.
Independent Possessive
- Class attribute: String
this.pronouns.ipos
This is the Player’s independent possessive pronoun.
Capital Independent Possessive
- Class attribute: String
this.pronouns.Ipos
This is the Player’s independent possessive pronoun, except the first letter is capitalized.
Reflexive
- Class attribute: String
this.pronouns.ref
This is the Player’s reflexive pronoun.
Capital Reflexive
- Class attribute: String
this.pronouns.Ref
This is the Player’s reflexive pronoun, except the first letter is capitalized.
Plural
- Class attribute: Boolean
this.pronouns.plural
This is a Boolean value indicating whether this pronoun set pluralizes verbs.
Original Voice String
- Spreadsheet label: Voice
- Class attribute: String
this.originalVoiceString
This is a phrase that will be used in Narrations when the Player speaks while their identity is obscured in some way. All Narrations which use this are written with the assumption that this string will begin with “a” or “an” and end with “voice”. Here are some examples with the Player’s voice string in bold:
- You hear a bitter voice in the room say “…What are you looking at?”.
- You hear a brash voice from a nearby room shout “HEY! IS ANYONE IN THERE!?”.
- You overhear an individual wearing a PLAGUE DOCTOR MASK, with a crisp voice you recognize to be Kyra’s, whisper “Yes, everything is going according to plan.”.
- A deep modulated voice coming from Amy’s WALKIE TALKIE says “That is correct. I am hidden somewhere in this facility.”.
Voice String
- Class attribute: String
this.voiceString
This internal attribute contains the Player’s current voice descriptor. This is primarily what is used in Narrations.
The reason this is used is that unlike the Player’s original voice string, this can change during gameplay. It can be
manually changed with
the setvoice command. When Player
data is loaded, this is the same as the Player’s original voice string. For that reason, moderators should be careful
when loading Player data during gameplay, as any Players with a voice string different from their original voice string
will have their voice string reset. If the name of another Player, whether living or dead, is supplied, then the Player
will speak using that Player’s voice. This will even trick Players with the
knows [Player name] behavior attribute into recognizing this Player’s voice as the
mimicked Player.
Stats
- Spreadsheet label: Stats
This is an external attribute. It only exists to group the Player’s stats together under one label. A Player’s stats are used in a variety of situations. Common applications of all of them include their ability to be modified by Status Effects and their ability to be used as a modifier in Die rolls. Here, their individual properties and applications will be detailed below.
Default Strength
- Spreadsheet label: Str
- Class attribute: Number
this.defaultStrength
This is the Player’s default strength stat. This quantifies the Player’s physical strength. It must be a whole number from 1 - 10.
Strength
- Class attribute: Number
this.strength
This internal attribute is the Player’s current strength stat. By default, this equals their default strength, however it can be changed by Status Effects with stat modifiers.
This stat is used to calculate the Player’s maximum carry weight. This value is recalculated every time the Player’s strength stat changes. The formula to calculate the Player’s max carry weight in kilograms is quadratic, not linear. It is roughly based on the range of real human weightlifting capacities. The full formula, where \(x\) is the Player’s strength stat, is:
\[ W_{max} = 1.783x^2 - 2x + 22 \]
The result is rounded down to the nearest whole number.
In effect, each strength stat value corresponds with a predetermined max carry weight, as shown in this chart:
| Strength Value | Max Carry Weight (kg) | Max Carry Weight (lb) |
|---|---|---|
| 1 | 21 | 46 |
| 2 | 25 | 55 |
| 3 | 32 | 70 |
| 4 | 42 | 92 |
| 5 | 56 | 123 |
| 6 | 74 | 163 |
| 7 | 95 | 209 |
| 8 | 120 | 264 |
| 9 | 148 | 326 |
| 10 | 180 | 396 |
The strength stat also has special behavior in Die rolls. If a Die is rolled using this Player’s strength stat, the defender’s dexterity roll modifier will be multiplied by \(-1\) and added to the Die’s modifier. In effect, this factors in the defender’s ability to dodge the Player’s attack.
Default Intelligence
- Spreadsheet label: Int
- Class attribute: Number
this.defaultIntelligence
This is the Player’s default intelligence stat. This quantifies the Player’s logical intelligence. It must be a whole number from 1 - 10.
Intelligence
- Class attribute: Number
this.intelligence
This internal attribute is the Player’s current intelligence stat. By default, this equals their default intelligence, however it can be changed by Status Effects with stat modifiers.
This stat has no programmed use. However, it can be used in if conditionals when writing descriptions to affect what the Player sees when inspecting various things. For example, a Player with a high intelligence stat may receive more clues to assist in solving Puzzles and murders than a Player with a low intelligence stat. Whereas a Player with a low intelligence stat might see this:
It's a small compartment below the dartboard. Written on it is "Prime x Prime x Prime = 266". There doesn't seem to be any way to open it. Maybe it will open if you hit three prime numbers on the dartboard that multiply together to make 266.
A Player with an average intelligence stat might see this:
It's a small compartment below the dartboard. Written on it is "Prime x Prime x Prime = 266". There doesn't seem to be any way to open it. Maybe it will open if you hit three prime numbers on the dartboard that multiply together to make 266. If that's the case, then you know a prime number is a number whose only products are 1 and itself. You don't even have to try any of the double or triple point values, or 50 for that matter.
And a Player with a high intelligence stat might see this:
It's a small compartment below the dartboard. Written on it is "Prime x Prime x Prime = 266". There doesn't seem to be any way to open it. Maybe it will open if you hit three prime numbers on the dartboard that multiply together to make 266. If that's the case, then you know a prime number is a number whose only products are 1 and itself. You don't even have to try any of the double or triple point values, or 50 for that matter. The only prime numbers on this board would be 2, 3, 5, 7, 11, 13, 17, and 19. Better yet, 266 is an even number, so you know one of the products MUST be 2, and you only need to find the other two numbers. This should be easy.
It should be noted that because this stat has no programmed use, it doesn’t necessarily have to correlate with the Player’s logical intelligence. It could correlate with the Player’s perception, or anything else. How this stat is used is entirely up to the moderator’s discretion when writing descriptions.
Default Dexterity
- Spreadsheet label: Dex
- Class attribute: Number
this.defaultDexterity
This is the Player’s default dexterity stat. This quantifies the Player’s skill and speed when using their hands or body. It must be a whole number from 1 - 10.
Dexterity
- Class attribute: Number
this.dexterity
This internal attribute is the Player’s current dexterity stat. By default, this equals their default dexterity, however it can be changed by Status Effects with stat modifiers.
This stat is used to determine the Player’s probability of success when attempting to steal Inventory Items from another Player. When this occurs, a Die is rolled using this Player’s dexterity stat, with the victim as the defender. If the Player has a high dexterity stat, and thus a positive dexterity roll modifier, then they will be more likely to succeed when attempting to steal. If the Player has a low dexterity stat, and thus a negative dexterity roll modifier, then they will be more likely to fail when attempting to steal.
It also has special behavior in Die rolls. If a Die is rolled using a different Player’s strength stat where this Player
is the defender, this Player’s dexterity roll modifier will be multiplied by -1 and added to the Die’s modifier. In
effect, this factors in the Player’s ability to dodge the attacker’s attack. If the Player has a high dexterity stat,
the attacker will be more likely to have a low attack roll, and vice versa.
Default Speed
- Spreadsheet label: Spd
- Class attribute: Number
this.defaultSpeed
This is the Player’s default speed stat. This quantifies the Player’s walking and running speed. It must be a whole number from 1 - 10.
Speed
- Class attribute: Number
this.speed
This internal attribute is the Player’s current speed stat. By default, this equals their default speed, however it can be changed by Status Effects with stat modifiers.
This stat is used to calculate the amount of time it takes for the Player to travel from one Exit to another in a Room.
The flat distance in pixels between the Player’s current position and the desired Exit’s position is calculated using the distance formula with the two positions’ respective X and Z coordinates. The flat distance is then converted to meters by dividing this value by the pixelsPerMeter setting. The rise of the Exit’s position relative to the Player’s is calculated by subtracting the Player’s Y coordinate from the Exit’s and dividing the resulting value by the pixels per meter setting. The slope between the two positions is then calculated by dividing the rise in meters by the flat distance in meters.
Movement speed is roughly based on the range of real human movement speeds. For example, a Player with a speed stat of 10 would have a movement speed of 8.34 meters per second. This is slightly less than Usain Bolt’s top sprinting speed of 10.44 meters per second. The base formula to calculate a Player’s movement speed in meters per millisecond (m/ms) is quadratic, not linear. It is as follows:
\[ R = (0.0183(rx)^2 + 0.005rx + 0.916)w \]
In this formula are several variables:
- \(x\) is the Player’s speed stat.
- \(r\) is \(1\) if the Player is walking and \(2\) if the Player is running.
- \(w\) is a fraction which represents slowdown based on the combined weight of all of the Player’s Inventory Items. The formula to calculate this, where \(c\) is the Player’s carry weight, is \(w = \frac{15}{c}\). However, the calculated value is clamped between \( \frac{1}{4} \) and \(1\).
The final rate, \(R’\), in meters per millisecond (m/ms), is then calculated with the following formula, where \(R\) is the base rate and \(s\) is the slope:
\[ R’ = R - sR \]
The time it takes to move, \(t\), in seconds, is then calculated with the following formula, where \(d\) is the flat distance in meters and \(R’\) is the final rate in meters per millisecond:
\[ t = \frac{d}{R’} * 1000 \]
However, there is an alternative calculation method. If the flat distance between the Player’s position and the Exit’s position is \(0\), then the time it takes to move between them is calculated based on the assumption that the Player is in a stairwell consisting of two horizontally-flipped right triangles with legs of equal length vertically stacked on top of one another, like this diagram:
Here, the Player is marked by the bottom red line and the Exit is marked by the top red line. They have the same X and Z coordinates; only their Y coordinates differ. The distance, \(d\), in meters between the Player and the Exit is calculated by using the Pythagorean theorem to find the length of the hypotenuse for each triangle. In this formula, \(l\) represents the length of each leg, calculated by dividing the rise in meters by \(2\):
\[ d = 2 * \sqrt{2l^2} \]
Then, if the rise is positive, meaning the Player is moving upstairs, the Player’s base rate is multiplied by \( \frac{2}{3} \). If the rise is negative, meaning the Player is moving downstairs, the Player’s base rate is multiplied by \( \frac{4}{3} \). In effect, their rate is decreased when moving upstairs and increased when moving downstairs.
Finally, the time it takes to move in this scenario, \(t\), in seconds, is calculated with the following formula, where \(d\) is the recently determined distance in meters and \(R\) is the base rate (without accounting for slope) in meters per millisecond:
\[ t = \frac{d}{R} * 2 * 1000 \]
Default Stamina
- Spreadsheet label: Sta
- Class attribute: Number
this.defaultStamina
This is the Player’s default speed stat. This quantifies the Player’s physical endurance. It must be a whole number from 1 - 10.
Max Stamina
- Class attribute: Number
this.maxStamina
This internal attribute is the Player’s current maximum stamina stat. By default, this equals their default stamina, however it can be changed by Status Effects with stat modifiers.
This stat is used to determine how long the Player can walk or run before being inflicted with the weary Status
Effect. The higher this is, the longer the Player can move without resting.
Stamina
- Class attribute: Number
this.stamina
This internal attribute is the Player’s current stamina stat. By default, this equals their maximum stamina, however it changes as the Player moves and rests. Whenever the Player’s max stamina changes, so too does their stamina; the ratio of their current stamina to their max stamina is retained.
As the Player moves, their stamina stat decreases. Every 100 milliseconds, the amount of stamina the Player loses, \( L\), is calculated using the following formula:
\[ L = dm * (u + su) \]
In this formula are several variables:
- \(d\) is the flat distance in meters the Player has moved in the past 100 milliseconds.
- \(m\) is \(1\) if the Player is walking and \(3\) if the Player is running.
- \(u\) is the staminaUseRate setting.
- \(s\) is the slope of the Player’s movement, calculated by dividing the number of meters they’ve risen in meters by the flat distance in meters they’ve moved in the past 100 milliseconds.
However, there is an alternative calculation method. If the flat distance between the Player’s position and the Exit’s position is \(0\), then the time it takes to move between them is calculated based on the assumption that the Player is in a stairwell. If the rise is positive, meaning the Player is moving upstairs, the amount of stamina the Player loses is calculated like so:
\[ L = 4dmu \]
If the rise is negative, meaning the Player is moving downstairs, the amount of stamina the Player loses is calculated like so:
\[ L = -\frac{dmu}{4} \]
When the Player’s stamina dips below half of their max stamina, they will be sent a warning that they’re starting to get
tired. If it reaches \(0\), they will stop moving and be inflicted with the weary Status Effect.
When the Player is not moving, their stamina is gradually restored. Every 30 seconds, they recover \( \frac{1}{20} \) of their max stamina.
Alive
- Spreadsheet label: Alive?
- Class attribute: Boolean
this.alive
This indicates whether the player is alive or not. If this is true, then the Player is alive, and can interact with
the game world like normally. If this is false, then the Player is dead, and they cannot do anything. When a Player
dies, some of their data is lost. In particular, their location, hiding spot, and Status Effects will be lost. However,
they retain everything else, including their Inventory Items. However, because dead Players cannot be inspected or
interacted with, all of their data is inaccessible.
Location
- Spreadsheet label: Location
- Class attribute: Room
this.location
This is the Room that the Player is currently in. This must match the Room’s name exactly on the spreadsheet.
Position
- Class attribute: object
this.pos
This internal attribute is an object containing variables that contain each of the Player’s current coordinates. This is used to calculate the amount of time it will take for the Player to move to an Exit. When the Player is moving, their position is constantly updated. Every 100 milliseconds, the amount of time that has elapsed since the Player started moving is taken as a ratio of the total amount of time it will take to move to the desired Exit. Each of the Player’s starting coordinates is subtracted from the Exit’s corresponding coordinates, and the resulting value is multiplied by that ratio and rounded to the nearest whole number. Then, each of these values are added to the Player’s starting coordinates to determined the Player’s updated position. This effectively makes it so that if the Player stops moving, they won’t have to move the full distance if they decide to move to that Exit again.
When the Player enters a Room, their position is updated to match the position of the Exit they entered from. However, if the Player didn’t enter from a specific Exit, as would be the case when Player or Room data is loaded or when moving to a non-adjacent Room, their position is set to the average position of all Exits in the Room.
The Player’s position has the following structure:
{ Number x, Number y, Number z }
This essentially groups what would be multiple class attributes into one. They are listed below:
X
- Class attribute: Number
this.pos.x
This is the Player’s current X coordinate.
Y
- Class attribute: Number
this.pos.y
This is the Player’s current Y coordinate.
Z
- Class attribute: Number
this.pos.z
This is the Player’s current Z coordinate.
Hiding Spot
- Spreadsheet label: Hiding Spot
- Class attribute: String
this.hidingSpot
This is a string which contains the name of the Object the Player is currently hiding in. Since this is just a string, it can be set manually on the spreadsheet to anything, whether it’s the name of an Object in the Room or not. If the Player is not currently hidden, this should be left blank.
Status
- Class
attribute: Array<Status Effect>
this.status
This internal attribute contains a list of all instantiated Status Effects that the Player currently has. Every time a Status Effect is inflicted or cured, the Player’s stats are recalculated.
Status String
- Spreadsheet label: Status Effects
- Class attribute: String
this.statusString
This string is a comma-separated list of the names of all Status Effects that the Player currently has, including those that aren’t visible. If a Status Effect has a duration, it can be listed here by putting the duration in parentheses. The duration must follow a specific format:
(D) H:mm:ss
D stands for the number of 24-hour days remaining; it is optional. H stands for the number of hours remaining. mm
stands for the number of minutes remaining; leading zeroes are required. ss stands for the number of seconds
remaining; leading zeroes are required. For example, a Status Effect named famished with 2 days, 13 hours, 45 minutes,
and 11 seconds remaining would be listed as famished (2 13:45:11). A Status Effect named clean with 1 day, 4 hours,
9 minutes, and 7 seconds remaining would be listed as clean (1 4:09:07). A Status Effect named mortally wounded with
59 minutes remaining would be listed as mortally wounded (0:59:00).
It should be noted that when entering Status Effects on the spreadsheet manually, it isn’t necessary to include the duration. If the Status Effect has a limited duration, it will automatically have its duration listed on the spreadsheet when Alter Ego saves the game data. The Player’s status string is regenerated with updated durations every second of gameplay.
Description
- Spreadsheet label: Description
- Class attribute: String
this.description
This is the description of the Player. When another Player inspects this Player, they will receive a parsed version of this string. See the article on writing descriptions for more information.
Player descriptions have a few peculiarities that set them apart from other descriptions, mostly due to the complexity of Players. In this section, Player descriptions will be explained in full detail. The default Player description provided in the default playerdefaults file is:
<desc><s>You examine <var v="container.displayName" />.</s> <if cond="container.hasAttribute('concealed')"><s><var v="container.pronouns.Sbj" /> <if cond="container.pronouns.plural">are</if><if cond="!container.pronouns.plural">is</if> [HEIGHT], but <var v="container.pronouns.dpos" /> face is concealed.</s></if><if cond="!container.hasAttribute('concealed')"><s><var v="container.pronouns.Sbj" /><if cond="container.pronouns.plural">'re</if><if cond="!container.pronouns.plural">'s</if> [HEIGHT] with [SKIN TONE], [HAIR], and [EYES].</s></if> <s><var v="container.pronouns.Sbj" /> wear<if cond="!container.pronouns.plural">s</if> <il name="equipment"><item>a SHIRT</item>, <item>a pair of PANTS</item>, and <item>a pair of TENNIS SHOES</item></il>.</s> <s>You see <var v="container.pronouns.obj" /> carrying <il name="hands"></il>.</s></desc>
This description always refers to the Player with the correct name and pronouns according to the situation, and it does
so by making use of the Player’s class attributes with if and var tags. However, unlike descriptions of other data
structures, the class attributes of the Player being described are not being accessed with the typical this keyword.
Instead, they are accessed by the container keyword. This is done so that the Player can view their own description
when inspecting a MIRROR Object, for example. Because
the parser module replaces the this keyword
in evaluated expressions
with container, the name of the variable referring to the data structure being described, and because the container
variable when a Player inspects a mirror is the MIRROR Object itself, the this keyword cannot be used in Player
descriptions while allowing for this functionality. Instead, the container keyword must be used, and a MIRROR Object
cannot simply use the Player’s description in a variable tag without modifications. It must replace all instances of the
container keyword with the player keyword, which describes the Player inspecting the MIRROR Object, like so:
<desc><s>You look at your reflection in the mirror.</s> <var v="player.description.replace(/container./g, 'player.')" /></desc>
Within the desc tags of the Player’s description, there are five sections:
-
<s>You examine <var v="container.displayName" />.</s>- This refers to the Player by their current display name. This should never be changed.
-
<if cond="container.hasAttribute('concealed')"><s><var v="container.pronouns.Sbj" /> <if cond="container.pronouns.plural">are</if><if cond="!container.pronouns.plural">is</if> [HEIGHT], but <var v="container.pronouns.dpos" /> face is concealed.</s></if>- This section describes the Player with very little detail in order to avoid revealing their identity when they
have the
concealedbehavior attribute. - The
concealedbehavior attribute automatically changes the Player’s pronouns to theneutralset. Consequently, this section could be written as<if cond="container.hasAttribute('concealed')"><s>They are [HEIGHT], but their face is concealed.</s></if>for simplicity’s sake. However, doing so removes the possibility of using the setpronouns command after the Player is inflicted with theconcealedbehavior attribute. It can still be used, but the new pronouns will not be reflected in the Player’s description.
- This section describes the Player with very little detail in order to avoid revealing their identity when they
have the
-
<if cond="!container.hasAttribute('concealed')"><s><var v="container.pronouns.Sbj" /><if cond="container.pronouns.plural">'re</if><if cond="!container.pronouns.plural">'s</if> [HEIGHT] with [SKIN TONE], [HAIR], and [EYES].</s></if>- This section describes the Player in more detail. It’s used when the Player doesn’t have the
concealedbehavior attribute. - Because the Player’s pronouns do not automatically change unless they are inflicted with the
concealedbehavior attribute, this section could be written without making use of the Player’s pronouns invartags. Instead, the Player’s pronouns could be written as plain text. This would allow a Player who uses multiple pronouns interchangeably to be referred to with alternating pronouns, for example. However, this would hamper the use of the setpronouns command for the Player unless additional logic checking is added. - In this section, the Player can be described in much more detail than the default description allows for, and detail can be added throughout the course of the game if the Player’s appearance changes in significant ways. However, Player descriptions should ideally be kept as short as possible so as to not overwhelm Players with too much irrelevant information.
- An example of this section that makes use of static pronouns, extra detail, and extra conditionals, might look like
this:
<if cond="!container.hasAttribute('concealed')"><s>It's a fairly young individual of average height with very pale skin.</s> <s>He's quite scrawny and frail-looking, with a very small chest.</s> <s>She has black eyes and short, red hair with bangs falling a little into her face and shoulder-length fringes on both sides, with the rest of its hair <if cond="findInventoryItem('BLAKES RIBBONS', container.name, '', 'HAT') !== undefined">done up in two buns held together with a pair of black ribbons</if><if cond="findInventoryItem('BLAKES RIBBONS', container.name, '', 'HAT') === undefined">coming down to about the shoulders</if>.</s> <s>He looks easy enough to get along with, if a little nervous.</s></if>
- This section describes the Player in more detail. It’s used when the Player doesn’t have the
-
<s><var v="container.pronouns.Sbj" /> wear<if cond="!container.pronouns.plural">s</if> <il name="equipment"><item>a SHIRT</item>, <item>a pair of PANTS</item>, and <item>a pair of TENNIS SHOES</item></il>.</s>- This sentence lists all Inventory Items that the Player currently has equipped, except for those equipped to their “RIGHT HAND” and “LEFT HAND” Equipment Slots and those whose Equipment Slot is covered by another equipped Inventory Item.
- If the Player’s equipped Inventory Items are manually changed on the spreadsheet, the contents of the
iltag must be manually updated with the single containing phrases of the respective Inventory Items initemtags. - If nothing is listed in the
iltag, this sentence will not appear in the parsed description. - Because this sentence appears regardless of whether or not the Player has the
concealedbehavior attribute,vartags should be used to reference the Player’s pronouns. They should not be replaced with static pronouns.
-
<s>You see <var v="container.pronouns.obj" /> carrying <il name="hands"></il>.</s>- This sentence lists all non-discreet Inventory Items that the Player currently has equipped to their “RIGHT HAND” or “LEFT HAND” Equipment Slots.
- If the Player’s held Inventory Items are manually changed on the spreadsheet, the contents of the
iltag must be manually updated with the single containing phrases of the respective Inventory Items initemtags. - If nothing is listed in the
iltag, this sentence will not appear in the parsed description. - Because this sentence appears regardless of whether or not the Player has the
concealedbehavior attribute,vartags should be used to reference the Player’s pronouns. They should not be replaced with static pronouns.
Additional information can be added to the Player’s description as needed. However, when doing so, precautions should be
taken to ensure that it does not conflict with the effects of the concealed behavior attribute. If additional sections
are added, they generally must use var tags to reference the Player’s pronouns. A full example of a Player description
with additional detail that makes use of static pronouns where possible might look like this:
<desc><s>You examine <var v="container.displayName"/>.</s> <if cond="container.hasAttribute('concealed')"><s>They are somewhat tall, but their face is concealed.</s></if><if cond="!container.hasAttribute('concealed')"><s>She's somewhat tall and has a pale complexion.</s> <s>She has long, creamsicle-orange hair with bangs in the middle.</s> <s>She has brown eyes and light brown eyebrows.</s> <s>She has a near-permanent smile, giving you the impression that she's very friendly - perhaps even a bit *too* friendly.</s> <s>She's somewhat thin with a very large chest.</s> <s>All of her fingernails are painted black.</s></if> <s><var v="container.pronouns.Sbj"/> wear<if cond="!container.pronouns.plural">s</if> <il name="equipment"><item>a BLACK HAIRBAND</item>, <item>a WHITE DRESS SHIRT</item>, <item>a BLACK TIE</item>, <item>a BLACK SUIT JACKET</item>, <item>a BLACK PENCIL SKIRT</item>, <item>a set of PANTYHOSE</item>, and <item>a pair of BLACK PUMPS</item></il>.</s> <s>You see <var v="container.pronouns.obj"/> carrying <il name="hands"></il>.</s> <if cond="container.statusString.includes('stinky')"><s><var v="container.pronouns.Sbj"/>'<if cond="container.pronouns.plural">re</if><if cond="!container.pronouns.plural">s</if> a little stinky.</s></if><if cond="container.statusString.includes('rancid')"><s><var v="container.pronouns.Sbj"/> smell<if cond="!container.pronouns.plural">s</if> absolutely **rancid**.</s></if></desc>
Inventory
- Class
attribute: Array<Equipment Slot>
this.inventory
This internal attribute is a list of Equipment Slots that the Player has. See the article on Equipment Slots for more information.
Spectate Channel
- Class attribute: TextChannel
this.spectateChannel
This is an internal attribute. When Player data is loaded, Alter Ego will attempt to find the channel in
the Spectate category whose name matches the name of the Player. If
it is not found, it will create one with that Player’s name. It will not do this if there are already 50 spectate
channels in the Spectate category, however. It also will not attempt to find or create spectate channels for NPCs. In
both scenarios, this is null.
A spectate channel replicates the experience of being this Player. Everything the Player sees, including descriptions, Narrations, dialog, and more, is sent to this channel in chronological order. Here, spectators and dead Players can watch the game happen in real time, or read it at any point in the future, even after the game has concluded.
There are some things that do not appear in spectate channels, however. Out-Of-Character (OOC) messages - messages that
begin with ( - are not sent, as
the dialogHandler module does not count
these as dialog. The Player’s commands are also not sent, nor are error messages about command syntax. When the Player
uses the status command, their status will not appear in their spectate
channel.
Max Carry Weight
- Class attribute: Number
this.maxCarryWeight
This internal attribute is the maximum weight the Player can currently carry in kilograms. How it is calculated is described in more detail in the strength stat section. If the Player attempts to take an Item that is heavier than this number, they will be told it is too heavy to lift, and if the Item is non-discreet, their attempt to take it will be Narrated in the Room channel. Likewise, if they attempt to take an Item that would make their current carry weight exceed this value, they will be told that they’re carrying too much weight; however, this will not be Narrated. The same happens if another Player attempts to give this Player an Inventory Item that would exceed this value. If the Player uses the dress command, they will be unable to dress themself in any Items that would exceed this value, although they will not be notified of it.
Carry Weight
- Class attribute: Number
this.carryWeight
This internal attribute is the combined weight of all of the Player’s Inventory Items. This is updated every time the Player’s inventory changes. This is used to determine how much slower the Player will be when moving.
Row
- Class attribute: Number
this.row
This is an internal attribute, but it can also be found on the spreadsheet. This is the row number of the Player.
Is Moving
- Class attribute: Boolean
this.isMoving
This internal attribute indicates whether the Player is currently in the process of moving or not. If this is true,
then they are currently moving. If this is false, then they are resting.
It should be noted that the Player can be forcibly stopped from moving in many ways. If Player data is reloaded,
if edit mode is enabled, if the Player is inflicted with a Status Effect with the
disable all, disable move, or
disable run behavior attributes, if the Player is forcibly moved using moderator or bot commands, or if the Player
dies, they will stop moving, and all class attributes associated with movement will be reset.
Move Timer
- Class attribute: Number
this.moveTimer
This internal attribute uses the setInterval method to
handle the Player’s movement. Every 100 milliseconds, 100 milliseconds are subtracted from the
Player’s remaining time, and the Player’s position and stamina are updated. However, if at
least one Player in the game has the “heated” Status Effect, the amount of milliseconds subtracted from the Player’s
remaining time is first multiplied by
the heatedSlowdownRate setting, effectively making the Player
move more slowly. If the Player stops moving for any reason,
the clearInterval method is used on this so that the
Player’s movement will no longer continue. When Player data is loaded, this is null.
Remaining Time
- Class attribute: Number
this.remainingTime
This internal attribute is the number of milliseconds remaining until the Player is done moving to the Exit they’re
currently moving to. If the Player stops moving for any reason, this is set to 0.
Move Queue
This internal attribute is a list of all movements the Player wishes to make in sequential order. When the Player uses the move command or run command, the Exits they supply as arguments are inserted into this list. Each one is parsed, and if the desired Exit is found, the Player begins moving to that Exit. When they reach the next Room, the next entry in the queue is parsed and the cycle continues until the Player reaches the final destination. However, if any entry in the queue is an invalid destination or they attempt to enter a locked Exit, the Player is notified of their mistake, they stop moving, and the queue is emptied.
This class attribute is unused if the Player is moved with the moderator or bot command, because those commands move the Player instantaneously. As such, NPCs cannot have queued movements.
Reached Half Stamina
- Class attribute: Boolean
this.reachedHalfStamina
This internal attribute indicates whether or not the Player has depleted half of their stamina while moving. When the
Player’s stamina first dips below half of their maximum stamina, they will be warned that they’re starting to become
tired, and this is set to true. Once this is true, the warning message is not sent again until Player data is
reloaded, where it is set to false by default.
Interval
- Class attribute: Number
this.interval
This internal attribute uses the setInterval method to handle stamina regeneration. Every 30 seconds, Alter Ego checks if the Player is moving. If they aren’t, and if their current stamina is less than their max stamina, they recover 1/20th of their max stamina.
Online
- Class attribute: Boolean
this.online
This internal attribute determines whether or not the Player is included in the count of online Players in Alter
Ego’s status message. If this is true, then the
Player is counted. If this is false, then they are not. A Player is set as online whenever they use a command or speak
in-game. NPCs are never considered online.
Online Interval
- Class attribute: Number
this.onlineInterval
This internal attribute uses the setTimeout method to
count down until the Player is no longer considered online. Every time the Player is set as online, the online interval
is reset using the clearTimeout method and then
restarted from the beginning. If the timer reaches 0, then the Player is set as offline. This takes 15 minutes. When
Player data is loaded, this is null.
Prefab
A Prefab is a data structure in the Neo World Program. It represents the concept of an item, and is the underlying data structure which gives Items and Inventory Items their properties.
Prefabs are static; once loaded from the spreadsheet, they do not change in any way. Thus, the saver module will never make changes to the Prefabs sheet. As a result, the Prefabs sheet can be freely edited without edit mode being enabled.
Attributes
Due to the versatility of functions that different items can have, Prefabs have many attributes. Note that if an attribute is internal, that means it only exists within the Prefab class. Internal attributes will be given in the “Class attribute” bullet point, preceded by their data type. If an attribute is external, it only exists on the spreadsheet. External attributes will be given in the “Spreadsheet label” bullet point.
ID
- Spreadsheet label: Prefab ID
- Class attribute: String
this.id
This is a unique identifier for the Prefab. All letters should be capitalized, and spaces are allowed. Though different Prefabs can have many attributes in common, no two Prefabs can have the same ID.
Single Name
- Spreadsheet label: Prefab Name
- Class attribute: String
this.name
This is the name used to refer to a singular instance of an Item or Inventory Item using this Prefab. When Players use a command to interact with an Item or Inventory Item using this Prefab, this string is what they will need to enter to refer to it. All letters should be capitalized, and spaces are allowed.
Plural Name
- Spreadsheet label: Prefab Name
- Class attribute: String
this.pluralName
This is the optional name used to refer to plural instances of Items or Inventory Items using this Prefab. Note that this shares the same spreadsheet cell as the Prefab’s single name, with both separated by a comma. If only one instance of a Prefab is intended to exist, it does not need a plural name. Additionally, it does not need a plural name if it would be the same as its single name.
Single Containing Phrase
- Spreadsheet label: Containing Phrase
- Class attribute: String
this.singleContainingPhrase
This is the phrase that will be inserted in/removed from item tags when an Item or Inventory Item using this Prefab is added to/removed from an item list. It is also the phrase that will be used when a non-discreet Item is inspected, taken, or dropped; when a non-discreet Inventory Item is inspected, stashed, unstashed, or carried from one Room to another; and when an Inventory Item (whether discreet or non-discreet) is equipped or unequipped. No restrictions are placed on the content of this string, however it should generally contain the Prefab’s single name.
Plural Containing Phrase
- Spreadsheet label: Containing Phrase
- Class attribute: String
this.pluralContainingPhrase
This is the optional phrase that will be used in an item list when it contains multiple instances of Prefabs with the same single containing phrase. Note that this shares the same spreadsheet cell as the Prefab’s single containing phrase, with both separated by a comma. If only one instance of a Prefab with a given single containing phrase is intended to exist, it does not need a plural containing phrase. However, if multiple instances are intended to exist, even if its plural containing phrase would be the same as its single containing phrase, one does need to be given.
Discreet
- Spreadsheet label: Discreet?
- Class attribute: Boolean
this.discreet
This is a simple Boolean value indicating whether interactions with Items and Inventory Items using this Prefab will
be narrated or not. Specifically, if this is false, then Alter Ego will notify the Room if a Player
inspects, takes, or drops an Item using this Prefab; or inspects, stashes, unstashes, or moves to another Room carrying
an Inventory Item using this Prefab. Additionally, if this is false, then when an Inventory Item using this Prefab is
moved to either of the Player’s hands, it will be added to the “hands” item list in that Player’s description.
Size
- Spreadsheet label: Size
- Class attribute: Number
this.size
This is a whole number representing how large the Prefab is. It is not associated with any particular unit of measurement, but instead represents relative sizes. For example, an ID card may have a size of 1 whereas a gun may have a size of 2 and a ladder may have a size of 10. There are no rules to determine what size a Prefab should have, however it should be non-negative.
Weight
- Spreadsheet label: Weight
- Class attribute: Number
this.weight
This is a whole number representing roughly how much the Prefab weighs in kilograms. This number determines whether a Player is capable of taking an Item using this Prefab with their strength stat. For more details, see the sections about Item and Inventory Item weights.
Usable
- Spreadsheet label: Usable?
- Class attribute: Boolean
this.usable
This is another Boolean value indicating whether Inventory Items using this Prefab can be used to inflict/cure one or
more Status Effects on the Player using it. If this is false, the Player will be told the Inventory Item
has no programmed use. Additionally, if a Player already has all of the Status Effects the Prefab inflicts and doesn’t
have any of the Status Effects it cures, the Player will not be able to use the Inventory Item and will instead be told
that it has no effect.
Use Verb
- Spreadsheet label: Use Verb
- Class attribute: String
this.verb
This is the phrase that will be used in the Narration when a Player uses an Inventory Item with this Prefab. Usage of an Inventory Item will always be narrated, and will use the following format:
[Player displayName] [this.verb] [this.singleContainingPhrase].
See the following table for some examples of the resulting Narration:
| Player displayName | Single Containing Phrase | Use Verb | Narration |
|---|---|---|---|
| Veronica | FOOD | eats | Veronica eats FOOD. |
| Faye | a bottle of WATER | drinks | Faye drinks a bottle of WATER. |
| An individual wearing a MASK | a TOWEL | dries off with | An individual wearing a MASK dries off with a TOWEL. |
| Colin | a bottle of PAINKILLERS | swallows a pill from | Colin swallows a pill from a bottle of PAINKILLERS. |
Uses
- Spreadsheet label: Uses
- Class attribute: Number
this.uses
This is a whole number indicating how many times a single instance of this Prefab can be used. For more details, see the sections about Item uses and Inventory Item uses.
Effects Strings
This is a comma-separated list of Status Effects that Inventory Items using this Prefab will inflict the Player with when used.
Effects
- Class
attribute: Array<Status Effect>
this.effects
This is an internal attribute which contains references to each of the Status Effect objects whose names are listed in
this.effectsStrings.
Cures Strings
This is a comma-separated list of Status Effects that Inventory Items using this Prefab will cure the Player of when
used. Status Effects will turn into their cured condition, if applicable. Note that it will
attempt to cure them in the order given. As a consequence, if the next Status Effect in the list is the current Status
Effect’s cured condition, it will immediately be cured after being inflicted, turning into its cured condition, and so
on. For example, imagine the following series of Status Effects, where each one’s cured condition follows the ->
symbol:
starving->famished->hungry->satisfied->full
If a Player with the starving Status Effect uses an Inventory Item whose Prefab has the cures string
starving, famished, hungry, satisfied, then the Player will be cured of starving and inflicted with famished, then
cured of famished and inflicted with hungry, and so on until the Player is eventually inflicted with full.
In order to avoid this behavior, if a Prefab’s cures string is meant to contain a list of Status Effects in a series,
they should be listed in reverse order. In the above example, the cures string should be
satisfied, hungry, famished, starving. That way, the Player will only be cured of starving and inflicted with
famished.
Cures
- Class
attribute: Array<Status Effect>
this.cures
This is an internal attribute which contains references to each of the Status Effect objects whose names are listed in
this.curesStrings.
Next Stage Name
- Spreadsheet label: Turns Into
- Class attribute: String
this.nextStageName
This is the ID of the Prefab Inventory Items using this Prefab will turn into once its number of uses reaches 0. Prefabs with infinite uses will never access this attribute. When an Inventory Item turns into its next stage, all of its attributes will be replaced with that of the new Prefab. Note that if the Prefab has a limited number of uses and this is blank, Inventory Items using it will simply disappear from the Player’s inventory once they run out of uses.
Next Stage
- Class attribute: Prefab
this.nextStage
This is an internal attribute which simply contains a reference to the actual Prefab object whose ID matches
this.nextStageName. If no next stage name is given, this will be null instead.
Equippable
- Spreadsheet label: Equippable?
- Class attribute: Boolean
this.equippable
This is another Boolean value indicating whether Inventory Items using this Prefab can be equipped to one of the
player’s Equipment Slots. If this is true, then Players will be able to equip it to one of the
Equipment Slots that it’s restricted to. If this is false, they will simply be told that the item is unequippable.
Additionally, if this is false, Players will be unable to unequip the Inventory Item if it’s already equipped. Note
that a moderator can forcibly equip and unequip Inventory Items for a Player
regardless of whether this is true or false. Note that when an Inventory Item is equipped or unequipped, a Narration
will always be sent to the Room the Player is in.
Equipment Slots
This is a list of Equipment Slots that Inventory Items using this Prefab can be equipped to. This should be a
comma-separated list. If a Player or a moderator attempts to equip an Inventory Item without specifying an Equipment
Slot to equip it to, Alter Ego will attempt to equip it to the first Equipment Slot listed here. If something is already
equipped to that Equipment Slot, another one will have to be manually specified. Note that if no Equipment Slots are
given here, Players will be unable to equip Inventory Items using this Prefab, even if its equippable attribute is set
to true. However, moderators can forcibly equip Inventory Items to any of a Player’s Equipment Slots, regardless of
whether or not it is listed here.
Covered Equipment Slots
This is a list of Equipment Slots that this Prefab will cover when it is equipped. When an Equipment Slot is covered by another equipped Inventory Item, the single containing phrase of whatever Inventory Item is equipped to it will be removed from the equipment item list in the Player’s description. Only when the Player unequips all Inventory Items whose Prefabs cover that Equipment Slot will the single containing phrase of that Inventory Item be added to the Player description’s equipment item list again.
Equipped Commands
This is a comma-separated list of bot commands that will be executed when an Inventory
Item using this Prefab is equipped. Note that this shares the same spreadsheet cell as the Prefab’s unequipped commands,
with both sets of commands separated by a forward slash (/). If no unequipped commands are desired, the forward slash
can be omitted from the cell.
Unequipped Commands
This is a comma-separated list of bot commands that will be executed when an Inventory Item using this Prefab is
unequipped. Note that this shares the same spreadsheet cell as the Prefab’s equipped commands, with both sets of
commands separated by a forward slash (/). If no equipped commands are desired, the forward slash should be the first
character in the cell, with the unequipped commands following it.
Inventory
This is a list of inventory slot objects that instances of this Prefab will have. Items and Inventory Items with inventory slots are capable of containing other Items/Inventory Items. Inventory slot objects have the following structure:
{ String name, Number capacity, Number takenSpace, Number weight, Array item }
In order to define an inventory slot for a Prefab, the name of the inventory slot and its capacity should be given,
separated by a colon (:). For example, a Prefab with the ID “PANTS” might have two inventory slots, named “LEFT
POCKET” and “RIGHT POCKET”, each with a capacity of 3. In this case, the cell for the “PANTS” Prefab’s inventory slots
would be LEFT POCKET: 3, RIGHT POCKET: 3. There is no theoretical limit to the amount of inventory slots a single item
can have.
The size of every Item/Inventory Item placed into a single inventory slot is added to that inventory slot’s takenSpace value. If the quantity of that Item/Inventory Item is higher than 1, its size will be multiplied by its quantity before being added. If inserting an Item/Inventory Item would cause the inventory slot’s takenSpace value to exceed its capacity, it cannot be inserted into that inventory slot. Additionally, every Item/Inventory Item inserted adds its own weight to the inventory slot’s weight. Lastly, the Item/Inventory Item itself will be inserted into the inventory slot’s item array.
When inventory slots are initialized, their takenSpace and weight attributes are set to 0. Their item arrays are initially empty. Prefab inventory slots will always retain this initialized state. That is, even if an Item/Inventory Item contains other Items/Inventory Items in one of its inventory slots, the corresponding inventory slots of its associated Prefab will remain in its initialized, empty state. Prefabs cannot contain Items/Inventory Items. The inventory attribute of Prefabs is merely a template for instances of those Prefabs to use so that they can contain Items/Inventory Items.
Preposition
- Spreadsheet label: Preposition
- Class attribute: String
this.preposition
This attribute is similar to the preposition attribute in the Object class. However, it does not determine whether instances of this Prefab can contain Items/Inventory Items. That function is taken care of by the inventory attribute of the Prefab. Otherwise, it functions the same. When a Player drops/stashes a non-discreet Item/Inventory Item into an instance of this Prefab, Alter Ego will narrate them doing so using this preposition. For example, if the player Seamus stashes an Inventory Item named MALLET into another Inventory Item named GUITAR CASE whose Prefab has the preposition “in”, Alter Ego will send “Seamus stashes a MALLET in his GUITAR CASE.” to the Room channel Seamus is currently in. If, however, Seamus drops the MALLET Inventory Item into a GUITAR CASE Item in the room, Alter Ego will send “Seamus puts a MALLET in the GUITAR CASE.”
Description
- Spreadsheet label: Description
- Class attribute: String
this.description
This is the description of the Prefab. When a Player inspects an instance of this Prefab, they will receive a parsed version of this string. Any item lists in a Prefab’s description must be blank. Note that when a Player inspects an Inventory Item that is equipped to one of another Player’s Equipment Slots, all sentences containing item lists will be removed from the description before it is parsed, effectively making it so that Players cannot see what is stashed in that Inventory Item. See the article on writing descriptions for more information.
Row
- Class attribute: Number
this.row
This is an internal attribute, but it can also be found on the spreadsheet. This is the row number of the Prefab.
Puzzle
A Puzzle is a data structure in the Neo World Program. Its primary purpose is to allow Players to interact with the game world and change its state in predictable, predefined ways. While this can be in the form of a gameplay puzzle that the Player can solve, a Puzzle can be far simpler than what would traditionally be called a puzzle in most games.
Attributes
In order to provide a versatile array of behaviors, Puzzles have many attributes. Note that if an attribute is internal, that means it only exists within the Puzzle class. Internal attributes will be given in the “Class attribute” bullet point, preceded by their data type. If an attribute is external, it only exists on the spreadsheet. External attributes will be given in the “Spreadsheet label” bullet point.
Name
- Spreadsheet label: Puzzle Name
- Class attribute: String
this.name
This is the name of the Puzzle. All letters should be capitalized, and spaces are allowed. Players will be able to interact with this Puzzle by using it as an argument in the use command. Note that multiple Puzzles can have the same name, so long as they are in different Rooms. However, to lower the likelihood of bugs and enable certain features, it is recommended that each Puzzle be given a unique name.
Solved
- Spreadsheet label: Solved?
- Class attribute: Boolean
this.solved
This is a simple Boolean value indicating whether the Puzzle has already been solved or not. If this is true, then the
Puzzle has been solved. If it is false, then the Puzzle has not been solved. How this affects a Puzzle’s behavior
varies based on the Puzzle’s type, but in general, if the Puzzle has not been solved, then a Player
can attempt to solve it. If the Puzzle has been solved, then the Player will simply receive the text in
the already solved description.
Outcome
- Spreadsheet label: Outcome
- Class attribute: String
this.outcome
This is a string indicating which solution the Puzzle has been solved with, if any. If the Puzzle is not solved or only has one possible solution, then this must be blank. In general, this does not need to be set manually. Alter Ego will automatically set this when the Puzzle is solved, if it has multiple possible solutions. This should only be set manually if the Puzzle should be solved by default. If that is the case, then it should match exactly one of the Puzzle’s solutions.
Requires Moderator
- Spreadsheet label: Requires Mod?
- Class attribute: Boolean
this.requiresMod
This is another Boolean value indicating whether the Puzzle requires moderator
intervention to solve. If this is true, then the Puzzle can only be solved by a moderator using
the puzzle command, and a Player who attempts to solve the Puzzle will
receive the message “You need moderator assistance to do that.” If this is false, then a Player will be able to
attempt to solve the Puzzle freely.
A Puzzle that requires moderator intervention to solve can be useful in a few situations. A few examples are:
- A Puzzle whose solution cannot be entered in a Discord message and interpreted by Alter Ego, such as an image or an arrangement of items in a certain order,
- A Puzzle with an open-ended solution that requires a Player to think creatively,
- A Puzzle that can only be attempted under certain conditions,
- A Puzzle that is not intended to be solved until a certain time, and
- A Puzzle that is not intended to be directly interacted with, only existing for game-mechanic purposes.
By making use of this attribute, a Puzzle can be given greater flexibility of solutions, while still making use of the predefined behavior that makes Puzzles such a useful data type.
Location
- Spreadsheet label: Location
- Class attribute: Room
this.location
This is the Room the Puzzle can be found in. This must match the Room’s name exactly on the spreadsheet.
Parent Object Name
- Spreadsheet label: Parent Object
- Class attribute: String
this.parentObjectName
This is the name of an Object that is associated with the Puzzle, if any. The parent Object must be in the
same Room as the Puzzle referencing it. If the name of an Object is supplied, then a Player will be able to supply the
name of the parent Object as an argument in the use command instead of the name of the
Puzzle. Narrations involving the Puzzle will also use the parent Object’s name instead of the Puzzle’s
name. This is particularly useful if every Puzzle is given a unique name. For example, if the Puzzle is named “PANIC
BUTTON” and the parent Object is named “YELLOW BUTTON”, then a Player will be able to interact with the Puzzle by
sending .use YELLOW BUTTON or .use PANIC BUTTON. When the Puzzle is interacted with by a Player named Haru, Alter
Ego will send “Haru uses the YELLOW BUTTON.” to the PANIC BUTTON’s Room channel.
Additionally, by assigning a Puzzle a parent Object, it becomes possible for the Puzzle to contain Items. This allows Items to be made inaccessible until the Puzzle is solved, while also allowing Players to take and drop Items from/into the parent Object if the Puzzle is solved. When an Object capable of containing Items is assigned a child Puzzle, the item list must be in the Puzzle’s already solved description. If no parent Object is needed, this cell can simply be left blank on the spreadsheet.
Parent Object
- Class attribute: Object
this.parentObject
This is an internal attribute which simply contains a reference to the actual Object object whose name matches
this.parentObjectName and whose location is the same as the Puzzle. If no parent Object name is given, this will be
null instead.
Type
- Spreadsheet label: Type
- Class attribute: String
this.type
This is a string which determines the specific behavior of the Puzzle. This must match exactly one of the predefined
Puzzle types that have been programmed into Alter Ego. Here, each Puzzle type will be listed, and their behavior will be
detailed. Note that if the term [PUZZLE NAME] is used, it doesn’t necessarily refer to the Puzzle’s name attribute. It
can refer to that, or the name of the Puzzle’s parent Object, if it has one.
password
- A Player must enter the correct password in order to solve the Puzzle. The password is case sensitive.
- Once the Puzzle has been solved, it can never be directly unsolved by a Player without moderator intervention.
- If a Player attempts to solve the Puzzle again, they will be sent the Puzzle’s already solved description.
- When a Player interacts with the Puzzle in any way, whether they solve it or not, Alter Ego will narrate
“
[Player displayName]uses the[PUZZLE NAME].” in the Puzzle’s Room channel.
interact
- A Player must only interact with the Puzzle in order to solve it.
- Once the Puzzle has been solved, it can never be directly unsolved by a Player without moderator intervention.
- If a Player attempts to solve the Puzzle again, they will be sent the Puzzle’s already solved description.
- When a Player interacts with the Puzzle in any way, whether they solve it or not, Alter Ego will narrate
“
[Player displayName]uses the[PUZZLE NAME].” in the Puzzle’s Room channel.
matrix
- The Puzzle behaves exactly the same as an
interact-type Puzzle. However, its solved commands have special behavior. - When the Puzzle’s solved commands are executed, the outcomes of all of its required Puzzles are accessible in its
solved commands. If a solved command contains the name of one of its required Puzzles in curly braces (for example:
{PUZZLE NAME}), that string will be replaced with that Puzzle’s outcome before it is executed. This allows solved commands to have variable arguments that result in different behavior depending on the outcomes of one or more Puzzles. - This is especially useful for instantiating procedurally generated Prefabs with possibilities manually selected by a Player in other Puzzles. However, this behavior can be used in any bot command.
player
- A Player must only interact with the Puzzle in order to solve it. However, the Player’s name must match one of the Puzzle’s solutions. The name is case sensitive.
- Once the Puzzle has been solved, it can never be directly unsolved by a Player without moderator intervention.
- If a Player attempts to solve the Puzzle again, they will be sent the Puzzle’s already solved description.
- When a Player interacts with the Puzzle in any way, whether they solve it or not, Alter Ego will narrate
“
[Player displayName]uses the[PUZZLE NAME].” in the Puzzle’s Room channel.
room player
- A Player must enter the display name of a Player in the same Room as them in order to solve the Puzzle. However, the
chosen Player’s display name must match one of the Puzzle’s solutions. The display name is not case sensitive. If a
Player solves the Puzzle, Alter Ego will narrate “
[Player displayName]uses the[PUZZLE NAME].” in the Puzzle’s Room channel. When the Puzzle’s solved commands are executed, the selected Player will be passed into the commandHandler module. As a result, any commands that use theplayerargument will execute as if the selected Player was the one who initiated them. - Once the Puzzle has been solved, it can never be directly unsolved by a Player without moderator intervention.
- If a Player attempts to solve the Puzzle again, they will be sent the Puzzle’s already solved description. Alter Ego
will narrate “
[Player displayName]uses the[PUZZLE NAME].” in the Puzzle’s Room channel. - If a Player fails to solve the Puzzle, Alter Ego will narrate “
[Player displayName]attempts to use the[PUZZLE NAME], but struggles.” in the Puzzle’s Room channel.
toggle
- A Player must only interact with the Puzzle in order to solve it.
- Once the Puzzle has been solved, it can be unsolved when a Player interacts with it again. This allows it to be “toggled” between two states at will.
- If a Player unsolves the Puzzle, they will be sent the Puzzle’s already solved description.
- When a Player interacts with the Puzzle, whether they solve or unsolve it, Alter Ego will narrate
“
[Player displayName]uses the[PUZZLE NAME].” in the Puzzle’s Room channel. However, if the Player attempts to unsolve it and the requirements have not all been met, Alter Ego will narrate “[Player displayName]attempts to use the[PUZZLE NAME], but struggles.” instead.
combination lock
- A Player must enter the correct password in order to solve the Puzzle. The password is case sensitive. If a Player
solves the Puzzle, Alter Ego will narrate “
[Player displayName]unlocks the[PUZZLE NAME].” in the Puzzle’s Room channel. - Once the Puzzle has been solved, it can be unsolved when a Player attempts to solve it again using an incorrect password or by using the lock alias for the use command.
- If a Player unsolves the Puzzle, they will be sent “You lock the
[PUZZLE NAME].”, and Alter Ego will narrate “[Player displayName]locks the[PUZZLE NAME].” in the Puzzle’s Room channel. - If the Puzzle is already solved and a Player attempts to solve the Puzzle again using the right password, or without
supplying a password, Alter Ego will narrate “
[Player displayName]opens the[PUZZLE NAME].” in the Puzzle’s Room channel. - If a Player fails to solve the Puzzle, Alter Ego will narrate “
[Player displayName]attempts and fails to unlock the[PUZZLE NAME].” in the Puzzle’s Room channel.
key lock
- A Player must have an Inventory Item based on the Prefab specified in the Puzzle’s
solution in order to solve the Puzzle. If no solution is given, this Puzzle behaves almost identically to a
toggle-type Puzzle. If a Player solves the Puzzle, Alter Ego will narrate “[Player displayName]unlocks the[PUZZLE NAME].” in the Puzzle’s Room channel. - Once the Puzzle has been solved, it can be unsolved when a Player uses the lock alias for the use command, but only if
they have the required Inventory Item. If the Player does not have the required Inventory Item, Alter Ego will
narrate “
[Player displayName]attempts and fails to lock the[PUZZLE NAME].” in the Puzzle’s Room channel. - If a Player unsolves the Puzzle, they will be sent “You lock the
[PUZZLE NAME].”, and Alter Ego will narrate “[Player displayName]locks the[PUZZLE NAME].” in the Puzzle’s Room channel. - If the Puzzle is already solved and a Player attempts to solve the Puzzle again while holding the required Inventory
Item, Alter Ego will narrate “
[Player displayName]opens the[PUZZLE NAME].” in the Puzzle’s Room channel.
probability
- A Player must only interact with the Puzzle in order to solve it. One of the Puzzle’s solutions will be randomly chosen as the outcome.
- Once the Puzzle has been solved, it can never be directly unsolved by a Player without moderator intervention.
- If a Player attempts to solve the Puzzle again, they will be sent the Puzzle’s already solved description.
- When a Player interacts with the Puzzle in any way, whether they solve it or not, Alter Ego will narrate
“
[Player displayName]uses the[PUZZLE NAME].” in the Puzzle’s Room channel.
stat probability
- A Player must only interact with the Puzzle in order to solve it. A stat-weighted Die will be rolled to semi-randomly choose one of the Puzzle’s solutions as the outcome.
- There are five versions of this Puzzle type:
str probability,int probability,dex probability,spd probability, andsta probability. The stat that the Die is weighted with determines which of the Player’s stats will be used. The Player’s roll modifier in that stat will be applied to the initial roll, and the ratio of the final result to the maximum Die value is multiplied by the number of solutions to determine the outcome. In effect, this means that a higher stat value is more likely to consistently yield outcomes which appear later in the list of solutions; whereas a lower stat value is more likely to consistently yield outcomes which appear first in the list of solutions. A Player with a stat value of 1, for example, may never get the final listed solution and a Player with a stat value of 10 may never get the first listed solution, depending on how many solutions there are and the range of possible Die rolls. - The precision of outcomes is limited by the range of Die values. For example, if the Die has a minimum of 1 and a maximum of 6, but there are 20 solutions, some outcomes may be impossible to achieve.
- Once the Puzzle has been solved, it can never be directly unsolved by a Player without moderator intervention.
- If a Player attempts to solve the Puzzle again, they will be sent the Puzzle’s already solved description.
- When a Player interacts with the Puzzle in any way, whether they solve it or not, Alter Ego will narrate
“
[Player displayName]uses the[PUZZLE NAME].” in the Puzzle’s Room channel.
channels
- A Player must only interact with the Puzzle in order to solve it. However, the Player can also enter the correct
password to solve the Puzzle. The password is case sensitive. If a password is supplied, it will be used as the
outcome. If no password is supplied and the Puzzle has no current outcome, the first solution in the list will be used
as the outcome. If no password is supplied and the Puzzle does have a current outcome, that outcome will be used. If a
Player solves the Puzzle, Alter Ego will narrate “
[Player displayName]turns on the[PUZZLE NAME].” in the Puzzle’s Room channel. - Once the Puzzle has been solved, it can be unsolved when a Player interacts with the Puzzle without providing a password. The outcome that the Puzzle was previously solved with will be retained and used if the Player solves the Puzzle again without providing a password.
- If a Player unsolves the Puzzle, they will be sent “You turn off the
[PUZZLE NAME].”, and Alter Ego will narrate “[Player displayName]turns off the[PUZZLE NAME].” in the Puzzle’s Room channel. - If the Puzzle is already solved and a Player attempts to solve the Puzzle again using the right password, they will
solve it again with that solution as the outcome, and Alter Ego will narrate “
[Player displayName]changes the channel on the[PUZZLE NAME].” in the Puzzle’s Room channel. - If a Player fails to solve the Puzzle, Alter Ego will narrate “
[Player displayName]attempts and fails to change the channel on the[PUZZLE NAME].” in the Puzzle’s Room channel.
weight
- A Player must take from or drop into the Puzzle’s parent Object an Item which makes the total weight of all Items in the Object equal the Puzzle’s solution in order to solve the Puzzle. In order to prevent the Player from simply entering the correct weight as a password with the use command, the Puzzle should be made inaccessible.
- Once the Puzzle has been solved, it can be unsolved when the Player takes from or drops into the Puzzle’s parent Object an Item which makes the total weight of all Items in the Object not equal the Puzzle’s solution. The Player will not be sent a message for unsolving the Puzzle.
- When a Player interacts with the Puzzle in any way, whether they solve it or not, Alter Ego will not narrate anything in the Puzzle’s Room channel.
container
- A Player must take from or drop into the Puzzle’s parent Object an Item which makes the container hold all of the
Items listed in the solution. Every time an Item is dropped into the Puzzle’s parent Object, Alter Ego will check if
the complete list of Items contained inside it matches the Puzzle’s solution. If multiple Items are required to solve
the Puzzle, they should be separated with a plus sign (
+) in the solution. In order to prevent the Player from simply entering the Prefab IDs as a password with the use command, the Puzzle should be made inaccessible. - Once the Puzzle has been solved, it can be unsolved when the Player takes from or drops into the Puzzle’s parent Object an Item. However, if the remaining Items are also a valid solution, the Puzzle will immediately be solved again using them as an outcome. The Player will not be sent a message for unsolving the Puzzle.
- When a Player interacts with the Puzzle in any way, whether they solve it or not, Alter Ego will not narrate anything in the Puzzle’s Room channel.
voice
- A Player must say the correct password in the Room that the Puzzle is in in order to solve it. Alternatively, a Player
with the
senderbehavior attribute must say the correct password while a Player with thereceiverbehavior attribute is in the Room that the Puzzle is in in order to solve it. The password is case insensitive, and non-alphanumeric (A-Z, 0-9, and spaces) characters will be ignored. The Player’s whole message does not need to be the password; it only needs to contain it. For example, if the password is “unlock the door”, then a Player who says “How do I unlock the door?” will still solve the Puzzle. - Once the Puzzle has been solved, it can never be directly unsolved by a Player without moderator intervention.
- If the Puzzle is already solved and a Player attempts to solve the Puzzle again using the right password, they will solve it again with that solution as the outcome.
- When a Player interacts with the Puzzle in any way, whether they solve it or not, Alter Ego will not narrate anything in the Puzzle’s Room channel.
switch
- A Player must enter the correct password in order to solve the Puzzle. The password is case sensitive. If a Player
solves the Puzzle, Alter Ego will narrate “
[Player displayName]sets the[PUZZLE NAME]to[password].” in the Puzzle’s Room channel. - A switch-type Puzzle can never be unsolved under any circumstances; it can only be set to different outcomes. For this reason, Alter Ego will fail to load switch-type Puzzles that are not solved and which do not have an outcome set.
- If the Player attempts to solve the Puzzle again using the same password as the current outcome, Alter Ego will
narrate “
[Player displayName]uses the[PUZZLE NAME], but nothing happens.” in the Puzzle’s Room channel. - If a Player fails to solve the Puzzle, Alter Ego will narrate “
[Player displayName]attempts to set the[PUZZLE NAME], but struggles.” in the Puzzle’s Room channel.
option
- A Player must enter the correct password in order to solve the Puzzle. The password is case sensitive. If a Player
solves the Puzzle, Alter Ego will narrate “
[Player displayName]sets the[PUZZLE NAME]to[password].” in the Puzzle’s Room channel. - Once the Puzzle has been solved, it can be unsolved when a Player attempts to solve it without supplying a password.
- If a Player unsolves the Puzzle, they will be sent “You clear the selection for the
[PUZZLE NAME].”, and Alter Ego will narrate “[Player displayName]resets the[PUZZLE NAME].” in the Puzzle’s Room channel. - If the Puzzle is already solved and a Player attempts to solve the Puzzle again using the right password, Alter Ego
will narrate “
[Player displayName]sets the[PUZZLE NAME], but nothing changes.” in the Puzzle’s Room channel. - If a Player fails to solve the Puzzle, Alter Ego will narrate “
[Player displayName]attempts to set the[PUZZLE NAME], but struggles.” in the Puzzle’s Room channel.
media
- A Player must provide the name of an Inventory Item in their inventory which is one of the Puzzle’s solutions in order
to solve the Puzzle. Unlike other Puzzle types which require an Inventory Item to solve, the name of the Inventory
Item must be provided in the Player’s use command; simply having it in their inventory isn’t sufficient. If a
Player solves the Puzzle, Alter Ego will narrate “
[Player displayName]inserts[item phrase]into the[PUZZLE NAME].” in the Puzzle’s Room channel. The item phrase can be one of two things: if the Inventory Item’s Prefab is discreet, it will simply be “an item”; if it is not discreet, it will be the Prefab’s single containing phrase. - Once the Puzzle has been solved, it can be unsolved when a Player interacts with the Puzzle without providing the name of an Inventory Item.
- If a Player unsolves the Puzzle, they will be sent the Puzzle’s already solved description, and Alter Ego will
narrate “
[Player displayName]presses eject on the[PUZZLE NAME].” in the Puzzle’s Room channel. - If the Puzzle is already solved and a Player attempts to solve the Puzzle again with one of the Puzzle’s solutions,
they will be sent “You cannot insert
[Prefab singleContainingPhrase]into the[PUZZLE NAME]as something is already inside it. Eject it first by sending.use [PUZZLE NAME].” - If a Player fails to solve the Puzzle, Alter Ego will narrate “
[Player displayName]attempts to insert[item phrase]into the[PUZZLE NAME], but it doesn’t fit.” in the Puzzle’s Room channel. The item phrase can be one of two things: if the Inventory Item’s Prefab is discreet, it will simply be “an item”; if it is not discreet, it will be the Prefab’s single containing phrase.
restricted exit
- A Player must enter the Exit whose name matches the name of this Puzzle in order to solve it. However, the Player’s name must match one of the Puzzle’s solutions, and the Puzzle must be accessible. The Exit must be in the same Room as the Puzzle.
- If the Player solves the Puzzle, they will be able to enter the Exit, even if it’s locked.
- Once the Puzzle has been solved, it can never be directly unsolved by a Player without moderator intervention.
- Even if the Puzzle has been solved, it will be repeatedly solved any time a Player enters the Exit if they are listed in the solutions and the Puzzle is accessible.
- When a Player interacts with the Puzzle in any way, whether they solve it or not, Alter Ego will not narrate anything in the Puzzle’s Room channel.
Accessible
- Spreadsheet label: Accessible?
- Class attribute: Boolean
this.accessible
This is another Boolean value indicating whether the Puzzle can currently be interacted with or not. If this is true,
then Players can attempt to solve the Puzzle with the use command. However, if the Puzzle has requirements and not all
of them are met, the Puzzle will be made inaccessible. If it is false, then a number of things will happen when a
Player uses the Puzzle, based on various factors. If the Puzzle has any requirements, Alter Ego will check each one to
see if it is met. If all requirements are met, the Puzzle will be made accessible, and the Player will attempt to solve
it. If all requirements are not met, the Player will receive the
Puzzle’s requirements not met description, and Alter Ego will narrate
“[Player displayName] attempts to use the [PUZZLE NAME], but struggles.” in the Puzzle’s Room channel. If the
Puzzle has no requirements not met description, Alter Ego will act as if the Puzzle doesn’t exist if the Player tries
to use it.
Requirements Strings
This is a comma-separated list of Puzzle names and/or Prefabs that are required for the Puzzle to be made accessible if it is not and vice versa. Puzzle names must match the Puzzle’s name exactly on the spreadsheet, although they can optionally be prefixed with “Puzzle: “. They do not need to be in the same Room as the Puzzle that requires them. If there are multiple Puzzles with the same name as one that is required, then the first to appear on the sheet will be required. For this reason, it is strongly suggested that Puzzles are given unique names. Prefabs can also be listed as requirements. However, they must be prefixed with “Prefab: “ or “Item: “, followed by the Prefab ID.
In order for all requirements to be considered met, all required Puzzles must be solved and all required Prefabs must be in the Player’s inventory as Inventory Items.
Requirements
This is an internal attribute which contains references to each of the Puzzle or Prefab objects whose names are listed
in this.requirementsStrings.
Solutions
This is a comma-separated list of accepted solutions to the Puzzle. There is no limit to how many solutions can be listed. There are two types of solutions: passwords and items. Password solutions are generally case sensitive and generally must be given in the Player’s use command in order to attempt to solve the Puzzle, although this varies by Puzzle type. Item solutions must consist of “Item: “ followed by a Prefab ID. In general, item solutions require only that the Player have an Inventory Item of the given Prefab in their inventory in order to solve the Puzzle. In some situations, listing an item as a requirement or as a solution to the Puzzle produces identical behavior. The difference, however, is that required items must all be present in the Player’s inventory, whereas an item solution only requires one item in the Player’s inventory to solve the Puzzle. A Puzzle can only be solved with one solution as its outcome at a time.
Remaining Attempts
- Spreadsheet label: Remaining Attempts
- Class attribute: Number
this.remainingAttempts
This is a whole number indicating how many times the Puzzle can be failed. Each time a Player attempts to solve the Puzzle and fails, this number will decrease by 1. If this reaches 0, the Puzzle cannot be solved, even if the correct solution is provided, and a Player who attempts to do so will receive the Puzzle’s no more attempts description. If no number is given, the Puzzle can be attempted and failed infinitely many times.
Command Sets String
- Spreadsheet label: When Solved / Unsolved
- Class attribute: String
this.commandSetsString
This is a comma-separated list of sets of bot commands that will be executed when the Puzzle is solved or unsolved.
If the Puzzle has only one solution, then command sets are implicit, and do not need to be written. Instead, a simple
list of commands is sufficient. This takes the form of a comma-separated list of bot commands that will be executed when
the Puzzle is solved. A comma-separated list of bot commands that will be executed when the Puzzle is unsolved can also
be included, with both sets separated by a forward slash (/). If no unsolved commands are desired, then the forward
slash can be omitted from the cell. If no solved commands are desired but unsolved commands are, the forward slash
should be the first character in the cell, with the unsolved commands following it.
Note that when writing bot commands, it is good practice to be as precise as possible and provide room names if they are permitted, in order to prevent potential bugs. It should also be noted that when a Puzzle’s commands solve or unsolve another Puzzle, its commands will not be executed. These are all valid examples of commands for a Puzzle with only one solution:
unsolve GREEN 12, unsolve PANEL 12 floor-2-hall-3, lock suite-12 DOORset accessible puzzle items LOCKER 1 locker-room / set inaccessible puzzle items LOCKER 1 locker-room/ set inaccessible object INPUT computer-lab
If the Puzzle has multiple solutions, then the command set format is required, with each set being comma-separated. The correct format is:
[solution 1(, solution 2(, solution N)): solved commands / unsolved commands]
Multiple solutions can share the same set of commands. The same rules as above apply, however there is one additional rule to keep in mind: item solutions must be listed exactly as they appear in the solutions set, with the “Item: “ prefix.
Due to the complexity of multi-solution Puzzles, their list of command sets can get quite long. These are all valid examples of Puzzles with multiple solutions:
[17, seventeen: unlock suite-10 VENT / lock suite-10 VENT]
[2: solve VENT suite-2, unlock suite-2 VENT / unsolve VENT suite-2, lock suite-2 VENT], [3, 4, 5, 6, 19, 27, 30, 42, 43, 49, 65, 66, 69, 83, 91: unsolve VENT suite-2, lock suite-2 VENT]
[OPEN: trigger BLAST DOOR 1, unlock cave-11 TUNNEL 1, unlock cave-11 TUNNEL 2, unlock cave-11 TUNNEL 3, trigger EXPLOSION COUNTDOWN END], [CLOSED: end BLAST DOOR 1, lock cave-11 TUNNEL 1, lock cave-11 TUNNEL 2, lock cave-11 TUNNEL 3]
[Item: BLUE DANUBE CD: destroy player BLUE DANUBE CD, trigger BLUE DANUBE WALTZ / end BLUE DANUBE WALTZ, instantiate BLUE DANUBE CD on FLOOR at ballroom], [Item: EINE KLEINE NACHTMUSIK CD: destroy player EINE KLEINE NACHTMUSIK CD, trigger EINE KLEINE NACHTMUSIK WALTZ / end EINE KLEINE NACHTMUSIK WALTZ, instantiate EINE KLEINE NACHTMUSIK CD on FLOOR at ballroom], [Item: FUR ELISE CD: destroy player FUR ELISE CD, trigger FUR ELISE WALTZ / end FUR ELISE WALTZ, instantiate FUR ELISE CD on FLOOR at ballroom], [Item: BEETHOVENS FIFTH CD: destroy player BEETHOVENS FIFTH CD, trigger BEETHOVENS FIFTH WALTZ / end BEETHOVENS FIFTH WALTZ, instantiate BEETHOVENS FIFTH CD on FLOOR at ballroom], [Item: FOUR SEASONS CD: destroy player FOUR SEASONS CD, trigger FOUR SEASONS WALTZ / end FOUR SEASONS WALTZ, instantiate FOUR SEASONS CD on FLOOR at ballroom], [Item: MARRIAGE OF FIGARO CD: destroy player MARRIAGE OF FIGARO CD, trigger MARRIAGE OF FIGARO WALTZ / end MARRIAGE OF FIGARO WALTZ, instantiate MARRIAGE OF FIGARO CD on FLOOR at ballroom], [Item: CANON IN D MAJOR CD: destroy player CANON IN D MAJOR CD, trigger CANON IN D MAJOR WALTZ / end CANON IN D MAJOR WALTZ, instantiate CANON IN D MAJOR CD on FLOOR at ballroom], [Item: CLAIR DE LUNE CD: destroy player CLAIR DE LUNE CD, trigger CLAIR DE LUNE WALTZ / end CLAIR DE LUNE WALTZ, instantiate CLAIR DE LUNE CD on FLOOR at ballroom]
[TIRAMISU, tiramisu: solve DESSERT IN PROGRESS player "Nestor begins preparing a dessert for player.", wait 60, instantiate TIRAMISU on TABLES at estia, unsolve DESSERT IN PROGRESS player "Penelope places a serving of TIRAMISU on one of the TABLES for player.", unsolve DESSERTS estia], [EK MEK, ek mek: solve DESSERT IN PROGRESS player "Nestor begins preparing an appetizer for player.", wait 60, instantiate EK MEK on TABLES at estia, unsolve DESSERT IN PROGRESS player "Penelope places a serving of EK MEK on one of the TABLES for player.", unsolve DESSERTS estia], [GELATO, gelato: solve DESSERT IN PROGRESS player "Nestor begins preparing a dessert for player.", wait 60, instantiate GELATO on TABLES at estia, unsolve DESSERT IN PROGRESS player "Penelope places a bowl of GELATO on one of the TABLES for player.", unsolve DESSERTS estia]
Command Sets
This is an internal attribute which consists of a list of command set objects. Command set objects have the following structure:
{ Array outcomes, Array solvedCommands, Array unsolvedCommands }
Correct Description
- Spreadsheet label: Correct Answer
- Class attribute: String
this.correctDescription
When a Player solves the Puzzle, they will receive a parsed version of this string. See the article
on writing descriptions for more information. If a Puzzle has multiple
solutions, it can be beneficial to make this vary based on the outcome the Player receives using if conditionals. It
should be noted that solutions are all strings, even if they’re numbers. Therefore, solutions in if conditionals should
be surrounded with single quote characters (').
Already Solved Description
- Spreadsheet label: Puzzle Already Solved
- Class attribute: String
this.alreadySolvedDescription
When a Player attempts to solve the Puzzle and it is already solved, they will receive a parsed version of this string. However, the exact situation that this description is used in can vary based on the Puzzle type. For Puzzles that contain Items, the item list must be contained in this description.
Incorrect Description
- Spreadsheet label: Incorrect Answer
- Class attribute: String
this.incorrectDescription
When a Player attempts to solve the Puzzle and enters the wrong solution, they will receive a parsed version of this string.
No More Attempts Description
- Spreadsheet label: No More Attempts
- Class attribute: String
this.noMoreAttemptsDescription
When a Player attempts to solve the Puzzle but it has 0 remaining attempts, they will receive a parsed version of this string.
Requirements Not Met Description
- Spreadsheet label: Requirement Not Met
- Class attribute: String
this.requirementsNotMetDescription
When a Player attempts to solve the Puzzle but all of the requirements are not met, they will receive a parsed version of this string. However, if the Puzzle is not accessible and this is blank, then Alter Ego will pretend as if the Puzzle doesn’t exist.
Row
- Class attribute: Number
this.row
This is an internal attribute, but it can also be found on the spreadsheet. This is the row number of the Puzzle.
Recipe
A Recipe is a data structure in the Neo World Program. Its primary purpose is to allow Players to transform Items or Inventory Items into other Items or Inventory Items using game-like crafting mechanics.
Recipes are static; once loaded from the spreadsheet, they do not change in any way. Thus, the saver module will never make changes to the Recipes sheet. As a result, the Recipes sheet can be freely edited without edit mode being enabled.
This article will impose two terms. Crafting is the act of transforming two Inventory Items into up to two Inventory Items using the craft command. Processing is the act of transforming one or more Items into zero or more Items using an Object. Every Recipe is either a crafting-type Recipe or a processing-type Recipe, but not both.
Attributes
Recipes have relatively few attributes. Their behavior is entirely static, incapable of changing. These attributes simply serve to provide instructions for Alter Ego to follow. Note that if an attribute is internal, that means it only exists within the Recipe class. Internal attributes will be given in the “Class attribute” bullet point, preceded by their data type. If an attribute is external, it only exists on the spreadsheet. External attributes will be given in the “Spreadsheet label” bullet point.
Ingredients
This is a comma-separated list of Prefab IDs. When Recipes are loaded, Alter Ego will automatically convert these to actual references to the Prefabs. Ingredients determine what Items or Inventory Items are required for the Recipe. Multiple Recipes can have the same list of ingredients. There are different sets of rules for ingredients, depending on the Recipe’s type.
Crafting-type Recipes:
- Must have exactly two ingredients and
- Can have two of the same Prefab as ingredients.
Processing-type Recipes:
- Must have at least one ingredient,
- Can have infinitely many ingredients, and
- Must not have more than one of the same Prefab as ingredients.
Note that the final rule only applies due to the way Items with the same Prefab ID are concatenated with the quantity attribute. If the Items are on two different rows of the spreadsheet due to having some difference between them, such as different numbers of uses or different descriptions, then processing-type Recipes can be carried out with multiple of the same Prefab as ingredients. However, because this will rarely be the case, processing-type Recipes with more than one of the same Prefab as ingredients should be avoided.
Uncraftable
- Spreadsheet label: Uncraftable?
- Class attribute: Boolean
this.uncraftable
This is a Boolean value indicating whether or not this Recipe can be reversed. If this is true, then
the uncraft command can be used
to convert the product into its ingredients. If this value is false,
then the Recipe cannot be reversed.
Note that in order for a Recipe to be uncraftable, it must be a crafting-type Recipe with only one product. Crafting-type Recipes with two products cannot be uncraftable.
Object Tag
- Spreadsheet label: Requires Object with Tag
- Class attribute: String
this.objectTag
This is a simple phrase that determines which Objects can be used to process this Recipe, if any. There are no rules for how Object tags must be named, but a single Recipe can only have one Object tag. The presence of an Object tag determines the type of each Recipe. If an Object tag is given, it will be a processing-type Recipe. If no Object tag is given, it will be a crafting-type Recipe.
The tag should match exactly the Recipe tag of any Objects that can be used to process this Recipe. For example, a Recipe with the Object tag “blender” can only be processed by an Object with the Recipe tag “blender” when it is activated.
Duration
- Spreadsheet label: Wait Duration
- Class attribute: Duration
this.duration
This is a string which determines how long the Recipe will take to process before it is completed. This can only be given for processing-type Recipes. This should consist of a whole number (no decimals) with a letter immediately following it, with no space between them. There is a fixed set of predefined units that correspond with each letter. They are as follows:
| Letter | Unit |
|---|---|
| s | seconds |
| m | minutes |
| h | hours |
| d | days |
| w | weeks |
| M | months |
| y | years |
So, a Recipe that should take 30 seconds to process should have a duration of 30s, one that should take 15 minutes
should have a duration of 15m, one that should take 2 hours should have a duration of 2h, one that should take 1.5
days should have a duration of 36h, and so on.
Products
This is a comma-separated list of Prefab IDs. When Recipes are loaded, Alter Ego will automatically convert these to actual references to the Prefabs. Products determine what the ingredients will be turned into upon completion of the Recipe. There are different sets of rules for products, depending on the Recipe’s type.
Crafting-type Recipes:
- Must not have more than two products and
- Can have two of the same Prefab as products.
Processing-type Recipes:
- Can have any number of products and
- Can have multiple of the same Prefab as products.
Note that although processing-type Recipes with multiple of the same Prefab as ingredients are typically not allowed, the same does not apply to products. A processing-type Recipe can produce as many of the same Prefab as desired.
Initiated Description
- Spreadsheet label: Message When Initiated
- Class attribute: String
this.initiatedDescription
This is a description that indicates when a Recipe has begun being processed. When a Player activates an Object that can
process this Recipe and all of the ingredients required for it are contained within the Object, they will receive a
parsed version of this string. See the article on writing descriptions
for more information. Note that unlike most other data types, the this keyword does not refer to the Recipe, but
rather the Object processing the Recipe. For example, in the description
<desc><s>You begin filling up the GLASS in the <var v="this.name" />.</s></desc>, the variable <var v="this.name" />
would be replaced with the name of the Object processing the Recipe.
Crafting-type Recipes will never use this text because they are completed instantaneously.
Completed Description
- Spreadsheet label: Message When Completed
- Class attribute: String
this.completedDescription
This is a description that indicates when a Recipe has finished being processed. When a Player crafts two Inventory
Items together or an Object finishes processing a Recipe that they initiated by activating the Object and they are still
in the same Room as the Object, they will receive a parsed version of this string. Just like the initiated description,
the this keyword refers to the Object processing the Recipe. However, in crafting-type Recipes, the this keyword
does refer to the Recipe itself.
Uncrafted Description
- Spreadsheet label: Message When Uncrafted
- Class attribute: String
this.uncraftedDescription
When a Player uncrafts an Inventory Item, they will receive a parsed version of this string. Because uncraftable Recipes
cannot have an Object tag, the this keyword will always refer to the Recipe itself.
Row
- Class attribute: Number
this.row
This is an internal attribute, but it can also be found on the spreadsheet. This is the row number of the Recipe.
Crafting
Crafting is a simple game mechanic that uses Recipes. It makes use of the craft Player method. Whether the action is initiated by a Player or by a moderator, the rules are the same:
- The Player must have Equipment Slots named “RIGHT HAND” and “LEFT HAND”.
- The Player must have two Inventory Items, one equipped to their RIGHT HAND and one equipped to their LEFT HAND.
- There must be a crafting-type Recipe whose ingredients are the Prefabs underlying the Player’s two held Inventory Items.
If all of the above requirements are met, the Player will craft the two Inventory Items together.
First, Alter Ego checks to see if any of the ingredients are also products. If that is the case, it then checks if the Inventory Item only has 1 use left. If so, the Inventory Item will be replaced with its next stage. If it doesn’t have a next stage, it will simply be destroyed. If the Inventory Item has a limited number of uses but it has more than 1 use left, its number of uses will be decreased by 1.
As an example of the above condition, suppose there is a crafting-type Recipe whose ingredients are a CLEAN GLASS and a JUG OF ORANGE JUICE, and whose products are a GLASS OF ORANGE JUICE and a JUG OF ORANGE JUICE. The JUG OF ORANGE JUICE has 6 uses. Each time it is used to produce a GLASS OF ORANGE JUICE, its number of uses decreases by 1. If its number of uses decreases to 0, then it will be replaced with its next stage, an EMPTY JUG OF ORANGE JUICE, at which point it can no longer be crafted.
The respective Inventory Items will then be replaced with the properties of the product Prefabs. When Inventory Items are replaced, any Inventory Items contained inside them will be recursively destroyed. If there is only 1 product, then the second ingredient will simply be destroyed, and only the first ingredient will be replaced. If there are 0 products, then both ingredients will be destroyed, and no products will be created.
Once the ingredients are finished being crafted, Alter Ego will send the Player the Recipe’s completed description. Additionally, if any of the product Prefabs are non-discreet, Alter Ego will narrate the Player crafting them.
Uncrafting
Uncrafting is a simplified reversal of the crafting mechanic. It makes use of the uncraft Player method. Whether the action is initiated by a Player or by a moderator, the rules are the same:
- The Player must have Equipment Slots named “RIGHT HAND” and “LEFT HAND”.
- The Player must have one Inventory Item equipped to their RIGHT HAND or LEFT HAND.
- The Player’s other hand must be empty.
- There must be a crafting-type Recipe whose only product is the Prefab underlying the Player held Inventory Item.
If all of the above requirements are met, the Player will uncraft their held Inventory Item.
First, Alter Ego checks the Recipe’s ingredients to see if only one of them is discreet. If so, then the ingredient with the discreet Prefab will be ingredient 1, and the non-discreet Prefab will be ingredient 2. If both are discreet or both are non-discreet, ingredients 1 and 2 will be the ingredient Prefabs in alphabetical order by their IDs.
Next, the Player’s held Inventory Item will be replaced with the properties of ingredient 1’s Prefab, and any Inventory Items contained inside of it will be recursively destroyed. The Prefab of ingredient 2 will then be instantiated in the Player’s free hand. Note that even if the original Inventory Item had a limited number of uses, both of the ingredients will be created with the default number of uses of their respective Prefabs.
Alter Ego will then send the Player the Recipe’s uncrafted description.
If either of the ingredients are non-discreet, Alter Ego will narrate the Player uncrafting them. If only one of them is discreet, then the Narration will be as follows:
[Player displayName] removes [ingredient 1 singleContainingPhrase] from [ingredient 2 singleContainingPhrase].
If both ingredients are non-discreet, then the Narration will instead be:
[Player displayName] separates [product singleContainingPhrase] into [ingredient 1 singleContainingPhrase] and [ingredient 2 singleContainingPhrase].
Processing
Processing is a complex game mechanic that uses Recipes. It makes use of the processRecipes Object method.
Recipes can be processed in an Object as long as that Object is activated and has a Recipe tag that matches the Recipe’s Object tag, regardless of how the Object was activated. There are four ways an Object can be activated:
- By a Player using the use player command,
- By a moderator using the object moderator command,
- By a Puzzle or Event’s solved/unsolved or triggered/ended commands using the object bot command, or
- By being loaded from the spreadsheet with its activation state being set to
true.
While an Object with a Recipe tag is activated, Alter Ego will attempt every second to find a Recipe that can be processed by the Object. In order to determine this, it looks for all Items contained in the Object, as well as any Items contained inside those Items (recursively). Next, it checks all Recipes whose Object tag matches the Object’s Recipe tag. For each Recipe, it compares the list of Items contained within the Object (including child Items) to the Recipe’s ingredients list. If an exact match is found, it begins processing the Items. If the list of Items in the Object does not exactly match any Recipe’s ingredients list, Alter Ego collects a list of all Recipes whose ingredients can all be found among the Object’s Items. When it finishes, it chooses to process the Recipe that uses the highest number of Items contained in the Object; i.e., the Recipe that will leave the fewest Items unprocessed.
If Alter Ego finds a Recipe that it can process using the Object, it will begin processing the Recipe. If the Object was activated by a Player, whether forcibly or by their own will, they will be sent the Recipe’s initiated description. However, even if the Object was not activated by a Player for the current Recipe being processed, it will still be processed. If a Recipe was already being processed and a different one that uses more of the Object’s Items is found, then it will be canceled in favor of the new one.
A Recipe being processed means that the Object’s process variable has been assigned, and that Alter Ego will decrement the process’s duration by 1 every second. When the duration reaches 0, the Items are processed.
Alter Ego checks that all of the Items required for the Recipe are still contained in the Object. If it is, it then checks to see if any of the ingredients are also products. If that is the case, it then checks if the Item only has 1 use left. If so, the Item will be replaced with its next stage. If the Item has a limited number of uses but it has more than 1 use left, its number of uses will be decreased by 1. This follows the same logic as in crafting-type Recipes.
If all of the Items are still in the Object, it destroys all of them regardless of quantity. So, even if a Recipe with multiple ingredients only requires 1 of a certain ingredient, all copies of that ingredient will be destroyed. Items contained inside of an ingredient will be recursively destroyed as well.
Then, all of the products are instantiated inside the Object. The only exception is that if an Item that is both an ingredient and a product has a limited number of uses and would reach 0 uses and its Prefab does not have a next stage, it will simply be destroyed.
If the Recipe being processed has only one ingredient and only one product, the quantity of the product will match the quantity of the ingredient. This is why the use of cooking utensils in Recipes is discouraged. For example, if a Player wants to cook 3 RAW EGG Items simultaneously using the same Object, they will be unable to do so if the Recipe also includes a FRYING PAN as an ingredient. In such a scenario, only 1 COOKED EGG would be produced. However, if the only ingredient is 1 RAW EGG and the only product is 1 COOKED EGG, then the Player can cook as many RAW EGG Items into an equivalent number of COOKED EGG items in a single processing cycle.
Once Items are finished being processed, the Player who activated the Object and started the process will be sent the Recipe’s completed description, if it was a Player who did so and they are still in the same Room as the Object. If the Object is set to automatically deactivate, it will be deactivated. If not, it will continue attempting to process Recipes with the Items contained inside it, which may include the Items instantiated during the previous process.
Room
A Room is a data structure in the Neo World Program. It represents a room that Players can move to.
Attributes
Despite being the basis of the Neo World Program game, Rooms have relatively few attributes. Note that if an attribute is internal, that means it only exists within the Room class. Internal attributes will be given in the “Class attribute” bullet point, preceded by their data type. If an attribute is external, it only exists on the spreadsheet. External attributes will be given in the “Spreadsheet label” bullet point.
Name
- Spreadsheet label: Room Name
- Class attribute: String
this.name
This is the name of the Room. Unlike the name attribute in most other data structures, this must be in all lowercase letters, with no spaces (though hyphens are allowed) or special characters. The reason for this is that the Room name must be exactly the same as the corresponding Discord channel.
Channel
- Class attribute: TextChannel
this.channel
This is an internal attribute. When the Room data is loaded, Alter Ego will attempt to find the channel whose name matches the name of the Room. By making the channel a persistent internal attribute, Alter Ego can perform many operations more easily, such as adding a Player to the Room’s channel. It should be noted that even if a Room’s channel is not part of a room category, Players will still be added to the channel when moving to its associated Room and Narrations will still be sent to the channel, but commands and dialog sent to that channel will not be passed through the commandHandler and dialogHandler modules, respectively.
Tags
This is a comma-separated list of keywords or phrases assigned to a Room that allows that Room, and others with shared tags, to be affected by Events. There are no rules for how tags must be named, and there is no theoretical limit on the number of tags a single Room can have. Some tags have predefined behavior. Here, each predefined tag will be listed, and their behavior will be detailed.
soundproof
- All dialog spoken inside the Room will not be narrated in adjacent Rooms, even if it is shouted or if Players in
adjacent Rooms have the
acute hearingbehavior attribute. - Players in the Room will not hear dialog from adjacent Rooms, regardless of the same circumstances.
audio surveilled
- All non-Whispered dialog sent to the Room will be narrated in all Rooms with the
audio monitoringtag with an indication of which Room the dialog originated in. - While there is no limit to how many Rooms can have this tag, applying it to too many could negatively affect Alter Ego’s performance.
audio monitoring
- All non-Whispered dialog sent to any Room with the
audio surveilledtag will be sent to the Room with an indication of which Room the dialog originated in.- Example:
[break-room] Someone with a crisp voice says "Are you listening to me?".
- Example:
- All shouted dialog sent to Rooms adjacent to a Room with the
audio surveilledtag will be narrated in the Room with theaudio monitoringtag, as long as there is at least one Player in the Room with theaudio surveilledtag.- Example:
[break-room] Someone in a nearby room with an obnoxious voice shouts "SOMEONE HELP!".
- Example:
video surveilled
- All Narrations sent to the Room will be narrated in all Rooms with the
video monitoringtag with an indication of which Room the Narration originated in. - While there is no limit to how many Rooms can have this tag, applying it to too many could negatively affect Alter Ego’s performance.
video monitoring
- All Narrations sent to any Room with the
video surveilledtag will be sent to the Room with an indication of which Room the Narration originated in.- Example:
[break-room] Kyra begins inspecting the DESK.
- Example:
- If the Room also has the
audio monitoringtag, then all non-Whispered dialog spoken in any Room with thevideo surveilledandaudio surveilledtags will appear as a more natural dialog message, with the speaker’s display name and display icon alongside the name of the Room the dialog originated in.
secret
- If the Room also has the
audio surveilledorvideo surveilledtag, then its name will be obscured when dialog and Narrations are transmitted to Rooms with theaudio monitoringorvideo monitoringtags.- Example:
[Intercom] Someone with a crisp voice says "Are you listening to me?". - Example:
[Surveillance feed] Kyra begins inspecting the DESK.
- Example:
Icon URL
- Spreadsheet label: Icon URL
- Class attribute: String
this.iconURL
This is an optional image URL that will accompany a Room’s description. The URL must end in .jpg, .png, or .gif.
Exits
- Spreadsheet labels: Exits, X, Y, Z, Unlocked?, Leads To, From, Room Description
- Class
attribute: Array<Exit>
this.exit
This is a list of Exits in the Room. All Rooms that can be accessed via a given Room’s Exits are considered adjacent to the given Room, meaning a Player can freely travel to them. For more information, see the article on Exits.
Room Description
- Spreadsheet label: Room Description
- Class attribute: String
this.description
This is the default description of a Room. The default description will always be the description for the first Exit in the Room. When a Player enters or inspects a Room, they will receive a parsed version of this string. The Player will not be sent the Room’s description by itself. Instead, they will be sent a Discord Embed containing:
- The name of the Room.
- The Room’s default description, or the description of the Exit they entered from.
- The Room’s occupants, excluding the Player themself.
- The description of the Room’s default drop Object. If the Room doesn’t have one, “You don’t see any items.” will be sent instead.
- The Room’s icon URL. If the Room does not have one, then the default Room icon URL will be used instead. If no default Room icon URL is set, then Alter Ego will use the server icon instead. If the server icon is not set, then no image will be sent in the MessageEmbed.
See the article on writing descriptions for more information.
Row
- Class attribute: Number
this.row
This is an internal attribute, but it can also be found on the spreadsheet. This is the row number of the first Exit in a Room. Alter Ego uses this data to determine which row of the Rooms spreadsheet contains the default description for a Room.
Occupants
This is an internal attribute. It is an array of all Players currently in the Room.
Occupants String
- Class attribute: String
this.occupantsString
This is an internal attribute. It is a string listing all of the Room’s
occupants’ display names in alphabetical order, however any Players with the
hidden behavior attribute are omitted.
Status
A Status, also called a Status Effect, is a data structure in the Neo World Program. It represents a condition that affects a Player.
Status Effects that are loaded from the spreadsheet are static; once loaded, they do not change in any way. Thus, the saver module will never make changes to the Status Effects sheet. As a result, the Status Effects sheet can be freely edited without edit mode being enabled. Only instantiated Status Effects — Status Effects that are inflicted on a Player — are dynamic.
Attributes
Status Effects have several attributes. However, their behavior is relatively limited. Note that if an attribute is internal, that means it only exists within the Status class. Internal attributes will be given in the “Class attribute” bullet point, preceded by their data type. If an attribute is external, it only exists on the spreadsheet. External attributes will be given in the “Spreadsheet label” bullet point.
Name
- Spreadsheet label: Effect Name
- Class attribute: String
this.name
This is the name of the Status Effect. There are no rules for how they must be named, but it is customary for their names to be adjectives in all lowercase letters; error messages sent to Players are written based on this custom. Each Status Effect should have a unique name. Additionally, Status Effects whose names contain the name of another Status Effect (e.g. “injured” and “badly injured”) should be avoided.
Duration
- Spreadsheet label: Duration
- Class attribute: Duration
this.duration
This is a Duration object which determines how long after the Status Effect is inflicted it will take to expire. This should consist of a whole number (no decimals) with a letter immediately following it, with no space between them. There is a fixed set of predefined units that correspond with each letter. They are as follows:
| Letter | Unit |
|---|---|
| s | seconds |
| m | minutes |
| h | hours |
| d | days |
| w | weeks |
| M | months |
| y | years |
So, a Status Effect that should last 30 seconds should have a duration of 30s, one that should last 15 minutes should
have a duration of 15m, one that should last 2 hours should have a duration of 2h, one that should last 1.5 days
should have a duration of 36h, and so on. If no duration is provided, this will be null, and the Status Effect will
not expire on its own.
Remaining
- Class attribute: Duration
this.remaining
This is an internal attribute which contains a Duration object indicating how much time is remaining until the Status
Effect expires. This is null for all Status Effects loaded from the spreadsheet. This is only assigned to an
instantiated Status Effect that has a duration. If the instantiated Status Effect has no duration, this is null. While
the instantiated Status Effect is active, 1000 milliseconds are subtracted from this Duration every second until it is
less than or equal to zero, at which point the Status Effect expires. However, the amount subtracted every second can
vary. If at least one Player in the game has the “heated” Status Effect, the amount subtracted is multiplied by the
heatedSlowdownRate setting, effectively making the Status
Effect take longer to expire.
Fatal
- Spreadsheet label: Fatal?
- Class attribute: Boolean
this.fatal
This is a simple Boolean value indicating whether an instance of this Status Effect will kill the Player when it expires
or not. If this is true, then a Player inflicted with this Status Effect will die when the Status Effect expires. If
this is false, the Player will simply be cured of the Status Effect. However, Alter Ego will not check if the Status
Effect is fatal if it has a next stage.
Visible
- Spreadsheet label: Visible?
- Class attribute: Boolean
this.visible
This is a simple Boolean value indicating whether an instance of this Status Effect will appear if a Player inflicted
with it uses the status command. If this is true, then it will appear in the
Player’s status. If this is false, then it will not. However, it will still be visible to
a moderator
who views the Player’s status.
Overriders
This is a comma-separated list of Status Effects that prevent this Status Effect from being inflicted. If a Player currently has any of the Status Effects listed here, then they cannot be inflicted with this Status Effect under any circumstances. However, it should be noted that overriders do not automatically cure Status Effects that they override when they are inflicted on a Player.
Cures
This is a comma-separated list of Status Effects that an instance of this Status Effect will cure once it is inflicted on a Player. Among other things, this allows particular Status Effects to be mutually exclusive, allowing for cycles where a Player can only be inflicted with one Status Effect in the cycle at any given time. For that reason, if the Status Effect is being inflicted due to being a previous Status Effect’s next stage or cured condition, it will not cure any Status Effects on this list.
Next Stage
- Spreadsheet label: Develops Into
- Class attribute: Status
this.nextStage
This is a single Status Effect that an instance of this Status Effect will develop into when it expires. When it expires, it will be cured, and the next stage will be inflicted on the Player. If the Player cannot be inflicted with the Status Effect’s next stage because they are inflicted with any of the next stage’ s overriders, they will be sent the Status Effect’s cured description. Otherwise, they will be sent the next stage’s inflicted description.
It is not possible for a Status Effect to have more than one next stage. If the Status Effect has no next stage, this is
null.
Duplicated Status
- Spreadsheet label: When Duplicated
- Class attribute: Status
this.duplicatedStatus
This is a single Status Effect that an instance of this Status Effect will develop into if it is inflicted on a Player who already has an instance of this Status Effect. If the Status Effect is duplicated, the Player will be cured of it without being sent its cured description, and they will be inflicted with the duplicated Status. However, the Status Effect cannot be duplicated if the Player is inflicted with one of its overriders.
It is not possible for a Status Effect to have more than one duplicated Status. If the Status Effect has no duplicated
Status, this is null.
Cured Condition
- Spreadsheet label: When Cured
- Class attribute: Status
this.curedCondition
This is a single Status Effect that an instance of this Status Effect will develop into if it is cured. When it is cured, the cured condition will be inflicted on the Player. However, it will not be inflicted if the Status Effect is cured by being duplicated, by being one of a recently inflicted Status Effect’s cures, or by developing into its next stage. The cured condition will only be inflicted if the Status Effect is cured by expiring with no next stage, or if it is cured by some external phenomenon (such as a moderator command or the Player using an Inventory Item) before it normally expires. When the cured condition is inflicted, the Player will not receive its inflicted description; they will be sent the cured Status Effect’s cured description.
It is not possible for a Status Effect to have more than one cured condition. If the Status Effect has no cured
condition, this is null.
Stat Modifiers
This is a comma-separated list of stat modifier objects that an instance of this Status Effect will apply to a Player inflicted with it. Stat modifier objects have the following structure:
{ Boolean modifiesSelf, String stat, Boolean assignValue, Number value }
In order to define a stat modifier, the name or abbreviation of the stat to modify must be listed. This must be
strength, intelligence, dexterity, speed, or stamina; or their abbreviations, str, int, dex, spd, or
sta. It must then be followed by an operator: +, -, or =. Next must be an integer value from 1 to 10.
Finally, if the stat is meant to modify the attacker’s stat in a Die roll where a Player inflicted with this
Status Effect is the defender, prefix the modifier with @.
Valid examples of stat modifiers for a single Status Effect are:
int-1. This decreases the Player’s intelligence stat by 1.str-2, dex-2, spd-2, sta-2. This decreases the Player’s strength, dexterity, speed, and stamina stats by 2.spd+4. This increases the Player’s speed stat by 4.str+9, int+9, dex+9, spd+9, sta+9. This increases all of the Player’s stats by 9.spd=1, sta=1. This sets the Player’s speed and stamina stats to 1.@str=0, dex+9. This increases the Player’s dexterity stat by 9 and temporarily sets the attacking Player’s strength stat to 0 when this Player is the defender. Effectively, this makes the defending Player immune to attacks.
Note that regardless of the values of stat modifiers, a Player’s stat cannot be less than 1 or greater than 10. It will
be clamped between these values if the modifiers would exceed these values. The only exception is when a stat modifier
assigns a value with the = operator. In this case, the clamp function is bypassed, and the Player’s stat can be set to
any integer value outside of that range.
Stat modifiers are stackable. If a Player has multiple Status Effects that modify the same stat, the modifiers will be
added together before being applied to the stat. However, stat modifiers which assign a value to a given stat will
overrule all other modifiers to that stat. So, even if a Player has one Status Effect with a stat modifier of sta+9,
if they have a Status Effect with a stat modifier of sta=1, their stamina stat will be set to 1.
Behavior Attributes
- Spreadsheet label: Attributes
- Class attribute: String
this.attributes
This is a comma-separated list of keywords that give the Status Effect predefined behavior when it is inflicted on a Player. Through the combination of different behavior attributes, the Status Effect can transform gameplay for the inflicted Player in drastic ways. These must match exactly one of the predefined behavior attributes that have been programmed into Alter Ego. Here, each behavior attribute will be listed, and their behavior will be detailed.
disable all
- Disables all commands.
disable [command]
- Disables the given command.
enable [command]
- Enables the given command when the Player has a Status Effect with the
disable allattribute.
enable say
- Enables the say command, which is disabled by default.
enable text
- Enables the text command, which is disabled by default.
no channel
- Removes the Player from the channel of the Room they’re in.
- When the Player moves to a different Room, they will not be added to the Room’s channel.
- If the Player is added to a Whisper as a result of hiding, they will not be given permission to read the Whisper channel, unless the only Status Effect they have with this attribute is the “hidden” Status Effect.
hear room
- All dialog from other Players in the Room will be sent to the Player via DM.
acute hearing
- All dialog from other Players in adjacent Rooms will be sent to the Player via DM.
- All Whisper messages from other Players in the same Room will be sent to the Player via DM.
knows [Player name]
- When the known Player speaks and their display name differs from their name, the Player will
receive a DM revealing the known Player’s identity. Example:
[Player display name], whose voice you recognize to be [Player name]'s, says "[Message]". - When the Player has the
no sightandhear roombehavior attributes, they will receive a DM revealing the known Player’s identity when they speak. Example:[Player name] says "[Message]". - If the Player is in a Whisper and doesn’t have permission to read the Whisper channel, they will receive a DM
revealing the known Player’s identity when they speak in the Whisper. Example:
[Player name] whispers "[Message]". - When the known Player’s voice can be heard from an adjacent Room, the Player will receive a DM revealing the known
Player’s identity. Example:
You hear [Player name] shout "[Message]" in a nearby room. - When the known Player has the
senderbehavior attribute and someone in the same Room as the Player has thereceiverattribute, the Player will receive a DM revealing the known Player’s identity when they speak. Example:[Player name] says "[Message]" through [Receiver display name]'s WALKIE TALKIE. - When the Player is in a Room with the
audio monitoringtag and the known Player speaks in a Room with theaudio surveilledtag, the Player will receive a DM revealing the known Player’s identity. Example:[Room name] [Player name] says "[Message]". - Note: The Player name is case sensitive. It must match the Player’s name exactly as it appears on the spreadsheet.
no hearing
- All messages from other Players in the Room will be deleted and sent to hearing Players via DM.
- The Player cannot be Whispered to. They will be removed from any Whispers that they are a part of.
- If the Player is added to a Whisper as a result of hiding, they will not be given permission to read the Whisper channel.
- If the Player is in a Whisper as a result of hiding, they will not receive any notifications about dialog sent in that Whisper.
- The Player cannot hear shouted dialog from adjacent Rooms. Instead of being narrated in the Room channel, it will be sent to all hearing Players in the Room via DM.
- The Player will not notice when someone in an adjacent Room uses the knock command.
- The Player will not hear dialog coming from a Player with the
receiverbehavior attribute. Instead of being narrated in the Room channel, it will be sent to all hearing Players in the Room via DM. - If the Player is in a Room with the
audio monitoringtag, they will not hear dialog coming from a Room with theaudio surveilledtag. Instead of being narrated in the Room channel, it will be sent to all hearing Players in the Room via DM.
sender
- All of the Player’s dialog (except Whispers) will be narrated in the Room of the Player with the
receiverattribute, if there is one that isn’t thesenderPlayer, regardless of the respective Players’ locations on the Map. - The Player will attempt to solve any
voice-type Puzzles in the Room that thereceiverPlayer is in.
receiver
- Non-Whispered dialog spoken by the Player with the
senderattribute will be narrated in the Room of thereceiverPlayer, regardless of the respective Players’ locations on the Map. Example:A voice coming from [Player display name]'s WALKIE TALKIE says "[Message]".
no speech
- Any message the player sends to a Room or Whisper channel will be deleted.
see room
- All Narrations (including those from moderators and Alter Ego) that are sent to the Room the Player is in will be sent
to the Player via DM, unless the Player has the
no sightbehavior attribute or thehiddenbehavior attribute. - If the Player has the
hiddenattribute, all Narrations (including those from moderators and Alter Ego) that are sent to the Whisper they’re in (if applicable) will be sent to the Player via DM, unless the Player has theno sightbehavior attribute.
no sight
- The Player will not receive the Room description when they enter a Room. Instead, they will be sent
Fumbling against the wall, you make your way to the next room over. - The
see roombehavior attribute is overridden; the Player will not be sent Narrations via DM. - If the Player has the
hear roombehavior attribute, the dialog they receive via DM will not have the speaking Player’s identity attached. Example:You hear a voice in the room say "[Message]". - If the Player has the
acute hearingbehavior attribute, the whispered dialog they receive via DM will not have the speaking Player’s identity attached. Example:You overhear someone in the room whisper "[Message]". - If the Player is in a Whisper and doesn’t have permission to read the Whisper channel, they will receive dialog sent
in that Whisper via DM. However, the dialog they receive will not have the speaking Player’s identity attached.
Example:
Someone whispers "[Message]".
unconscious
- Alter Ego will narrate
[Player display name] goes unconscious.in the Room the Player is in when this behavior attribute is inflicted.- If the Status Effect which inflicts this behavior attribute onto the Player is named “asleep”, Alter Ego will
instead narrate
[Player display name] falls asleep.
- If the Status Effect which inflicts this behavior attribute onto the Player is named “asleep”, Alter Ego will
instead narrate
- Alter Ego will narrate
[Player display name] regains consciousness.in the Room the Player is in when this behavior attribute is cured.- If the Status Effect which inflicted this behavior attribute onto the Player is named “asleep”, Alter Ego will
instead narrate
[Player display name] wakes up.
- If the Status Effect which inflicted this behavior attribute onto the Player is named “asleep”, Alter Ego will
instead narrate
- The Player will receive no notifications except those about Status Effects.
- The Player will not receive dialog via DM, regardless of any other behavior attributes they may have.
- The Player cannot be Whispered to. They will be removed from any Whispers that they are a part of.
- Attempts to steal an Inventory Item from this Player will always succeed.
- The Player will appear in the list of sleeping Players when another Player enters the Room they’re in.
- The Player will not receive notifications about edit mode being enabled or disabled.
hidden
- Alter Ego will narrate
[Player display name] hides in the [Player hiding spot].in the Room the Player is in when this behavior attribute is inflicted. - Alter Ego will narrate
[Player display name] comes out of the [Player hiding spot].in the Room the Player is in when this behavior attribute is cured. - The Player cannot be Whispered to. They will be removed from any Whispers that they are a part of. If the Status Effect is inflicted by use of the hide command, a Whisper will automatically be created with all Players hiding in the same Object.
- If the Player whispers and someone in the Room has the
acute hearingbehavior attribute, the whispered dialog that will be sent via DM will not have the Player’s identity attached. Example:You overhear someone in the room whisper "[Message]". - Narrations about the Player’s actions will not be sent to the channel of the Room they’re in, unless the action is coming out of hiding.
- If the Player is in a Whisper, Narrations about their actions will be sent to the Whisper channel.
- The Player will not appear in the list of occupants when another Player enters the Room they’re in.
- The Player will not appear in the occupants string of the Room they’re in.
- The Player cannot be inspected, except by another Player hiding in the same Object as them.
- The Player cannot be given to or stolen from, except by another Player hiding in the same Object as them.
- The Player cannot be the target for a Gesture, except by another Player hiding in the same Object as them.
- The Player can only use the dress command to dress from the Object they’re hiding in, from its child Puzzle, or from Items contained within it.
- The Player can only use the drop command to drop Inventory Items into the Object they’re hiding in, into its child Puzzle, or into Items contained within it.
- The Player can only use the gesture command to target the Object they’re hiding in, Items contained within it, Players hiding in the same Object they’re hiding in, and their own Inventory Items.
- The Player can only use the give command to give Inventory Items to Players hiding in the same Object as them.
- The Player can only use the inspect command to inspect the Room, the Object they’re hiding in, Items contained within it, their own Inventory Items, Players hiding in the same Object they’re hiding in, and their Inventory Items.
- When the Player uses the say command, their display name will be temporarily changed to
Someone in the room. It will be restored to what it was previously after the command is executed. - When the Player uses the say command, their display icon will be temporarily changed to this image. It will be restored to what it was previously after the command is executed.
- The Player can only use the steal command to steal Inventory Items from Players hiding in the same Object as them.
- The Player can only use the take command to take Items from the Object they’re hiding in, from its child Puzzle, or from Items contained within it.
- The Player can only use the undress command to undress into the Object they’re hiding in, into its child Puzzle, or into Items contained within it.
- The Player can only use the use command to activate/deactivate the Object they’re hiding in, solve/unsolve its child Puzzle, or use their own Inventory Items.
concealed
- When this behavior attribute is inflicted:
- The Player’s display name will be changed. If an equipped Inventory Item inflicted this behavior attribute, then
it will be changed to
An individual wearing [Inventory Item single containing phrase]. If the behavior attribute was inflicted some other way, it will be changed toAn individual wearing a MASK. - The Player’s display icon will be changed to this image.
- The Player’s pronouns will be changed to
neutral.
- The Player’s display name will be changed. If an equipped Inventory Item inflicted this behavior attribute, then
it will be changed to
- When this behavior attribute is cured:
- The Player’s display name will be reset.
- The Player’s display icon will be reset.
- The Player’s pronouns will be reset.
- Alter Ego will narrate
The [Inventory Item name] comes off, revealing the figure to be [Player name].in the Room the Player is in, if an unequipped Inventory Item cured this behavior attribute. If the behavior attribute was cured some other way, “MASK” will be used in place of[Inventory Item name].
- The Player cannot be Whispered to. They will be removed from any Whispers that they are a part of.
all or nothing
- All Die rolls when the Player is the attacker will be the minimum or maximum possible for the Die before modifiers are applied. For example, if the minimum is 1 and the maximum is 20, all of the Player’s rolls will be 1 or 20 before modifiers.
coin flipper
- All Die rolls when the Player is the attacker will have a 50% chance of having a modifier of +1 applied if the Player has an Inventory Item with “COIN” in its name.
no stamina decrease
- The Player will not consume stamina when moving.
thief
- The Player will always succeed without getting caught when stealing an Inventory Item from another Player. However, they will still get caught if the Inventory Item is non-discreet.
Effect
- Spreadsheet label: Effect
This is an external attribute that is never loaded by Alter Ego. This should be a description of the Status Effect, explaining entirely how it works and what it does to a Player inflicted with it. However, it can be left blank.
Inflicted Description
- Spreadsheet label: Message When Inflicted
- Class attribute: String
this.inflictedDescription
When a Player is inflicted with this Status Effect, they will receive a parsed version of this string. See the article on writing descriptions for more information.
Cured Description
- Spreadsheet label: Message When Cured
- Class attribute: String
this.curedDescription
When a Player is cured of this Status Effect, they will receive a parsed version of this string.
Row
- Class attribute: Number
this.row
This is an internal attribute, but it can also be found on the spreadsheet. This is the row number of the Status Effect.
Timer
- Class attribute: moment-timer
this.timer
This is an internal attribute which contains a timer counting down until the Status Effect expires. This is null for
all Status Effects loaded from the spreadsheet. This is only assigned to an instantiated Status Effect that has a
duration. If the instantiated Status Effect has no duration, this is null. While the instantiated Status Effect is
active, every 1000 milliseconds, 1 second is subtracted from the Status
Effect’s remaining Duration until it reaches 0. When it does, the timer is stopped, and the
Status Effect is cured.
Whisper
A Whisper is a data structure in the Neo World Program. It represents a group of two or more Players speaking quietly to each other such that no one else in the Room can hear them.
A normal Whisper can only be created when a Player or moderator uses
the whisper command. There is no
upper limit to the number of Players that can be included in a Whisper, so long as they are all in the same Room.
However, it is not possible for one Player to create a Whisper with Players in the Room who have the hidden,
concealed, no hearing, or unconscious behavior attributes. If a Player in a
Whisper becomes inflicted with a Status Effect with one of these behavior attributes or they leave the
Room, they will be removed from the Whisper. If, when a Player is removed from the Whisper, the group of Players
remaining is the same as a different Whisper that already exists, it will be deleted upon the Player’s removal.
Otherwise, a Whisper will only be deleted once all Players have been removed from it.
A Whisper can also be created when a Player hides in an Object. This allows a Whisper to be created
with only one Player. However, if more Players hide in the same Object, the Whisper will be deleted and a new one will
be created with all Players. A Whisper created in this way behaves similarly to a Room, but with most of the same
properties as a normal Whisper. When a Player comes out of hiding or is inflicted with a Status Effect with the
no channel or no hearing behavior attributes, they will be removed from the Whisper. When all Players are removed
from the Whisper, it will be deleted.
Attributes
Whispers have few attributes.
Players
This is an array of all Players currently in the Whisper.
Location
- Class attribute: Room
this.location
This is the Room the Whisper exists in. All of the Players in the Whisper must be in this Room.
Channel Name
- Class attribute: String
this.channelName
This is the name that the channel will be set to. It is created using the name of the Whisper’s location
followed by an alphabetized list of all the Players’ display names, all separated with
hyphens (-). Whenever a Player is removed from the Whisper, the channel name is updated to exclude them.
Channel
- Class attribute: TextChannel
this.channel
When the Whisper is initialized, a channel is created for it in the Whisper category. In this channel, Players can speak to each other freely without others in the Room hearing them.
If a Player is part of a Whisper but has the no channel behavior attribute, they will not be given permission to view
the channel. This is helpful for Players with the concealed behavior attribute, for example, because having that
permission would allow other Players in the Whisper to see their Discord account, thus
revealing their identity. Similarly, Players in the Whisper with the no hearing behavior attribute are not given
permission to view the channel. NPCs are also not given permission to view the channel, because they don’t have Discord
accounts. When a Player is removed from the Whisper, their permission to view the channel is revoked.
When a Whisper is marked to be deleted, one of two things can happen. If
the autoDeleteWhisperChannels setting is true, then the
channel will be deleted as well. If it is false, then the channel’s name will be set to “archived-(Room name)”.
Discord only allows a single category to have up to 50 channels. Therefore, if Whisper channels are not automatically
deleted, they must be moved to another category or manually deleted before this limit is reached. Otherwise, no new
Whispers can be created.
Docker Settings
Alter Ego has various settings that can be configured in the file .env. All values should be enclosed with single
quotes. Remember to uncomment (i.e. remove the # before the line) for them to go into effect. This page details each
setting and what it does.
Bot settings
COMMAND_PREFIX
This is what users must begin their messages with in order to run a command. If Alter Ego detects that a message begins with this string, it will pass the message into its command handler module to determine if it was a command or not, and run it if it was.
DEBUG_MODE
This is a simple Boolean value. If this is true, Alter Ego will
start in debug mode. If this is false, it will start normally.
Other game data
PIXELS_PER_M
This is how many pixels it takes to represent 1 meter on your Map. When calculating the amount of time it takes a player to move from one room to another, Alter Ego needs to convert the distance between the two rooms from pixels to meters. In order to set this properly, find a part of your map with a standard size (for example, a basketball court must be 28 x 15 meters according to the International Basketball Federation). Divide the number of pixels making up its length by its length in meters. The result should go here.
STAMINA_USE_RATE
This is used to calculate how much stamina a player will lose every 1/10th of a second they are moving. You can change this to be higher or lower, depending on how quickly you want players to lose stamina, but it should always be a negative number.
HEATED_SLOWDOWN_RATE
This number is used to slow down time when at least one player is inflicted with the “heated” Status Effect. To accomplish this feat, the rate of time passing during player movement as well as in timed Status Effects is multiplied by this number. This allows you to narrate heated situations such as combat without worrying about how much time is passing. The lower this number, the more slowed down time will become. Players are not informed that time is being slowed, so setting this number too low can tip them off that a heated situation is ongoing.
DICE_MIN
This is an integer that indicates the lowest possible number for a standard die roll. This should usually be set to 1.
DICE_MAX
This is an integer that indicates the highest possible number for a standard die roll. The default is 6, but it can be
changed to any number higher than diceMin.
DEFAULT_DROP_OBJECT
This is the name of the Object in each room that players will drop Items on if they don’t specify one themselves. Every Room must have an Object with this name capable of holding Items.
DEFAULT_ROOM_ICON_URL
This is the URL of an image that will be inserted into
the Room MessageEmbed
when a player enters or inspects a Room if the Room does not have a unique icon URL. This must end in .jpg, .png, or
.gif. If this is left blank and the Room does not have a unique icon URL, then Alter Ego will use the server icon
instead. If the server icon is not set, then no image will be sent in the MessageEmbed.
AUTODELETE_WHISPER_CHANNELS
This is a Boolean value that determines whether or not Whisper channels will be
automatically deleted when all players have left the room. If this is true, they will be deleted. If this is false,
they will be renamed “archived-(Room name)”. Because Discord only allows a single category to
have up to 50 channels, this should be true unless you plan on manually deleting Whisper channels when you no longer
need to see them.
AUTOSAVE_INTERVAL
This is how often, in seconds, Alter Ego should update the spreadsheet with any necessary changes. The default is 30.
Bot activities
These are Discord user activities that Alter Ego will set for itself at certain times. They each have two options:
- type: This is the verb that will be used. This is
a Discord ActivityType, so valid strings are:
- PLAYING
- STREAMING
- LISTENING
- WATCHING
- COMPETING
- string: This is the name of the activity that will be used after the verb.
ONLINE_ACTIVITY_TYPE, ONLINE_ACTIVITY_STRING
This is the activity that Alter Ego will set for itself when it comes online. Its default activity will display as
Listening to Future Foundation HQ. Alter Ego will set its status to Online.
DEBUG_MODE_TYPE, DEBUG_MODE_STRING
This is the activity that Alter Ego will set for itself when it comes online in debug mode. Its default activity will
display as Playing NWP Debugger.exe. Alter Ego will set its status to Do Not Disturb.
IN_PROGRESS_TYPE, IN_PROGRESS_STRING
This is the activity that Alter Ego will set for itself when a game has begun. Its default activity will display as
Streaming Neo World Program. Alter Ego’s status will be set to Online, however if a valid URL is set, it will appear
to be streaming. The number of players online will be appended and updated periodically.
Default player data
All of the settings in this section will be uploaded to the Players sheet when the startgame timer ends. They can be changed to suit each individual player on the spreadsheet itself before all game data is loaded for the first time.
DEFAULT_PRONOUNS
This is the default pronoun string that each player will have. The
default is neutral. Once it is on the spreadsheet, it should be edited to suit each player.
DEFAULT_VOICE
This is the default original voice string that each player will
have. The default is a neutral voice. Once it is on the spreadsheet, it should be edited to suit each player.
Default Stats
These are the default stats a player will have. These should generally be changed on the spreadsheet to suit each individual player before the game is officially started. These must be a whole number between 1 and 10.
DEFAULT_STR
This is the strength stat that each player will have by default. The default is 5. For more information, read the
strength section of the Player article.
DEFAULT_INT
This is the intelligence stat that each player will have by default. The default is 5. For more information, read the
intelligence section of the Player article.
DEFAULT_DEX
This is the dexterity stat that each player will have by default. The default is 5. For more information, read the
dexterity section of the Player article.
DEFAULT_SPD
This is the speed stat that each player will have by default. The default is 5. For more information, read the
speed section of the Player article.
DEFAULT_STA
This is the stamina stat that each player will have by default. The default is 5. For more information, read the
stamina section of the Player article.
DEFAULT_LOCATION
This is the name of the Room that all players will start in at the beginning of the game.
DEFAULT_STATUS_EFFECTS
This is a comma-separated list of Status Effects that will be inflicted on all players at the beginning of the game.
DEFAULT_INVENTORY
This is an array of arrays that creates the default player
inventory on the spreadsheet. This is used to initialize the Inventory Items sheet when the startgame timer ends. If you
wish to change the default inventory that players start with, you can do so here. Note that if the # character is
found in the container identifier slot, Alter Ego will replace it with a unique number for each player.
DEFAULT_DESCRIPTION
This is the default description that will be applied to each player’s Description cell on the Players sheet when the startgame timer ends. Once it is on the spreadsheet, it should be edited to describe each player’s appearance. The item lists should also be filled out to contain the containing phrases for the default inventory, if it has been changed.
Role IDs
In general, these should not need be changed, as they are now autopopulated by Alter Ego. However, if you created your own roles instead of using a template, or if Alter Ego cannot find the correct role names, you can manually change the IDs here.
In order to copy a role ID, make sure your Discord account
has Developer Mode enabled. Mention a role by typing
@(Role name) on Discord, but place a \ before the @ symbol. When you send the message, the role will display its
ID, which is a string of numbers.
TESTER_ROLE
This should be the ID of the Tester role in single quotes.
ELIGIBLE_ROLE
This should be the ID of the Eligible role in single quotes.
PLAYER_ROLE
This should be the ID of the Player role in single quotes.
HEADMASTER_ROLE
This should be the ID of the Headmaster role in single quotes.
MODERATOR_ROLE
This should be the ID of the Moderator role in single quotes.
DEAD_ROLE
This should be the ID of the Dead role in single quotes.
SPECTATOR_ROLE
This should be the ID of the Spectator role in single quotes.
Category and channel IDs
In general, these should not need be changed, as they are now autopopulated by Alter Ego. However, if you created your own channels instead of using a template, or if Alter Ego cannot find the correct room names, you can manually change the IDs here.
In order to copy a category or channel ID, right click on it in the channel list and click Copy ID.
ROOM_CATEGORIES
NOTE: You can now use the
.createroomcategorycommand to set these, so it is very unlikely that you will need to change this.
This is a list of all room category IDs. They can be separated by commas, spaces, or anything else, but it should all be a single string.
WHISPER_CATEGORY
This should be the ID of the Whisper category in single quotes.
SPECTATE_CATEGORY
This should be the ID of the Spectator category in single quotes.
TESTING_CHANNEL
This should be the ID of the testing channel in single quotes.
GENERAL_CHANNEL
This should be the ID of the general channel in single quotes.
ANNOUNCEMENT_CHANNEL
This should be the ID of the announcements channel in single quotes.
COMMAND_CHANNEL
This should be the ID of the bot-commands channel in single quotes.
LOG_CHANNEL
This should be the ID of the bot-log channel in single quotes.
Node Settings
Alter Ego has various settings that can be configured in configuration files. They are split up into
settings.json, serverconfig.json, and playerdefaults.json. This page details each setting and what it does.
Bot settings (settings.json)
commandPrefix
This is what users must begin their messages with in order to run a command. If Alter Ego detects that a message begins with this string, it will pass the message into its command handler module to determine if it was a command or not, and run it if it was.
debug
This is a simple Boolean value. If this is true, Alter Ego will
start in debug mode. If this is false, it will start normally.
Other game data (settings.json)
pixelsPerMeter
This is how many pixels it takes to represent 1 meter on your Map. When calculating the amount of time it takes a player to move from one room to another, Alter Ego needs to convert the distance between the two rooms from pixels to meters. In order to set this properly, find a part of your map with a standard size (for example, a basketball court must be 28 x 15 meters according to the International Basketball Federation). Divide the number of pixels making up its length by its length in meters. The result should go here.
staminaUseRate
This is used to calculate how much stamina a player will lose every 1/10th of a second they are moving. You can change this to be higher or lower, depending on how quickly you want players to lose stamina, but it should always be a negative number.
heatedSlowdownRate
This number is used to slow down time when at least one player is inflicted with the “heated” Status Effect. To accomplish this feat, the rate of time passing during player movement as well as in timed Status Effects is multiplied by this number. This allows you to narrate heated situations such as combat without worrying about how much time is passing. The lower this number, the more slowed down time will become. Players are not informed that time is being slowed, so setting this number too low can tip them off that a heated situation is ongoing.
diceMin
This is an integer that indicates the lowest possible number for a standard die roll. This should usually be set to 1.
diceMax
This is an integer that indicates the highest possible number for a standard die roll. The default is 6, but it can be
changed to any number higher than diceMin.
defaultDropObject
This is the name of the Object in each room that players will drop Items on if they don’t specify one themselves. Every Room must have an Object with this name capable of holding Items.
defaultRoomIconURL
This is the URL of an image that will be inserted into
the Room MessageEmbed
when a player enters or inspects a Room if the Room does not have a unique icon URL. This must end in .jpg, .png, or
.gif. If this is left blank and the Room does not have a unique icon URL, then Alter Ego will use the server icon
instead. If the server icon is not set, then no image will be sent in the MessageEmbed.
autoDeleteWhisperChannels
This is a Boolean value that determines whether or not Whisper channels will be
automatically deleted when all players have left the room. If this is true, they will be deleted. If this is false,
they will be renamed “archived-(Room name)”. Because Discord only allows a single category to
have up to 50 channels, this should be true unless you plan on manually deleting Whisper channels when you no longer
need to see them.
autoSaveInterval
This is how often, in seconds, Alter Ego should update the spreadsheet with any necessary changes. The default is 30.
Bot activities (settings.json)
These are Discord user activities that Alter Ego will set for itself at certain times. They each have two options:
- type: This is the verb that will be used. This is
a Discord ActivityType, so valid strings
are:
- PLAYING
- STREAMING
- LISTENING
- WATCHING
- COMPETING
- string: This is the name of the activity that will be used after the verb.
onlineActivity
This is the activity that Alter Ego will set for itself when it comes online. Its default activity will display as
Listening to Future Foundation HQ. Alter Ego will set its status to Online.
debugModeActivity
This is the activity that Alter Ego will set for itself when it comes online in debug mode. Its default activity will
display as Playing NWP Debugger.exe. Alter Ego will set its status to Do Not Disturb.
gameInProgressActivity
This is the activity that Alter Ego will set for itself when a game has begun. Its default activity will display as
Streaming Neo World Program. Alter Ego’s status will be set to Online, however if a valid URL is set, it will appear
to be streaming. The number of players online will be appended and updated periodically.
playerdefaults.json
All of the settings in this section will be uploaded to the Players sheet when the startgame timer ends. They can be changed to suit each individual player on the spreadsheet itself before all game data is loaded for the first time.
defaultPronouns
This is the default pronoun string that each player will have. The
default is neutral. Once it is on the spreadsheet, it should be edited to suit each player.
defaultVoice
This is the default original voice string that each player will
have. The default is a neutral voice. Once it is on the spreadsheet, it should be edited to suit each player.
defaultStats
These are the default stats a player will have. These should generally be changed on the spreadsheet to suit each individual player before the game is officially started.
strength
This is the strength stat that each player will have by default. The default is 5. For more information, read the
strength section of the Player article.
intelligence
This is the intelligence stat that each player will have by default. The default is 5. For more information, read the
intelligence section of the Player article.
dexterity
This is the dexterity stat that each player will have by default. The default is 5. For more information, read the
dexterity section of the Player article.
speed
This is the speed stat that each player will have by default. The default is 5. For more information, read the
speed section of the Player article.
stamina
This is the stamina stat that each player will have by default. The default is 5. For more information, read the
stamina section of the Player article.
defaultLocation
This is the name of the Room that all players will start in at the beginning of the game.
defaultStatusEffects
This is a comma-separated list of Status Effects that will be inflicted on all players at the beginning of the game.
defaultInventory
This is an array of arrays that creates the default player
inventory on the spreadsheet. This is used to initialize the Inventory Items sheet when the startgame timer ends. If you
wish to change the default inventory that players start with, you can do so here. Note that if the # character is
found in the container identifier slot, Alter Ego will replace it with a unique number for each player.
defaultDescription
This is the default description that will be applied to each player’s Description cell on the Players sheet when the startgame timer ends. Once it is on the spreadsheet, it should be edited to describe each player’s appearance. The item lists should also be filled out to contain the containing phrases for the default inventory, if it has been changed.
Role IDs (serverconfig.json)
In general, these should not need be changed, as they are now autopopulated by Alter Ego. However, if you created your own roles instead of using a template, or if Alter Ego cannot find the correct role names, you can manually change the IDs here.
In order to copy a role ID, make sure your Discord account
has Developer Mode enabled. Mention a role by typing
@(Role name) on Discord, but place a \ before the @ symbol. When you send the message, the role will display its
ID, which is a string of numbers.
testerRole
This should be the ID of the Tester role in quotes.
eligibleRole
This should be the ID of the Eligible role in quotes.
playerRole
This should be the ID of the Player role in quotes.
headmasterRole
This should be the ID of the Headmaster role in quotes.
moderatorRole
This should be the ID of the Moderator role in quotes.
deadRole
This should be the ID of the Dead role in quotes.
spectatorRole
This should be the ID of the Spectator role in quotes.
Category and channel IDs (serverconfig.json)
In general, these should not need be changed, as they are now autopopulated by Alter Ego. However, if you created your own categories and channels instead of using a template, or if Alter Ego cannot find the correct category / channel names, you can manually change the IDs here.
In order to copy a category or channel ID, right click on it in the channel list and click Copy ID.
roomCategories
NOTE: You can now use the
.createroomcategorycommand to set these, so it is very unlikely that you will need to change this.
This is a list of all room category IDs. They can be separated by commas, spaces, or anything else, but it should all be a single string.
whisperCategory
This should be the ID of the Whisper category in quotes.
spectateCategory
This should be the ID of the Spectator category in quotes.
testingChannel
This should be the ID of the testing channel in quotes.
generalChannel
This should be the ID of the general channel in quotes.
announcementChannel
This should be the ID of the announcements channel in quotes.
commandChannel
This should be the ID of the bot-commands channel in quotes.
logChannel
This should be the ID of the bot-log channel in quotes.
Spreadsheet ID (settings.json)
A Google Sheets URL contains two IDs. The first is the ID of the entire spreadsheet itself. The second is the ID of the individual sheet currently open in the spreadsheet. You can retrieve the ID of either by copying them from the URL. The format is as follows:
https://docs.google.com/spreadsheets/d/(entire spreadsheet ID)/edit#gid=(individual sheet ID)
spreadsheetID
This should be the ID of the spreadsheet Alter Ego will use in quotes.
Cell constants
These are all cell constants used by Alter Ego to retrieve data. These generally shouldn’t be changed.
Manual Installation
Installing Alter Ego without Docker is not recommended. Doing so is more complicated and Alter Ego may run differently depending on the OS you run on your system and the dependencies installed there.
Node Installation
Installation of Alter Ego is rather complicated. In order to create an environment in which Alter Ego can facilitate a game, many steps need to be taken. This page will explain them in detail.
Step 1: Download Alter Ego
First, you need to download Alter Ego itself. If you already have Git, you can clone the repository by entering
git clone https://github.com/MolSnoo/Alter-Ego.git in Git. If not, you can simply download the ZIP file to your
computer.
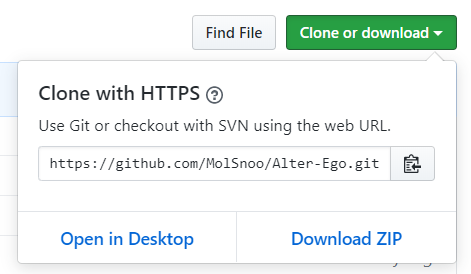
Downloading Alter Ego as a ZIP file is not recommended however, as that makes it harder to keep your copy of Alter Ego up to date. If you do not already have Git, install the official GitHub Desktop app, and then click File > Clone Repository, then navigate to the URL tab and paste the Alter Ego repository link like so:
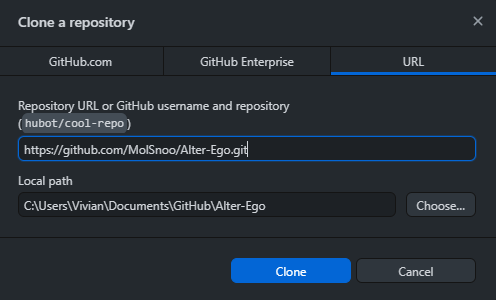
If you’ve done it this way, then you can update Alter Ego by clicking the Pull origin button in the GitHub Desktop app.
Switch to a numbered version
If you do not wish to use the latest changes on on the master branch (it is considered to be a Development version
now), you have to run additional commands to sync to a numbered version.
With Git
Alter Ego versions are organized in “tags”, therefore you must switch to a tag in git to stay on a numbered version. In a terminal, run.
git fetch --all --tags
git checkout tags/[VERSION] -b [BRANCH NAME]
Where VERSION is the version of Alter Ego you wish to use (e.g. 1.8.0) and BRANCH_NAME is a name of your choice (
e.g. 1.8.0)
Without Git
Go to the Alter Ego GitHub page and download the latest release. Click the releases box and select the newest one (or whichever version you choose).
There, you will see something like this.
Download the source code archive Source code (zip). Use your favorite archive utility to open the archive (e.g. 7zip,
GNOME Archive Manager, Keka), and extract the contents into your folder of choice.
Step 2: Install Node.js.
If you already have Node.js installed, you can skip this step.
Node.js is the programming language that Alter Ego was coded in. Without installing it to your computer, you won’t be able to run Alter Ego. You can install it using the link below. The LTS version should be fine.
https://nodejs.org/en/
Step 3: Install dependencies
Alter Ego requires a few dependencies in order to run properly. These are things like the Discord and the Google Sheets API which allow it to facilitate a game.
First, open the Node.js command prompt. It should look like this:
Now run the command cd <the directory you installed Alter Ego in>. It will take you to that directory. It should look
something like this:
Now that you’re in the directory of Alter Ego, run this command: npm install. This will automatically install all of
the required dependencies.
Step 4: Create a Discord bot
Now that you have Alter Ego installed, you’ll need to create a new Discord bot to bind its functionality to. Navigate to https://discordapp.com/developers/applications/, and once you log in to your Discord account, create a new application. You can call it whatever you like. This example will use an application called “Test Bot”. Once you create the application, you’ll be taken to a page that looks like this:
You can ignore this for now. Navigate over to the Bot tab on the left-hand side, then click Add Bot. This will bring you to a page like this:
On this page, you can change the bot’s name, set its profile picture, and a few other things. Be sure to uncheck the Public Bot setting! Alter Ego can only be on one server, so you definitely don’t want people inviting it to their own servers!
In order for Alter Ego to function properly, you must check the three options under the Privileged Gateway Intents section, specifically the Presence Intent, Server Members Intent, and Message Content Intent. If you’ve done this right, it will look like this:
Step 5: Create a Discord server
Before you can get Alter Ego up and running, you’ll have to create a Discord server. You can call it whatever you like, but once it’s made, you’ll have to set a number of things up.
The easiest way to create a server is using this template, which will add all of the requisite roles and channels for you. If you want to set those up manually, refer to this page.
Enable Developer Mode
You’ll have to enable Developer Mode for your account for the next few steps. To do this, navigate to your User Settings in Discord. Open the Appearance tab and scroll to the bottom. Under Advanced, you’ll see a switch labeled Developer Mode. Turn it on if it’s not already.
Step 6: Invite your bot to the server
Back on the Discord Developer Portal, click on the OAuth2 tab on the left-hand side. Scroll down to this section:
Check bot, then in the box that appears below, check Administrator. You should have something that looks like this:
Finally, copy that URL in the Scopes box and open it in your browser. It will take you to a page that looks like this:
Select the server you just made, make sure Administrator is checked, and click Authorize.
With that, your bot will join your server! However, it doesn’t do anything at the moment. You still need to do a few things.
Step 7: Create a spreadsheet
Next, you will need to create a spreadsheet for Alter Ego to use. For more information, see the article on spreadsheets.
Step 8: Enable the Google Sheets API
In order for Alter Ego to work properly, you will need to create a new Google APIs project. The easiest way to do that is to navigate to the Google Workspace project creation guide and follow the instructions. For step 5 under the Enable a Google Workspace API section, search for Google Sheets API. Assuming you’ve done this correctly, you should arrive at a page that looks like this:
Step 9: Create a service account
In order to allow Alter Ego to make changes to the spreadsheet, you’ll need to create a service account for it to use. To do that, navigate to the Credentials tab on the left-hand side of the page you were just taken to. Click the Create credentials button and select Service account. You should be brought to a page like this:
For the name, enter the bot’s name; in this case, it’s Test Bot. For the description, enter whatever you like. Next, grant it the “Owner” role. You can skip step 3.
Once your service account is made, you should see it under the Service Accounts list. Click on the edit button for the service account, and then click on the Keys tab, so that it brings you to a page like this:
Click the Add Key button and select Create new key. Make sure the key type is JSON, then click Create. This will download a file to your computer. Don’t touch that just yet - there’s one thing to do first. Return to the Service Accounts page.
Step 10: Share the spreadsheet
On the Service Accounts page, you should now see the service account you just created. Copy its email address, then head over to the spreadsheet you made earlier.
On the spreadsheet, press the Share button. Paste the service account’s email address into the dialog box and make sure to give it permission to edit the spreadsheet. You can also do the same with any other moderators you have, if you haven’t done so already. Once you’ve done that, you nearly have everything you need.
Step 11: Copy configuration files
In the Alter Ego folder, navigate to the Defaults folder, and you should see something like this:
Alter-Ego
└───Defaults
│   │   README: DO NOT CHANGE.txt
│   │   default_constants.json
│   │   default_demodata.json
│   │   default_playerdefaults.json
│   │   default_serverconfig.json
│   │   default_settings.json
│...
Copy all .json files into the Configs directory, then rename them by removing the “default_” before the name of the
file. For instance default_settings.json becomes settings.json
Your folders should now look something like this:
Alter-Ego
└───Defaults
│   │   README: DO NOT CHANGE.txt
│   │   default_constants.json
│   │   default_demodata.json
│   │   default_playerdefaults.json
│   │   default_serverconfig.json
│   │   default_settings.json
│
└───Configs
│   │   CONFIGS GO HERE
│   │   constants.json
│   │   demodata.json
│   │   playerdefaults.json
│   │   serverconfig.json
│   │   settings.json
│...
Step 12: Edit credentials file
Open the file you downloaded after creating the service account in any text editor. The file should look something like this:
{
    "type": "service_account",
    "project_id": "(CONFIDENTIAL)",
    "private_key_id": "(CONFIDENTIAL)",
    "private_key": "(CONFIDENTIAL)",
    "client_email": "(CONFIDENTIAL)",
    "client_id": "(CONFIDENTIAL)",
    "auth_uri": "https://accounts.google.com/o/oauth2/auth",
    "token_uri": "https://oauth2.googleapis.com/token",
    "auth_provider_x509_cert_url": "https://www.googleapis.com/oauth2/v1/certs",
    "client_x509_cert_url": "(CONFIDENTIAL)"
}
In case it wasn’t clear, almost all of the data in this file is confidential. Don’t share it with a single person, and make absolutely sure not to put it online somehow.
Open Configs/credentials.json. This file is where you’re going to put the credentials for both the Discord bot and the
service account. Copy and paste this into the file:
{
    "discord": {
        "token": ""
    },
    "google": {

    }
}
Now navigate to the Discord Developer Portal once again and find the application you created earlier. Open the Bot tab. Under Token, click Copy. Paste it inside the quotation marks after “token” in your credentials file. This token must not be shared with anyone, as it grants access to your bot’s account.
The next thing to do with your credentials file is add the Google service account credentials. Copy everything within the braces from the service account credentials file and paste it onto the blank line after “google”. Make sure everything’s indented properly, and if you did everything right, you’ll have a file that looks like this:
{
    "discord": {
        "token": "(CONFIDENTIAL)"
    },
    "google": {
        "type": "service_account",
        "project_id": "(CONFIDENTIAL)",
        "private_key_id": "(CONFIDENTIAL)",
        "private_key": "(CONFIDENTIAL)",
        "client_email": "(CONFIDENTIAL)",
        "client_id": "(CONFIDENTIAL)",
        "auth_uri": "https://accounts.google.com/o/oauth2/auth",
        "token_uri": "https://oauth2.googleapis.com/token",
        "auth_provider_x509_cert_url": "https://www.googleapis.com/oauth2/v1/certs",
        "client_x509_cert_url": "(CONFIDENTIAL)"
    }
}
Step 13: Fill out settings
The last thing you must do before you can run Alter Ego is configure the settings file. For more information, see the article on settings.
Step 14: Run Alter Ego
Finally, you can run Alter Ego. In the Node.js terminal, run node bot.js. If you did everything right, this is what
you’ll see:
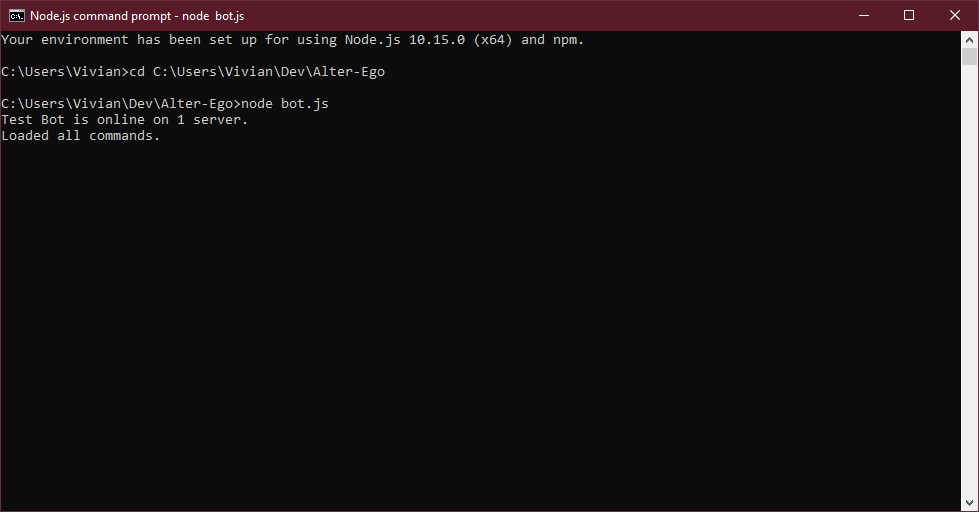
You can now use Alter Ego to run a game of the Neo World Program. Good luck!
Manual Channel and Role Creation
This article details the process of manually setting up a Discord server for the Neo World Program. If you use the server template provided in the official tutorial, you can skip this process entirely.
Create roles
Note: Ensure that the role that was created when you invited Alter Ego to the server (which was automatically assigned to it) is the second highest role in the list.
Navigate to the Server Settings, then open the Roles tab. You’ll need to create several roles and set their permissions.
@everyone
This should be one of two roles in your server at the moment. Disable all permissions for it. There are some optional permissions you can enable for it, however. Doing this will enable them for every role:
- Embed Links (optional)
- Attach Files (optional)
- Add Reactions (optional)
- Use External Emojis (optional)
- If this permission is not enabled, then any external emojis that are sent in a Room channel, whether by a Player or a moderator, will not be sent in spectate channels. Instead, they will be replaced with the name of the emoji.
- Use External Stickers (optional)
- Stickers will not show up in spectate channels under any circumstances.
[Bot name]
This will have been automatically created when you added your bot to the server and will be the name of your bot. You can change the role’s name if you wish, but be sure to give enable the following setting:
- Display role members separately from online members
You can leave everything else as it is.
Hidden
This is a role not required by Alter Ego, but helpful to have. By giving it to certain server members, you can keep them in the server while hiding them from players. This is useful if you want to have secret NPCs in your game. Disable all permissions for it.
Dead
This is a new role you’ll have to create. You can call it whatever you want, but remember that it’s supposed to be the role for dead players. These are the settings you’ll need to enable:
- Display role members separately from online members
- Allow anyone to @mention this role
- Read Message History
Disable everything else.
Spectator
This is the role for spectators. Once again, you can call this (and all of the new roles) whatever you like, but the names given here are what’s recommended for clarity’s sake. Enable these settings:
- Display role members separately from online members
- Allow anyone to @mention this role
- Read Message History
Disable everything else.
Tester
This is the role for testers. This role is only necessary if you use debug mode. Enable these settings:
- Allow anyone to @mention this role
- Send Messages
Disable everything else.
Eligible
This is the role for users who allowed to play the game. If a user doesn’t have this role, they won’t be able to use the play command when you start the game. Enable these settings:
- Allow anyone to @mention this role
- Send Messages
Disable everything else.
Player
This is the role for players in an ongoing game. Users with the Eligible role will be given this role as soon as they use the play command. Enable these settings:
- Display role members separately from online members
- Allow anyone to @mention this role
- Send Messages
Disable everything else.
Headmaster
This role allows a player to move to any room they wish, adjacent or not. This should generally not be given out freely. Enable these settings:
- Display role members separately from online members
- Allow anyone to @mention this role
- Send Messages
- Read Message History
Disable everything else.
Moderator
This is the last role you need to make. This should be given to your moderator(s), including yourself. Enable these settings:
- Display role members separately from online members
- Allow anyone to @mention this role
From here, you have two options: you can either give them the Administrator permission, which automatically gives them all permissions, or grant the following permissions:
- View Channels
- Manage Channels
- Manage Roles
- View Audit Log
- Change Nickname
- Manage Nicknames
- Send Messages
- Embed Links
- Attach Files
- Mention @everyone, @here, and All Roles
- Manage Messages
- Read Message History
Whether you give them Administrator privileges or not depends on whether or not you want any other moderators to be able to do things like change the server name or add emojis. All other permissions are optional.
Organize roles
A good thing to do is to organize your roles. You can give them special colors if you want, too. An order like this is ideal:
Ensure that the role that was created when you invited Alter Ego to the server (which was automatically assigned to it) is the second highest role in the list. If it’s not, it may have issues with permissions.
Create categories and channels
There are a number of channels you’ll have to create before you can get Alter Ego to work. You can name them all anything you want, but the ones listed here are recommended for clarity’s sake.
Category: Monopad
This category is where you should put all of the important channels that will be viewable to everyone. You can put all kinds of channels here such as rules for the killing game, a list of players and their talents, maps, etc. Before anything else, though, you’ll have to set the permission overrides for this category. Be sure to assign the following roles the listed permission overrides for this category:
- @everyone
- View Channels: Enabled
- Send Messages: Disabled
- Read Message History: Enabled
- Hidden
- View Channels: Disabled
- Headmaster
- Send Messages: Enabled
- Moderator
- Send Messages: Enabled (only needed if Moderator doesn’t have Administrator permission)
Channel: announcements
This channel will be used by the bot in very limited circumstances. If a message is sent in this channel by a player with the Headmaster role, it will be sent to the spectate channels of all players. You can use this channel to post general announcements, announcements from the killing game host (e.g. morning and night announcements, body discovery announcements, etc.), and anything else you want to inform everyone about. You don’t need to set any permission overrides for this channel.
Category: Free Time Events
This category is for people to talk outside of the game. You should set the following permission overrides for this category:
- @everyone
- View Channels: Enabled
- Send Messages: Enabled
- Embed Links: Enabled
- Attach Files: Enabled
- Add Reactions: Enabled
- Use External Emojis: Enabled
- Read Message History: Enabled
- Hidden
- View Channels: Disabled
Channel: general
This channel is where everyone can talk about anything. The only restriction in this channel should be that no one can meta-game, or reveal information about the game that other players wouldn’t have access to (for example, mentioning that someone died even though their body hasn’t yet been discovered). You don’t need to set any permission overrides for this channel.
Channel: spectator-chat
This channel is where dead players and spectators can discuss the game. Meta-gaming here is completely fine, as living players won’t be able to see it. You should set the following permission overrides for this channel:
- @everyone
- View Channel: Neutral
- Dead
- View Channel: Enabled
- Spectator
- View Channel: Enabled
Channel: testing
This channel is only necessary if you use debug mode. If you do, the startgame and endgame announcements will be made in this channel instead of in general. You should set the following permission overrides for this channel:
- @everyone
- View Channel: Disabled
- Tester
- View Channel: Enabled
- Moderator
- View Channel: Enabled
Category: Control Panel
This category is for the moderator(s) only. You should set the following permission override for this category:
- Moderator
- View Channels: Enabled
Channel: bot-log
This channel is where Alter Ego will post the time and location in which players perform actions. For example, every time a player moves to another room, it will be posted here. Every time a player inspects an object or item, it will be posted here. Due to the sheer number of messages that will be posted in this channel, it is strongly recommended you mute it.
Channel: bot-commands
This channel is the only place where Alter Ego will accept commands from a moderator.
Category: Rooms
This doesn’t have to be a single category, but can in fact be several. A room category is where you’ll create all of the channels corresponding with the game’s Rooms. The reason you can create multiple categories for this is that Discord only allows a single category to have 50 channels. Since this is too restrictive for the game, Alter Ego allows you to divide the room channels amongst several categories, in whatever way you like. The overall role permissions you set up earlier are configured specifically for the game, so you don’t need to set any permission overrides for room categories or the channels that belong to them.
Category: Whispers
This category is where Alter Ego will create Whisper channels. There is only one permission override you should make, but it is optional:
- Player
- Read Message History: Enabled
Category: Spectators
This category is where Alter Ego will create and post to spectate channels for each player. These will allow spectators to view the game for any player they choose, seeing everything they see in real time. You should set the following permission override for this category:
- @everyone
- Send Messages: Disabled
- Read Message History: Enabled
- Dead
- View Channels: Enabled
- Spectator
- View Channels: Enabled
Other
Any other categories and channels are optional. One good idea is to have a music channel and use a music bot so you can play music in a voice channel that fits the mood of whatever is happening in-game, however this is not necessary.